OpenCASCADE View Manipulator
eryar@163.com
Abstract. When you finish modeling objects in the scene, you must want to use some operations to view the scene objects, such as Pan, Zoom and Rotate the scene. Pan and Zoom is easy to understand, rotate the 3D scene according to 2D point in the viewport is a little complicated. There are many methods to rotate the 3D scene, but the Arcball Controller is intuitive for the user and any viewport can be described. You can rotate your model at will just by using the mouse.
Key Words. OpenCASCADE Camera, View, ArcBall, Rotate
1. Introduction
當用OpenGL建立了一個模型場景后,就需要有便捷的操作來觀察場景中的物體��。場景的觀察即注重于一個從三維世界轉換到二維屏幕的過程�����。假設場景的觀察者使用一臺相機來記錄世界的變化���,那么相機的移動���、角度偏轉���、焦距變化都會改變底片上顯現的內容��,也就是觀察這個世界的方式,這涉及到三維人機的交互���。
三維用戶交互是一種與三維環境本身特性相匹配的交互動作,可使用戶在虛擬場景中獲得身臨其境的直觀感受�����。三維世界的交互技術相當于一種“控制-顯示”的映射��,用戶設備例如鼠標、鍵盤等向系統輸入控制信息��,然后系統向用戶輸出執行結果��。所以首先要對硬件設備的輸入信息進行處理�����,然后就是根據這些信息來改變場景數據。
三維交互涉及的任務很多�����,包括三維場景對象的選擇和編輯�����、三維世界中的導航漫游��,乃至時下流行的三維交互建模等。本文主要介紹如何通過改變像機參數來對場景進行瀏覽�����,如對場景的平移��、縮放和旋轉操作��。
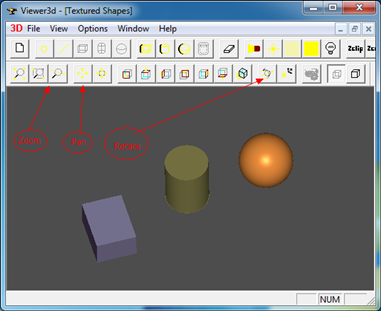
Figure 1.1 OpenCASCADE Viewer
2.Translate View
場景的移動就是改變觀察相機的位置,相對容易理解��,在OpenCASCADE的類V3d_View中也是這樣實現的��,代碼如下所示:
// ==================================================================
// function : Translate
// purpose : Internal
// ==================================================================
void V3d_View::Translate (const Handle(Graphic3d_Camera)& theCamera,
const Standard_Real theDXv,
const Standard_Real theDYv) const
{
const gp_Pnt& aCenter = theCamera->Center();
const gp_Dir& aDir = theCamera->Direction();
const gp_Dir& anUp = theCamera->Up();
gp_Ax3 aCameraCS (aCenter, aDir.Reversed(), aDir ^ anUp);
gp_Vec aCameraPanXv = gp_Vec (aCameraCS.XDirection()) * theDXv;
gp_Vec aCameraPanYv = gp_Vec (aCameraCS.YDirection()) * theDYv;
gp_Vec aCameraPan = aCameraPanXv + aCameraPanYv;
gp_Trsf aPanTrsf;
aPanTrsf.SetTranslation (aCameraPan);
theCamera->Transform (aPanTrsf);
}
由上述代碼可知���,根據兩次鼠標位置計算出需要移動的偏移量來對相機進行移動變換。根據鼠標第一次按下及移動過程中的坐標點來計算偏移量。計算偏移量時��,需要注意坐標系的統一���,即要么都在視口坐標系�����,要么都在世界坐標系中�����。如下代碼是將鼠標點變換到世界坐標系中進行移動:
void ArcballController::Translate(const gp_Pnt2d &thePoint)
{
gp_Pnt aCurrentPoint = Convert2World(thePoint);
gp_Trsf aTrsf;
aTrsf.SetTranslation(aCurrentPoint, mPreviousPoint);
mCamera->Transform(aTrsf);
}
對相機參數進行修改后,需要更新場景數據。移動場景只涉及到MODELVIEW變換��,所以需要刷新模型視圖MODELVIEW變換矩陣數據并重繪場景���,相關代碼如下所示:
// model/view transformation for pan and rotate.
glMatrixMode(GL_MODELVIEW);
glLoadIdentity();
glLoadMatrixf(theArcballController.GetOrientationMatrix());
其中theArcballController的這個函數是調用了Graphic3d_Camera的函數來設置模型視圖變換矩陣。經過測試,移動效果還可以,如下圖所示為將一個Teapot從屏幕左上角移動到了右下角:
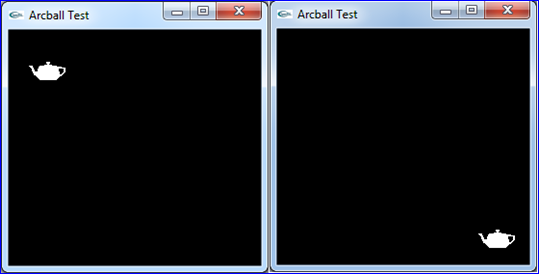
Figure 2.1 Translate the Scene
3.Zoom View
對于透視投影而言,靠模型越近�����,看到模型就越大��,因為透視投影的特點就是近大遠小��。而對平行投影而言,這種規律就不適用了�����。其實二者都可以統一到通過調整視口大小來對場景模型進行縮放��。同樣的模型�����,當投影到較大的視口中時��,模型的投影得到的二維圖形也會較大��;當投影到較小的視口中時,模型的投影得到的二維圖形也會較小��。這樣就達到對場景進行縮放的目的了���。其中OpenCASCADE中的實現是通過設置Graphic3d_Camera的Scale來實現的��,代碼如下圖所示:
//===================================================================
//function : SetZoom
//purpose :
//===================================================================
void V3d_View::SetZoom(const Standard_Real Coef,const Standard_Boolean Start)
{
V3d_BadValue_Raise_if( Coef <= 0.,"V3d_View::SetZoom, bad coefficient");
if (Start)
{
myCamStartOpEye = myCamera->Eye();
myCamStartOpCenter = myCamera->Center();
}
Standard_Real aViewWidth = myCamera->ViewDimensions().X();
Standard_Real aViewHeight = myCamera->ViewDimensions().Y();
// ensure that zoom will not be too small or too big
Standard_Real coef = Coef;
if (aViewWidth < coef * Precision::Confusion())
{
coef = aViewWidth / Precision::Confusion();
}
else if (aViewWidth > coef * 1e12)
{
coef = aViewWidth / 1e12;
}
if (aViewHeight < coef * Precision::Confusion())
{
coef = aViewHeight / Precision::Confusion();
}
else if (aViewHeight > coef * 1e12)
{
coef = aViewHeight / 1e12;
}
myCamera->SetEye (myCamStartOpEye);
myCamera->SetCenter (myCamStartOpCenter);
myCamera->SetScale (myCamera->Scale() / Coef);
View()->AutoZFit();
ImmediateUpdate();
}
根據鼠標點計算出縮改系數�����,通過myCamera->SetScale()來達到對場景進行縮放的目的。場景縮放操作涉及到需要更新OpenGL的投影矩陣數據�����,代碼如下所示:
// projection transformation for zoom.
glMatrixMode(GL_PROJECTION);
glLoadIdentity();
glLoadMatrixf(theArcballController.GetProjectionMatrix());
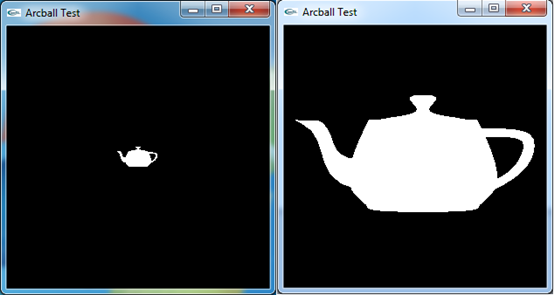
Figure 3.1 Zoom the scene
4.Rotate View
通過鼠標在二維屏幕上來旋轉三維的場景有幾種方法��,如下圖所示:
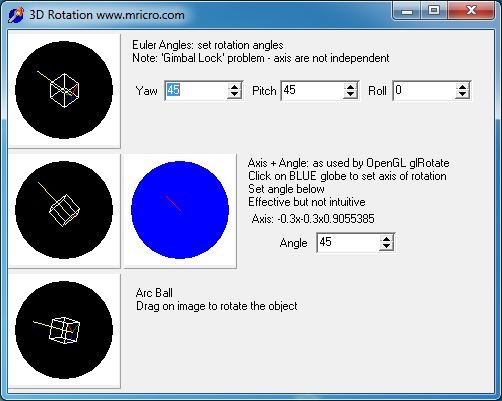
Figure 4.1 3D Rotation(http://www.cabiatl.com/mricro/obsolete/graphics/3d.html)
方法一是通過Euler Angles來實現��,好處是用戶比較容易理解Euler角,如yaw, pitch和roll,如下圖所示:
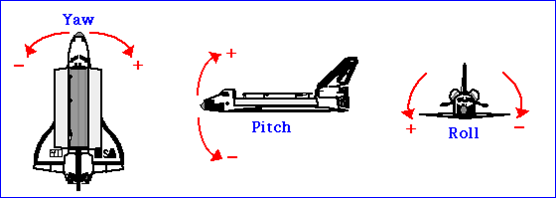
Figure 4.2 Euler Angles: Yaw, Pitch and Roll
缺點就是因為死鎖問題(gimbal lock)導致不能指定一些視圖��,當出現死鎖問題時���,操作就顯得不直觀了�����。
比較直觀的方法就是ArcBall方式了,使用這種方法可以以任意方向來查看場景中的模型���。有個網頁版的實現,可以去體驗一下:
http://www.math.tamu.edu/~romwell/arcball_js/index.html
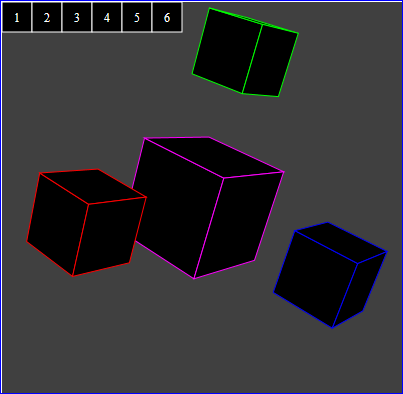
Figure 4.3 Arcball in Javascript
ArcBall的原理是將二維屏幕上鼠標點轉換到球面上��,拖動鼠標就是在轉動這個球��。根據映射到球面的兩個點��,通過矢量的點乘及叉乘得到旋轉角度及旋轉軸。通過這種方式可以將二維的鼠標位置映射到三維的場景來實現對場景觀察的直觀操作��。
OpenCASCADE中場景的旋轉方式是通過先遍歷場景中的模型計算出重心點���,再繞三個坐標軸來旋轉�����,代碼如下所示:
//=============================================================================
//function : Rotate
//purpose :
//=============================================================================
void V3d_View::Rotate(const Standard_Real ax, const Standard_Real ay, const Standard_Real az,
const Standard_Real X, const Standard_Real Y, const Standard_Real Z, const Standard_Boolean Start)
{
Standard_Real Ax = ax ;
Standard_Real Ay = ay ;
Standard_Real Az = az ;
if( Ax > 0. ) while ( Ax > DEUXPI ) Ax -= DEUXPI ;
else if( Ax < 0. ) while ( Ax < -DEUXPI ) Ax += DEUXPI ;
if( Ay > 0. ) while ( Ay > DEUXPI ) Ay -= DEUXPI ;
else if( Ay < 0. ) while ( Ay < -DEUXPI ) Ay += DEUXPI ;
if( Az > 0. ) while ( Az > DEUXPI ) Az -= DEUXPI ;
else if( Az < 0. ) while ( Az < -DEUXPI ) Az += DEUXPI ;
if (Start)
{
myGravityReferencePoint.SetCoord (X, Y, Z);
myCamStartOpUp = myCamera->Up();
myCamStartOpEye = myCamera->Eye();
myCamStartOpCenter = myCamera->Center();
}
const Graphic3d_Vertex& aVref = myGravityReferencePoint;
myCamera->SetUp (myCamStartOpUp);
myCamera->SetEye (myCamStartOpEye);
myCamera->SetCenter (myCamStartOpCenter);
// rotate camera around 3 initial axes
gp_Pnt aRCenter (aVref.X(), aVref.Y(), aVref.Z());
gp_Dir aZAxis (myCamera->Direction().Reversed());
gp_Dir aYAxis (myCamera->Up());
gp_Dir aXAxis (aYAxis.Crossed (aZAxis));
gp_Trsf aRot[3], aTrsf;
aRot[0].SetRotation (gp_Ax1 (aRCenter, aYAxis), -Ax);
aRot[1].SetRotation (gp_Ax1 (aRCenter, aXAxis), Ay);
aRot[2].SetRotation (gp_Ax1 (aRCenter, aZAxis), Az);
aTrsf.Multiply (aRot[0]);
aTrsf.Multiply (aRot[1]);
aTrsf.Multiply (aRot[2]);
myCamera->Transform (aTrsf);
View()->AutoZFit();
ImmediateUpdate();
}
5.Conclusion
當實現三維場景的建模后�����,最激動人心的應該是對場景及場景中模型的控制。通過交互操作使用戶方便地觀察場景的模型��,或直觀地編輯場景中的模型���。所以交互也是三維軟件中的重要功能,且是給用戶最直接的感覺的操作��。
因為交互操作涉及到鼠標鍵盤消息的處理���,所以首先要設計好對這些消息的處理方式�����,在OpenSceneGraph中使用了適配器的方式來實現跨平臺的消息處理,使用戶通過繼承的方式來實現對消息的處理�����。這種方式使程序的可擴展性及代碼的可讀性更好�����,OpenCASCADE中的消息的處理還是比較直接的��,沒有什么封裝。
本文主要介紹了如何實現對場景的控制��,如移動��、縮放及旋轉操作�����,這些功能的實現需要對OpenGL的渲染管線有一定的了解。在理解了對視圖/場景的控制后���,為進一步理解對場景中的模型的控制打下基礎,如選擇Picking��,拖拽Drag等操作��。最后給出一個基于OpenCASCADE的類Graphic3d_Camera及GLUT實現的場景變換操作��,功能不是很完善,僅供參考�����。若有好的意見��,歡迎反饋��。
6. References
1. Brad Smith. ArcBall. http://rainwarrior.ca/dragon/arcball.html
2. WikiBooks. Modern OpenGL Tutorial Arcball.
http://en.wikibooks.org/wiki/OpenGL_Programming/Modern_OpenGL_Tutorial_Arcball
3. sgCore demo code. http://www.shnenglu.com/eryar/archive/2013/06/30/201411.html
4. Virtual Trackballs Revisited. http://image.diku.dk/research/trackballs/index.html
5. http://oviliazhang.diandian.com/post/2012-05-19/40027878859
6. 王銳,錢學雷. OpenSceneGraph三維渲染引擎設計與實踐. 清華大學出版社. 2009