由于接下去要用uniscribe(這是一個可以告訴我們在渲染一個超長unicode字符串的時候,什么地方可以換行,什么地方要換順序,什么字符要用一種神奇的方法來渲染之類的庫)做可以插入圖片和其它亂七八糟東西的rich text box,為了更方便做實驗,而且也考慮到很多軟件也需要直接繪圖的功能,所以我寫了這么兩個Demo:
1、Rendering.RawAPI.GDI(http://www.gaclib.net/Demos/Rendering.RawAPI.GDI/Demo.html)
2、Rendering.RawAPI.Direct2D(http://www.gaclib.net/Demos/Rendering.RawAPI.Direct2D/Demo.html)
由于這兩個Demo很像,而且Direct2D的比較復雜,所以我在這里介紹一下這個Direct2D的demo。
在Demo里面可以看到,我們可以使用GuiGDIElement或者GuiDirect2DElement來進行手工的繪圖操作。這兩個Element的使用有限制。當GacUI使用GDI繪圖(SetupWindowsGDIRenderer)的時候才可以使用GuiGDIElement,對于Direct2D也是一樣的。在使用它們進行繪圖的時候,坐標用的是窗口的坐標。但是GacUI會在繪制的時候先加入一個clip,這樣我們在繪制的時候就算繪制出了邊界,也不會有任何不好的影響。而且這個clip的矩形范圍會在渲染事件觸發(fā)的時候給出。在這里我們先來看一下Direct2D的demo。
首先,整個程序的框架是這樣子的:
#include "..\..\Public\Source\GacUI.h"
#include <math.h>
#include <Windows.h>
int CALLBACK WinMain(HINSTANCE hInstance, HINSTANCE hPrevInstance, LPSTR lpCmdLine, int CmdShow)
{
// SetupWindowsDirect2DRenderer() is required for GuiDirect2DElement
return SetupWindowsDirect2DRenderer();
}
class Direct2DWindow : public GuiWindow
{
protected:
// arguments.rt is ID2D1RenderTarget.
void element_Rendering(GuiGraphicsComposition* sender, GuiDirect2DElementEventArgs& arguments)
{
}
// The render target is going to be destroyed, any binded resources should be released.
void element_BeforeRenderTargetChanged(GuiGraphicsComposition* sender, GuiDirect2DElementEventArgs& arguments)
{
}
// The new render target is prepared, any binded resources are allowed to recreate now.
void element_AfterRenderTargetChanged(GuiGraphicsComposition* sender, GuiDirect2DElementEventArgs& arguments)
{
}
public:
Direct2DWindow()
:GuiWindow(GetCurrentTheme()->CreateWindowStyle())
{
SetText(L"Rendering.RawAPI.Direct2D");
SetClientSize(Size(640, 480));
GetBoundsComposition()->SetPreferredMinSize(Size(640, 480));
MoveToScreenCenter();
{
GuiDirect2DElement* element=GuiDirect2DElement::Create();
element->Rendering.AttachMethod(this, &Direct2DWindow::element_Rendering);
element->BeforeRenderTargetChanged.AttachMethod(this, &Direct2DWindow::element_BeforeRenderTargetChanged);
element->AfterRenderTargetChanged.AttachMethod(this, &Direct2DWindow::element_AfterRenderTargetChanged);
GuiBoundsComposition* composition=new GuiBoundsComposition;
composition->SetAlignmentToParent(Margin(0, 0, 0, 0));
composition->SetOwnedElement(element);
GetContainerComposition()->AddChild(composition);
}
}
};
void GuiMain()
{
Direct2DWindow window;
GetApplication()->Run(&window);
}
在構(gòu)造函數(shù)里面,我們創(chuàng)建了一個GuiDirect2DElement,然后把它放進一個會自動充滿整個窗口的composition里面。然后我們需要監(jiān)聽三個事件(GDI只有一個,就是Rendering):
1、Rendering。這個事件在窗口被繪制的時候調(diào)用。GacUI才用了一個低功耗的方法讓程序不斷的繪制自己,所以我們并不需要擔心“如何刷新窗口”的這個問題。
2、BeforeRenderTargetChanged。在這個時候我們要清理掉我們創(chuàng)建出來的資源,譬如說畫刷等等。
3、AfterRenderTargetChanged。在這個時候我們要建立一些繪圖資源,譬如說畫刷等等。
為什么下面兩個函數(shù)那么蛋疼呢?因為Direct2D的類似畫刷這樣的東西,是必須跟一個ID2D1RenderTarget綁定在一起的,不同的render target之間的畫刷不能共享。而且那個可憐的render target還有可能會失效,這個時候GacUI就要重新創(chuàng)建他們。所以無論如何,都必須監(jiān)聽這三個對象,除非我們只用GuiDirect2DElement來渲染文字(因為文字相關(guān)的資源是IDWriteFactory控制的,跟render target無關(guān))。
在這個Demo里面,我們要畫的是一個會動的鐘。在這個鐘里面我們要繪制4種線形:邊框、時針、分針、秒針。因此我們需要4個不同的ID2D1SolidColorBrush。由于操作COM對象的時候總要去記得操作那個引用計數(shù),特別的麻煩,而且還容易忘掉。所以我特地為大家提供了一個叫做ComPtr的東西。所以我們就可以這么聲明、創(chuàng)建和釋放他們:
ComPtr<ID2D1SolidColorBrush> borderBrush;
ComPtr<ID2D1SolidColorBrush> secondBrush;
ComPtr<ID2D1SolidColorBrush> minuteBrush;
ComPtr<ID2D1SolidColorBrush> hourBrush;
// The render target is going to be destroyed, any binded resources should be released.
void element_BeforeRenderTargetChanged(GuiGraphicsComposition* sender, GuiDirect2DElementEventArgs& arguments)
{
borderBrush=0;
secondBrush=0;
minuteBrush=0;
hourBrush=0;
}
// The new render target is prepared, any binded resources are allowed to recreate now.
void element_AfterRenderTargetChanged(GuiGraphicsComposition* sender, GuiDirect2DElementEventArgs& arguments)
{
ID2D1SolidColorBrush* brush;
{
brush=0;
arguments.rt->CreateSolidColorBrush(D2D1::ColorF(0.0f, 0.0f, 0.0f), D2D1::BrushProperties(), &brush);
borderBrush=brush;
}
{
brush=0;
arguments.rt->CreateSolidColorBrush(D2D1::ColorF(0.0f, 0.0f, 1.0f), D2D1::BrushProperties(), &brush);
secondBrush=brush;
}
{
brush=0;
arguments.rt->CreateSolidColorBrush(D2D1::ColorF(0.0f, 1.0f, 0.0f), D2D1::BrushProperties(), &brush);
minuteBrush=brush;
}
{
brush=0;
arguments.rt->CreateSolidColorBrush(D2D1::ColorF(1.0f, 0.0f, 0.0f), D2D1::BrushProperties(), &brush);
hourBrush=brush;
}
}
想必大家都應(yīng)該看清楚了。Before和After事件里面,GacUI都會提供用來繪圖的ID2D1RenderTarget,這個時候必須正確的創(chuàng)建和釋放資源。只要這些資源都建立了起來,那么剩下的就只有把一個時鐘畫出來了。畫一個時鐘還是很容易的,只需要那么幾行代碼就行了:
static const int Radius=200;
static const int LongScale=10;
static const int ShortScale=5;
static const int SecondLength=180;
static const int MinuteLength=150;
static const int HourLength=120;
float GetAngle(float second)
{
return (second-15.0f)*3.1416f/30.0f;
}
void DrawLine(ID2D1RenderTarget* rt, ComPtr<ID2D1SolidColorBrush> brush, float angle, int width, int startLength, int endLength, int x, int y)
{
float s=sin(angle);
float c=cos(angle);
float x1=(c*startLength)+(float)(x+Radius);
float y1=(s*startLength)+(float)(y+Radius);
float x2=(c*endLength)+(float)(x+Radius);
float y2=(s*endLength)+(float)(y+Radius);
rt->DrawLine(D2D1::Point2F(x1, y1), D2D1::Point2F(x2, y2), brush.Obj(), (float)width);
}
// arguments.rt is ID2D1RenderTarget.
void element_Rendering(GuiGraphicsComposition* sender, GuiDirect2DElementEventArgs& arguments)
{
int w=arguments.bounds.Width();
int h=arguments.bounds.Height();
int x=arguments.bounds.Left()+(w-Radius*2)/2;
int y=arguments.bounds.Left()+(h-Radius*2)/2;
arguments.rt->DrawEllipse(D2D1::Ellipse(D2D1::Point2F((float)(x+Radius), (float)(y+Radius)), (float)Radius, (float)Radius), borderBrush.Obj());
for(int i=0;i<60;i++)
{
int scale=i%5==0?LongScale:ShortScale;
float angle=GetAngle((float)i);
DrawLine(arguments.rt, borderBrush, angle, 1, Radius-scale, Radius, x, y);
}
DateTime dt=DateTime::LocalTime();
{
float angle=GetAngle(dt.hour*5+dt.minute/12.0f+dt.second/720.0f);
DrawLine(arguments.rt, hourBrush, angle, 5, 0, HourLength, x, y);
}
{
float angle=GetAngle(dt.minute+dt.second/60.0f);
DrawLine(arguments.rt, minuteBrush, angle, 3, 0, MinuteLength, x, y);
}
{
float angle=GetAngle((float)dt.second);
DrawLine(arguments.rt, secondBrush, angle, 1, 0, SecondLength, x, y);
}
}
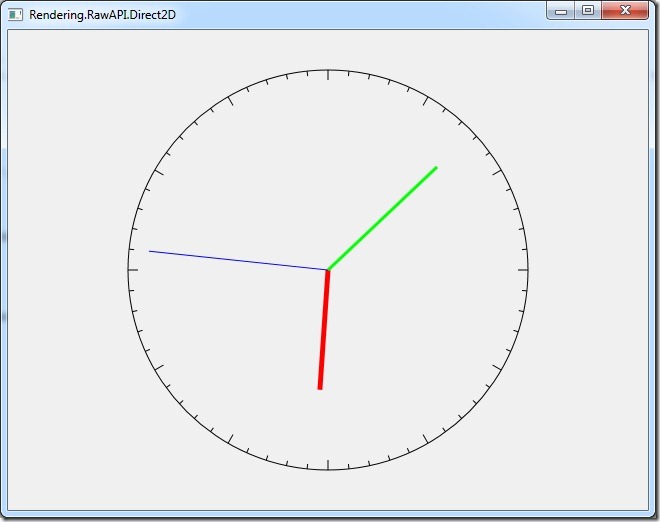
然后我們就獲得了下圖:(LiveWrite真是太好了,cppblog的傻逼編輯器每次插入圖片都會插入到一個詭異的位置中去)

這樣我們就完成了一個時鐘的制作了,而且也學會了如何在GacUI里面直接使用GDI和Direct2D繪圖了。
posted on 2012-11-05 07:14
陳梓瀚(vczh) 閱讀(4590)
評論(2) 編輯 收藏 引用 所屬分類:
2D 、
GacUI