大家好,歡迎來到新的一課,在這一課中我們將擴展glCamera類,來實現鏡頭光暈的效果。在日常生活中,當我們對著光源看時,會發現強烈的反光。
為了完成這個效果,我們需要一些數學知識。首先,我們需要一些函數,用來檢測某個點或球是否在當前的視景體內。接著我們需要一些紋理作為我們的光暈效果,我們可以把它貼在顯示面上。
在我的上一個攝像機類里把下面函數寫錯了,現在修正如下:
void glCamera::SetPrespective(){ GLfloat Matrix[16]; glVector v;
// 根據當前的偏轉角旋轉視線
glRotatef(m_HeadingDegrees, 0.0f, 1.0f, 0.0f);
glRotatef(m_PitchDegrees, 1.0f, 0.0f, 0.0f);
// 返回模型變換矩陣
glGetFloatv(GL_MODELVIEW_MATRIX, Matrix);
// 獲得視線的方向
m_DirectionVector.i = Matrix[8];
m_DirectionVector.j = Matrix[9];
m_DirectionVector.k = -Matrix[10];
// 重置矩陣
glLoadIdentity();
// 旋轉場景
glRotatef(m_PitchDegrees, 1.0f, 0.0f, 0.0f);
glRotatef(m_HeadingDegrees, 0.0f, 1.0f, 0.0f);
// 設置當前攝像機的位置
v = m_DirectionVector;
v *= m_ForwardVelocity;
m_Position.x += v.i;
m_Position.y += v.j;
m_Position.z += v.k;
// 變換到新的位置
glTranslatef(-m_Position.x, -m_Position.y, -m_Position.z);
}
好了,我們現在開始吧。我將使用4個對立的紋理來制造我們的鏡頭光暈,第一和二個光暈圖像被放置在光源處,第三和第四個圖像將根據視點的位置和方向動態的生成。紋理的圖像如下所示:
Big Glow
Streaks
Glow
Halo
現在你在頭腦里應該有了一個大慨地圖像了吧。我們來說說何時我們應該繪制光暈,一般來說平時我們是看不見這些光暈的,只有當我們對準光源的時候才能看見這些。所以我們首先要獲得視景體的數據,下面的函數可以幫我們完成這個功能。
// 獲得當前視景體的6個平面方程的參數void glCamera::UpdateFrustum(){ GLfloat clip[16]; GLfloat proj[16]; GLfloat modl[16]; GLfloat t;
//返回投影矩陣
glGetFloatv( GL_PROJECTION_MATRIX, proj );
//返回模型變換矩陣
glGetFloatv( GL_MODELVIEW_MATRIX, modl );
//計算剪切矩陣,即上面兩個矩陣的乘積
clip[ 0] = modl[ 0] * proj[ 0] + modl[ 1] * proj[ 4] + modl[ 2] * proj[ 8] + modl[ 3] * proj[12];
clip[ 1] = modl[ 0] * proj[ 1] + modl[ 1] * proj[ 5] + modl[ 2] * proj[ 9] + modl[ 3] * proj[13];
clip[ 2] = modl[ 0] * proj[ 2] + modl[ 1] * proj[ 6] + modl[ 2] * proj[10] + modl[ 3] * proj[14];
clip[ 3] = modl[ 0] * proj[ 3] + modl[ 1] * proj[ 7] + modl[ 2] * proj[11] + modl[ 3] * proj[15];
clip[ 4] = modl[ 4] * proj[ 0] + modl[ 5] * proj[ 4] + modl[ 6] * proj[ 8] + modl[ 7] * proj[12];
clip[ 5] = modl[ 4] * proj[ 1] + modl[ 5] * proj[ 5] + modl[ 6] * proj[ 9] + modl[ 7] * proj[13];
clip[ 6] = modl[ 4] * proj[ 2] + modl[ 5] * proj[ 6] + modl[ 6] * proj[10] + modl[ 7] * proj[14];
clip[ 7] = modl[ 4] * proj[ 3] + modl[ 5] * proj[ 7] + modl[ 6] * proj[11] + modl[ 7] * proj[15];
clip[ 8] = modl[ 8] * proj[ 0] + modl[ 9] * proj[ 4] + modl[10] * proj[ 8] + modl[11] * proj[12];
clip[ 9] = modl[ 8] * proj[ 1] + modl[ 9] * proj[ 5] + modl[10] * proj[ 9] + modl[11] * proj[13];
clip[10] = modl[ 8] * proj[ 2] + modl[ 9] * proj[ 6] + modl[10] * proj[10] + modl[11] * proj[14];
clip[11] = modl[ 8] * proj[ 3] + modl[ 9] * proj[ 7] + modl[10] * proj[11] + modl[11] * proj[15];
clip[12] = modl[12] * proj[ 0] + modl[13] * proj[ 4] + modl[14] * proj[ 8] + modl[15] * proj[12];
clip[13] = modl[12] * proj[ 1] + modl[13] * proj[ 5] + modl[14] * proj[ 9] + modl[15] * proj[13];
clip[14] = modl[12] * proj[ 2] + modl[13] * proj[ 6] + modl[14] * proj[10] + modl[15] * proj[14];
clip[15] = modl[12] * proj[ 3] + modl[13] * proj[ 7] + modl[14] * proj[11] + modl[15] * proj[15];
//提取右面的平面方程系數
m_Frustum[0][0] = clip[ 3] - clip[ 0];
m_Frustum[0][1] = clip[ 7] - clip[ 4];
m_Frustum[0][2] = clip[11] - clip[ 8];
m_Frustum[0][3] = clip[15] - clip[12];
t = GLfloat(sqrt( m_Frustum[0][0] * m_Frustum[0][0] + m_Frustum[0][1] * m_Frustum[0][1] + m_Frustum[0][2] * m_Frustum[0][2] ));
m_Frustum[0][0] /= t;
m_Frustum[0][1] /= t;
m_Frustum[0][2] /= t;
m_Frustum[0][3] /= t;
//提取左面的平面方程系數
m_Frustum[1][0] = clip[ 3] + clip[ 0];
m_Frustum[1][1] = clip[ 7] + clip[ 4];
m_Frustum[1][2] = clip[11] + clip[ 8];
m_Frustum[1][3] = clip[15] + clip[12];
t = GLfloat(sqrt( m_Frustum[1][0] * m_Frustum[1][0] + m_Frustum[1][1] * m_Frustum[1][1] + m_Frustum[1][2] * m_Frustum[1][2] ));
m_Frustum[1][0] /= t;
m_Frustum[1][1] /= t;
m_Frustum[1][2] /= t;
m_Frustum[1][3] /= t;
//提取下面的平面方程系數
m_Frustum[2][0] = clip[ 3] + clip[ 1];
m_Frustum[2][1] = clip[ 7] + clip[ 5];
m_Frustum[2][2] = clip[11] + clip[ 9];
m_Frustum[2][3] = clip[15] + clip[13];
t = GLfloat(sqrt( m_Frustum[2][0] * m_Frustum[2][0] + m_Frustum[2][1] * m_Frustum[2][1] + m_Frustum[2][2] * m_Frustum[2][2] ));
m_Frustum[2][0] /= t;
m_Frustum[2][1] /= t;
m_Frustum[2][2] /= t;
m_Frustum[2][3] /= t;
//提取上面的平面方程系數
m_Frustum[3][0] = clip[ 3] - clip[ 1];
m_Frustum[3][1] = clip[ 7] - clip[ 5];
m_Frustum[3][2] = clip[11] - clip[ 9];
m_Frustum[3][3] = clip[15] - clip[13];
t = GLfloat(sqrt( m_Frustum[3][0] * m_Frustum[3][0] + m_Frustum[3][1] * m_Frustum[3][1] + m_Frustum[3][2] * m_Frustum[3][2] ));
m_Frustum[3][0] /= t;
m_Frustum[3][1] /= t;
m_Frustum[3][2] /= t;
m_Frustum[3][3] /= t;
//提取遠面的平面方程系數
m_Frustum[4][0] = clip[ 3] - clip[ 2];
m_Frustum[4][1] = clip[ 7] - clip[ 6];
m_Frustum[4][2] = clip[11] - clip[10];
m_Frustum[4][3] = clip[15] - clip[14];
t = GLfloat(sqrt( m_Frustum[4][0] * m_Frustum[4][0] + m_Frustum[4][1] * m_Frustum[4][1] + m_Frustum[4][2] * m_Frustum[4][2] ));
m_Frustum[4][0] /= t;
m_Frustum[4][1] /= t;
m_Frustum[4][2] /= t;
m_Frustum[4][3] /= t;
//提取近面的平面方程系數
m_Frustum[5][0] = clip[ 3] + clip[ 2];
m_Frustum[5][1] = clip[ 7] + clip[ 6];
m_Frustum[5][2] = clip[11] + clip[10];
m_Frustum[5][3] = clip[15] + clip[14];
t = GLfloat(sqrt( m_Frustum[5][0] * m_Frustum[5][0] + m_Frustum[5][1] * m_Frustum[5][1] + m_Frustum[5][2] * m_Frustum[5][2] ));
m_Frustum[5][0] /= t;
m_Frustum[5][1] /= t;
m_Frustum[5][2] /= t;
m_Frustum[5][3] /= t;
}
現在我們可以測試一個點或圓是否在視景體內了。下面的函數可以測試一個點是否在視景體內。
BOOL glCamera::PointInFrustum(glPoint p){ int i; for(i = 0; i < 6; i++) { if(m_Frustum[i][0] * p.x + m_Frustum[i][1] * p.y + m_Frustum[i][2] * p.z + m_Frustum[i][3] <= 0) { return(FALSE); } } return(TRUE);}
下面的函數用來測試某個點是否位于當前場景物體的前面:
bool glCamera::IsOccluded(glPoint p){ GLint viewport[4]; GLdouble mvmatrix[16], projmatrix[16]; GLdouble winx, winy, winz; GLdouble flareZ; GLfloat bufferZ;
glGetIntegerv (GL_VIEWPORT, viewport);
glGetDoublev (GL_MODELVIEW_MATRIX, mvmatrix);
glGetDoublev (GL_PROJECTION_MATRIX, projmatrix);
// 返回頂點p在單位立方體中的位置
gluProject(p.x, p.y, p.z, mvmatrix, projmatrix, viewport, &winx, &winy, &winz);
flareZ = winz;
// 讀取點(winx,winy)的深度坐標
glReadPixels(winx, winy,1,1,GL_DEPTH_COMPONENT, GL_FLOAT, &bufferZ);
// 如果深度坐標小于點的坐標,則返回true
if (bufferZ < flareZ)
return true;
//否則返回false
else
return false;
}
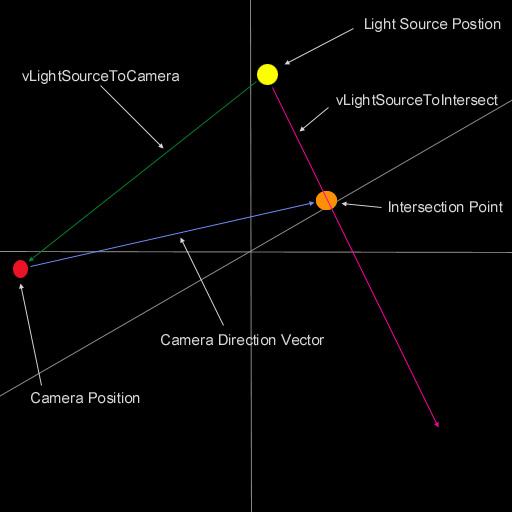
我們通過檢測光源是否正對我們的視線來決定是否繪制光暈,但如果你的視點超過了光源的位置,則會發生看不見光暈的現象。為了避免這種現象,我們在移動視點的使用,也相應的移動我們的光源。為了在視點和光源之間繪制多個光暈,我們需要計算之間的向量,下面的代碼完成這個功能:
//下面的函數完成具體的渲染光暈的任務void glCamera::RenderLensFlare(){ GLfloat Length = 0.0f;
// 如果我們的光源在我們的視線范圍內,則繪制它
if(SphereInFrustum(m_LightSourcePos, 1.0f) == TRUE)
{
vLightSourceToCamera = m_Position - m_LightSourcePos; // 計算光源到我們視線的距離
Length = vLightSourceToCamera.Magnitude();
//下面三個函數計算光源位置到光暈結束位置之間的向量
ptIntersect = m_DirectionVector * Length;
ptIntersect += m_Position;
vLightSourceToIntersect = ptIntersect - m_LightSourcePos;
Length = vLightSourceToIntersect.Magnitude();
vLightSourceToIntersect.Normalize();
glEnable(GL_BLEND);
glBlendFunc(GL_SRC_ALPHA, GL_ONE);
glDisable(GL_DEPTH_TEST);
glEnable(GL_TEXTURE_2D);
首先我們需要找到光源位置和視點位置之間的向量,接下來我們需要在視線的方向設置一個插值點,這個點的距離必須和光源位置和視點位置之間的距離相等。完成以后,我們找出可以產生光暈的方向,即下圖紅線的方向,在這個線上我們可以繪制我們的光暈。
if (!IsOccluded(m_LightSourcePos)) //如果光暈可見 { // 渲染中間的光暈 RenderBigGlow(0.60f, 0.60f, 0.8f, 1.0f, m_LightSourcePos, 16.0f); RenderStreaks(0.60f, 0.60f, 0.8f, 1.0f, m_LightSourcePos, 16.0f); RenderGlow(0.8f, 0.8f, 1.0f, 0.5f, m_LightSourcePos, 3.5f);
//繪制到光暈結束位置的0.1處的光暈
pt = vLightSourceToIntersect * (Length * 0.1f);
pt += m_LightSourcePos;
RenderGlow(0.9f, 0.6f, 0.4f, 0.5f, pt, 0.6f);
//繪制到光暈結束位置的0.15處的光暈
pt = vLightSourceToIntersect * (Length * 0.15f);
pt += m_LightSourcePos;
RenderHalo(0.8f, 0.5f, 0.6f, 0.5f, pt, 1.7f);
//繪制到光暈結束位置的0.175處的光暈
pt = vLightSourceToIntersect * (Length * 0.175f);
pt += m_LightSourcePos;
RenderHalo(0.9f, 0.2f, 0.1f, 0.5f, pt, 0.83f);
//繪制到光暈結束位置的0.285處的光暈
pt = vLightSourceToIntersect * (Length * 0.285f);
pt += m_LightSourcePos;
RenderHalo(0.7f, 0.7f, 0.4f, 0.5f, pt, 1.6f);
//繪制到光暈結束位置的0.2755處的光暈
pt = vLightSourceToIntersect * (Length * 0.2755f);
pt += m_LightSourcePos;
RenderGlow(0.9f, 0.9f, 0.2f, 0.5f, pt, 0.8f);
//繪制到光暈結束位置的0.4755處的光暈
pt = vLightSourceToIntersect * (Length * 0.4775f);
pt += m_LightSourcePos;
RenderGlow(0.93f, 0.82f, 0.73f, 0.5f, pt, 1.0f);
//繪制到光暈結束位置的0.49處的光暈
pt = vLightSourceToIntersect * (Length * 0.49f);
pt += m_LightSourcePos;
RenderHalo(0.7f, 0.6f, 0.5f, 0.5f, pt, 1.4f);
//繪制到光暈結束位置的0.65處的光暈
pt = vLightSourceToIntersect * (Length * 0.65f);
pt += m_LightSourcePos;
RenderGlow(0.7f, 0.8f, 0.3f, 0.5f, pt, 1.8f);
//繪制到光暈結束位置的0.63處的光暈
pt = vLightSourceToIntersect * (Length * 0.63f);
pt += m_LightSourcePos;
RenderGlow(0.4f, 0.3f, 0.2f, 0.5f, pt, 1.4f);
//繪制到光暈結束位置的0.8處的光暈
pt = vLightSourceToIntersect * (Length * 0.8f);
pt += m_LightSourcePos;
RenderHalo(0.7f, 0.5f, 0.5f, 0.5f, pt, 1.4f);
//繪制到光暈結束位置的0.7825處的光暈
pt = vLightSourceToIntersect * (Length * 0.7825f);
pt += m_LightSourcePos;
RenderGlow(0.8f, 0.5f, 0.1f, 0.5f, pt, 0.6f);
//繪制到光暈結束位置的1.0處的光暈
pt = vLightSourceToIntersect * (Length * 1.0f);
pt += m_LightSourcePos;
RenderHalo(0.5f, 0.5f, 0.7f, 0.5f, pt, 1.7f);
//繪制到光暈結束位置的0.975處的光暈
pt = vLightSourceToIntersect * (Length * 0.975f);
pt += m_LightSourcePos;
RenderGlow(0.4f, 0.1f, 0.9f, 0.5f, pt, 2.0f);
}
glDisable(GL_BLEND );
glEnable(GL_DEPTH_TEST);
glDisable(GL_TEXTURE_2D);
}
}
好了,下面的函數用來繪制四種不同的光暈
//繪制Halo形的光暈void glCamera::RenderHalo(GLfloat r, GLfloat g, GLfloat b, GLfloat a, glPoint p, GLfloat scale){ glPoint q[4]; q[0].x = (p.x - scale); q[0].y = (p.y - scale); q[1].x = (p.x - scale); q[1].y = (p.y + scale); q[2].x = (p.x + scale); q[2].y = (p.y - scale); q[3].x = (p.x + scale); q[3].y = (p.y + scale); glPushMatrix(); glTranslatef(p.x, p.y, p.z); glRotatef(-m_HeadingDegrees, 0.0f, 1.0f, 0.0f); glRotatef(-m_PitchDegrees, 1.0f, 0.0f, 0.0f); glBindTexture(GL_TEXTURE_2D, m_HaloTexture); glColor4f(r, g, b, a); glBegin(GL_TRIANGLE_STRIP); glTexCoord2f(0.0f, 0.0f); glVertex2f(q[0].x, q[0].y); glTexCoord2f(0.0f, 1.0f); glVertex2f(q[1].x, q[1].y); glTexCoord2f(1.0f, 0.0f); glVertex2f(q[2].x, q[2].y); glTexCoord2f(1.0f, 1.0f); glVertex2f(q[3].x, q[3].y); glEnd(); glPopMatrix(); }
//繪制Gloew形的光暈
void glCamera::RenderGlow(GLfloat r, GLfloat g, GLfloat b, GLfloat a, glPoint p, GLfloat scale)
{
glPoint q[4];
q[0].x = (p.x - scale);
q[0].y = (p.y - scale);
q[1].x = (p.x - scale);
q[1].y = (p.y + scale);
q[2].x = (p.x + scale);
q[2].y = (p.y - scale);
q[3].x = (p.x + scale);
q[3].y = (p.y + scale);
glPushMatrix();
glTranslatef(p.x, p.y, p.z);
glRotatef(-m_HeadingDegrees, 0.0f, 1.0f, 0.0f);
glRotatef(-m_PitchDegrees, 1.0f, 0.0f, 0.0f);
glBindTexture(GL_TEXTURE_2D, m_GlowTexture);
glColor4f(r, g, b, a);
glBegin(GL_TRIANGLE_STRIP);
glTexCoord2f(0.0f, 0.0f);
glVertex2f(q[0].x, q[0].y);
glTexCoord2f(0.0f, 1.0f);
glVertex2f(q[1].x, q[1].y);
glTexCoord2f(1.0f, 0.0f);
glVertex2f(q[2].x, q[2].y);
glTexCoord2f(1.0f, 1.0f);
glVertex2f(q[3].x, q[3].y);
glEnd();
glPopMatrix();
}
//繪制BigGlow形的光暈
void glCamera::RenderBigGlow(GLfloat r, GLfloat g, GLfloat b, GLfloat a, glPoint p, GLfloat scale)
{
glPoint q[4];
q[0].x = (p.x - scale);
q[0].y = (p.y - scale);
q[1].x = (p.x - scale);
q[1].y = (p.y + scale);
q[2].x = (p.x + scale);
q[2].y = (p.y - scale);
q[3].x = (p.x + scale);
q[3].y = (p.y + scale);
glPushMatrix();
glTranslatef(p.x, p.y, p.z);
glRotatef(-m_HeadingDegrees, 0.0f, 1.0f, 0.0f);
glRotatef(-m_PitchDegrees, 1.0f, 0.0f, 0.0f);
glBindTexture(GL_TEXTURE_2D, m_BigGlowTexture);
glColor4f(r, g, b, a);
glBegin(GL_TRIANGLE_STRIP);
glTexCoord2f(0.0f, 0.0f);
glVertex2f(q[0].x, q[0].y);
glTexCoord2f(0.0f, 1.0f);
glVertex2f(q[1].x, q[1].y);
glTexCoord2f(1.0f, 0.0f);
glVertex2f(q[2].x, q[2].y);
glTexCoord2f(1.0f, 1.0f);
glVertex2f(q[3].x, q[3].y);
glEnd();
glPopMatrix();
}
//繪制Streaks形的光暈
void glCamera::RenderStreaks(GLfloat r, GLfloat g, GLfloat b, GLfloat a, glPoint p, GLfloat scale)
{
glPoint q[4];
q[0].x = (p.x - scale);
q[0].y = (p.y - scale);
q[1].x = (p.x - scale);
q[1].y = (p.y + scale);
q[2].x = (p.x + scale);
q[2].y = (p.y - scale);
q[3].x = (p.x + scale);
q[3].y = (p.y + scale);
glPushMatrix();
glTranslatef(p.x, p.y, p.z);
glRotatef(-m_HeadingDegrees, 0.0f, 1.0f, 0.0f);
glRotatef(-m_PitchDegrees, 1.0f, 0.0f, 0.0f);
glBindTexture(GL_TEXTURE_2D, m_StreakTexture);
glColor4f(r, g, b, a);
glBegin(GL_TRIANGLE_STRIP);
glTexCoord2f(0.0f, 0.0f);
glVertex2f(q[0].x, q[0].y);
glTexCoord2f(0.0f, 1.0f);
glVertex2f(q[1].x, q[1].y);
glTexCoord2f(1.0f, 0.0f);
glVertex2f(q[2].x, q[2].y);
glTexCoord2f(1.0f, 1.0f);
glVertex2f(q[3].x, q[3].y);
glEnd();
glPopMatrix();
}
你可以使用w,s,a,d變換攝像機的方向,1,2顯示/關閉各種信息參數。C給攝像機一個固定的速度,X停止它。
上面就是這個教程的全部了,所有的問題,評論和抱怨都歡迎。當然我不是第一個作這個效果的人,下面是其他方面相關的文章:
http://www.gamedev.net/reference/articles/article874.asp
http://www.gamedev.net/reference/articles/article813.asp
http://www.opengl.org/developers/code/mjktips/lensflare/
http://www.markmorley.com/opengl/frustumculling.html
http://oss.sgi.com/projects/ogl-sample/registry/HP/occlusion_test.txt
http://oss.sgi.com/projects/ogl-sample/registry/NV/occlusion_query.txt