
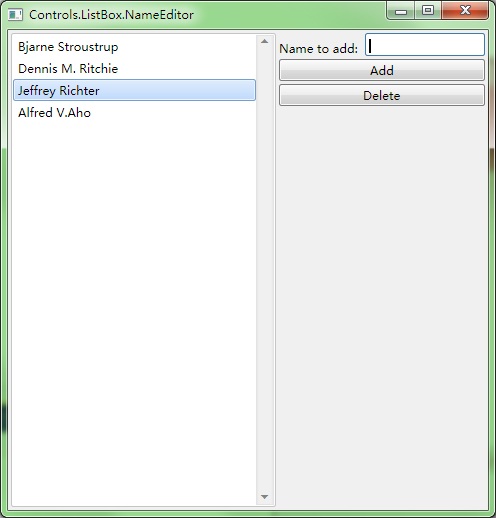
GacUI在結束了文本框的介紹之后,開始進入列表的介紹。列表內容豐富,包含各種預定義的列表控件、用來顯示和操作大量對象的虛擬模式、MVC分離、修改列表樣式等內容。今天先從文本列表的簡單操作開始。這個Demo展示了如何對列表進行添加和刪除。窗口里面有一個列表,然后有添加和刪除兩個按鈕,分別用于把文本框的內容添加到列表內,和刪除掉選中的列表項的。在這個Demo里面只允許列表項單選,并且水平滾動條默認不出現。先看圖:
空間如何布局,我就不再贅述了,明顯是一個四行三列的表格。代碼如下:
#include "..\..\Public\Source\GacUIIncludes.h"
#include <Windows.h>
// for SortedList, CopyFrom and Select
using namespace vl::collections;
int CALLBACK WinMain(HINSTANCE hInstance, HINSTANCE hPrevInstance, LPSTR lpCmdLine, int CmdShow)
{
return SetupWindowsDirect2DRenderer();
}
class NameEditorWindow : public GuiWindow
{
private:
GuiTextList* listBox;
GuiSinglelineTextBox* textBox;
GuiButton* buttonAdd;
GuiButton* buttonRemove;
void buttonAdd_Clicked(GuiGraphicsComposition* sender, GuiEventArgs& arguments)
{
// add the specified name at the end of the list box
listBox->GetItems().Add(textBox->GetText());
textBox->SelectAll();
textBox->SetFocus();
}
void buttonRemove_Clicked(GuiGraphicsComposition* sender, GuiEventArgs& arguments)
{
// remove the selected items using item index
listBox->GetItems().RemoveAt(listBox->GetSelectedItems()[0]);
}
void listBox_SelectionChanged(GuiGraphicsComposition* sender, GuiEventArgs& arguments)
{
// disable the button if no item is selected
buttonRemove->SetEnabled(listBox->GetSelectedItems().Count()>0);
}
public:
NameEditorWindow()
:GuiWindow(GetCurrentTheme()->CreateWindowStyle())
{
this->SetText(L"Controls.ListBox.NameEditor");
GuiTableComposition* table=new GuiTableComposition;
table->SetRowsAndColumns(4, 3);
table->SetCellPadding(3);
table->SetAlignmentToParent(Margin(0, 0, 0, 0));
table->SetRowOption(0, GuiCellOption::MinSizeOption());
table->SetRowOption(1, GuiCellOption::MinSizeOption());
table->SetRowOption(2, GuiCellOption::MinSizeOption());
table->SetRowOption(3, GuiCellOption::PercentageOption(1.0));
table->SetColumnOption(0, GuiCellOption::PercentageOption(1.0));
table->SetColumnOption(1, GuiCellOption::MinSizeOption());
table->SetColumnOption(2, GuiCellOption::MinSizeOption());
this->GetContainerComposition()->AddChild(table);
{
GuiCellComposition* cell=new GuiCellComposition;
table->AddChild(cell);
cell->SetSite(0, 0, 4, 1);
listBox=g::NewTextList();
listBox->GetBoundsComposition()->SetAlignmentToParent(Margin(0, 0, 0, 0));
listBox->SetHorizontalAlwaysVisible(false);
listBox->SelectionChanged.AttachMethod(this, &NameEditorWindow::listBox_SelectionChanged);
cell->AddChild(listBox->GetBoundsComposition());
}
{
GuiCellComposition* cell=new GuiCellComposition;
table->AddChild(cell);
cell->SetSite(0, 1, 1, 1);
GuiLabel* label=g::NewLabel();
label->SetText(L"Name to add: ");
label->GetBoundsComposition()->SetAlignmentToParent(Margin(0, -1, 0, 0));
cell->AddChild(label->GetBoundsComposition());
}
{
GuiCellComposition* cell=new GuiCellComposition;
table->AddChild(cell);
cell->SetSite(0, 2, 1, 1);
textBox=g::NewTextBox();
textBox->GetBoundsComposition()->SetPreferredMinSize(Size(120, 23));
textBox->GetBoundsComposition()->SetAlignmentToParent(Margin(0, 0, 0, 0));
cell->AddChild(textBox->GetBoundsComposition());
}
{
GuiCellComposition* cell=new GuiCellComposition;
table->AddChild(cell);
cell->SetSite(1, 1, 1, 2);
buttonAdd=g::NewButton();
buttonAdd->SetText(L"Add");
buttonAdd->GetBoundsComposition()->SetAlignmentToParent(Margin(0, 0, 0, 0));
buttonAdd->Clicked.AttachMethod(this, &NameEditorWindow::buttonAdd_Clicked);
cell->AddChild(buttonAdd->GetBoundsComposition());
}
{
GuiCellComposition* cell=new GuiCellComposition;
table->AddChild(cell);
cell->SetSite(2, 1, 1, 2);
buttonRemove=g::NewButton();
buttonRemove->SetText(L"Delete");
buttonRemove->SetEnabled(false);
buttonRemove->GetBoundsComposition()->SetAlignmentToParent(Margin(0, 0, 0, 0));
buttonRemove->Clicked.AttachMethod(this, &NameEditorWindow::buttonRemove_Clicked);
cell->AddChild(buttonRemove->GetBoundsComposition());
}
// set the preferred minimum client size
this->GetBoundsComposition()->SetPreferredMinSize(Size(480, 480));
// call this to calculate the size immediately if any indirect content in the table changes
// so that the window can calcaulte its correct size before calling the MoveToScreenCenter()
this->ForceCalculateSizeImmediately();
// move to the screen center
this->MoveToScreenCenter();
}
};
void GuiMain()
{
GuiWindow* window=new NameEditorWindow;
GetApplication()->Run(window);
delete window;
}
這里需要注意的幾點就是,為了實現在列表沒有選中內容的時候禁用刪除按鈕,我們需要監聽GuiTextList::SelectionChanged事件。核心的代碼就是下面這幾行:
void buttonAdd_Clicked(GuiGraphicsComposition* sender, GuiEventArgs& arguments)
{
// add the specified name at the end of the list box
listBox->GetItems().Add(textBox->GetText());
textBox->SelectAll();
textBox->SetFocus();
}
void buttonRemove_Clicked(GuiGraphicsComposition* sender, GuiEventArgs& arguments)
{
// remove the selected items using item index
listBox->GetItems().RemoveAt(listBox->GetSelectedItems()[0]);
}
void listBox_SelectionChanged(GuiGraphicsComposition* sender, GuiEventArgs& arguments)
{
// disable the button if no item is selected
buttonRemove->SetEnabled(listBox->GetSelectedItems().Count()>0);
}
GuiTextList控件的GetItems函數返回所有的列表項。這個對象有Add、Insert、Clear、IndexOf、Remove、RemoveAt、Contains、Count等函數,可以用來操作列表項。GuiTextList還有GetSelectedItems函數(其實是定義在GuiSelectableListControl里面的),可以用來獲得所有選中的列表項的下標(從0開始)。每當列表內容被修改的時候,GetSelectedItems的結果就會被自動清空。
下一個Demo將是關于如何處理允許多選的列表的操作方法。
posted @
2012-05-23 04:42 陳梓瀚(vczh) 閱讀(2381) |
評論 (4) |
編輯 收藏 這是
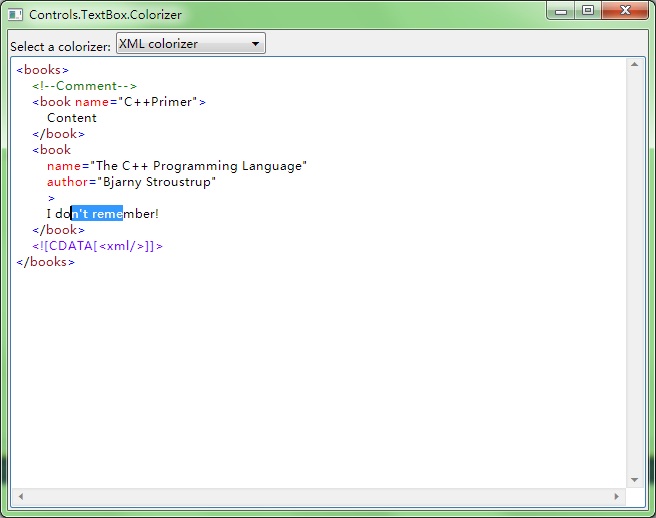
GacUI關于文本框高亮的最后一個Demo了。這個Demo是關于XML著色的。XML著色比起C++著色更難,主要是因為在類似<book name="C++ Primer">這樣的代碼里面,book和name的顏色不一樣,<和book的顏色也不一樣(參考Visual Studio)。這種時候單純依靠正則表達式來區分顏色是不夠的,我們還需要引入一個新的狀態機。這個狀態機只有三個狀態,用來區分tag name,attribute name和text三種顏色。狀態機是手寫的,并且GacUI提供了一個回調來寫這個只有寥寥幾行狀態機。先看圖:
跟C++一樣,XML著色首先是由正則表達式組成的。XML的正則表達式比較簡單,只有符號、name、字符串、CData、注釋和其它一些簡單的東西:
1 class XmlColorizer : public GuiTextBoxRegexColorizer
2 {
3 public:
4 XmlColorizer()
5 {
6 text::ColorEntry entry=win7::Win7GetTextBoxTextColor();
7 SetDefaultColor(entry);
8
9 entry.normal.text=Color(0, 128, 0);
10 AddToken(L"/<!--([^/-]|-[^/-]|--[^>])*--/>", entry);
11
12 entry.normal.text=Color(128, 0, 255);
13 AddToken(L"/<!/[CDATA/[([^/]]|/][^/]]|/]/][^>])*/]/]/>", entry);
14
15 entry.normal.text=Color(0, 0, 0);
16 AddToken(L"\"[^\"]*\"", entry);
17
18 entry.normal.text=Color(0, 0, 255);
19 AddToken(L"[<>=]", entry);
20
21 entry.normal.text=Color(255, 0, 0);
22 AddToken(L"[a-zA-Z0-9_/-:]+", entry);
23
24 entry.normal.text=Color(163, 21, 21);
25 AddExtraToken(entry);
26
27 Setup();
28 }
29
30 void ColorizeTokenContextSensitive(const wchar_t* text, vint start, vint length, vint& token, int& contextState)override
31 {
32 
33 }
34
35 int GetContextStartState()override
36 {
37
38 }
39 }; 其次要對三種地方的[a-zA-Z0-9_/-:]進行著色。Tag的名字用褐色,attribute的名字用紅色,而普通文本用黑色。因此我們可以做一個狀態機,初始狀態為0。如果讀進了<,狀態變成1。1遇到了一個Tag名字之后變為2。從2開始所有的名字就只能是attribute的名字了。我們只考慮正確的情況,錯誤的代碼著色出了問題不僅沒有壞處,還可以提醒程序員有什么地方寫錯了。之后遇到了>變回0,在0的狀態下所有的東西都是普通文本,所以名字就都是黑色的。因此上面ColorizeTokenContextSensitive函數中就需要填入這個邏輯。GetContextStartState返回0,作為第一行的起始狀態。代碼如下:
void ColorizeTokenContextSensitive(const wchar_t* text, vint start, vint length, vint& token, int& contextState)override
{
// 0 < 1 name 2 att > 0
switch(token)
{
case 3:
if(length==1)
{
switch(text[start])
{
case '<':
contextState=1;
break;
case '>':
contextState=0;
break;
}
}
break;
case 4:
switch(contextState)
{
case 0:
token=-1;
break;
case 1:
token=5;
contextState=2;
break;
}
break;
}
}
int GetContextStartState()override
{
return 0;
}
這個函數里面有幾個魔法數字,其實都是關于Token的編號的。構造函數里面我們使用AddToken將一個顏色關聯到正則表達式上,使用AddExtraToken創建一個沒有正則表達式關聯的顏色。所以在這個狀態機里面,所有的顏色都用Token的序號來表示。無論是使用AddToken還是AddExtraToken,第一個顏色編號為0,第二個顏色編號為1。因此case 3指的是[<>=],而case 4指的是[a-zA-Z0-9_/-:]+。而case 4里面的token=5則表示在狀態為1的時候,名字都用AddExtraToken指定的那個褐色進行染色。缺省的名字(也就是id為4的token)是紅色,所以不需要對contextState為2的時候進行處理。
這樣我們就完成了XML的著色。GacUI接下來的幾個Demo將會是關于ListBox、ListView和TreeView的,敬請期待。
posted @
2012-05-20 00:41 陳梓瀚(vczh) 閱讀(2264) |
評論 (2) |
編輯 收藏 GacUI終于把
上一篇文章中提到的自動采用正則表達式進行高亮的Demo做出來了。這次實現的是C++ colorizer。而XML colorizer不僅需要正則表達式,還需要一個人工維護的狀態,這個等到下一個Demo再提及。先看圖
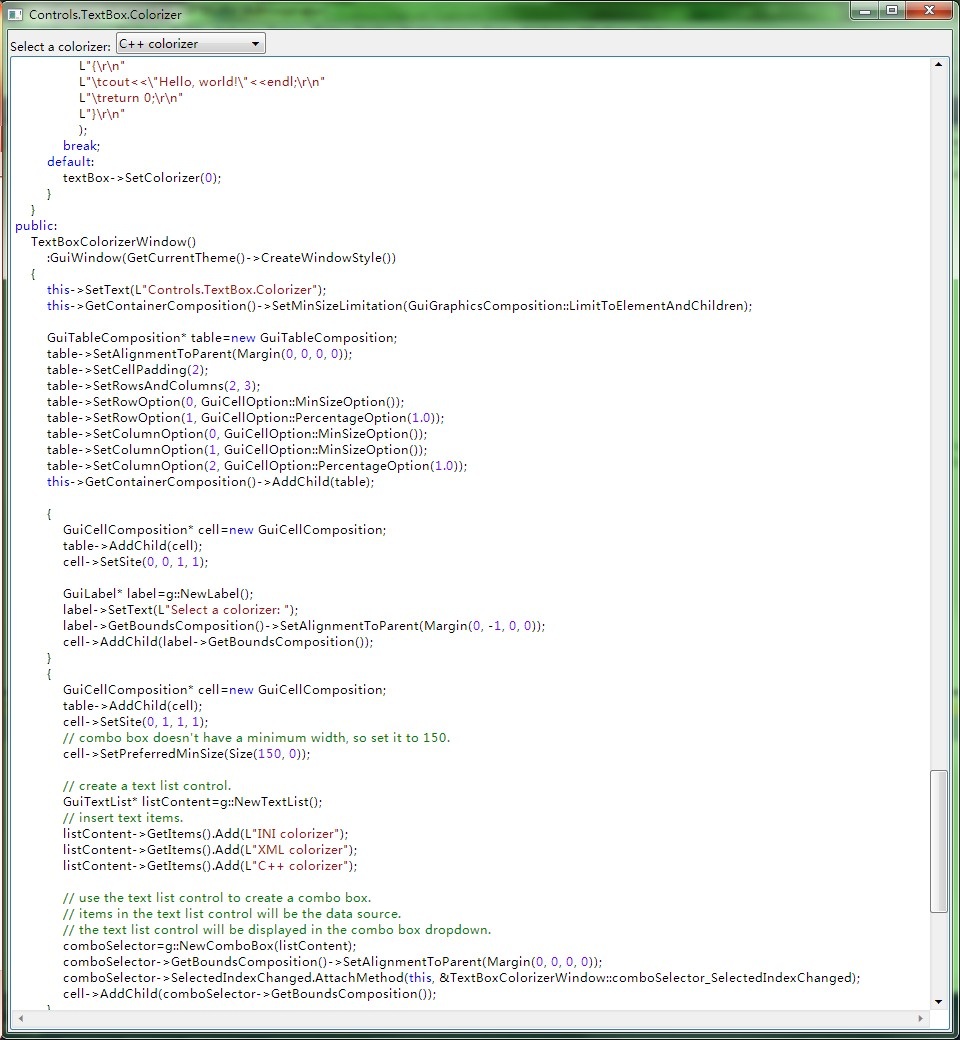
在不需要人工維護狀態,僅通過正則表達式就可以著色的時候,編寫一個colorizer變得十分的簡單。這個Colorizer雖然不是一定非得通過繼承來實現,但是這個Demo還是使用了繼承。首先編寫一個類,繼承自GuiTextBoxRegexColorizer,然后在構造函數里面填寫下面的代碼:
class CppColorizer : public GuiTextBoxRegexColorizer
{
public:
CppColorizer()
{
text::ColorEntry entry=win7::Win7GetTextBoxTextColor();
SetDefaultColor(entry);
entry.normal.text=Color(128, 0, 255);
AddToken(L"/d+(./d*)?([eE][+/-]?/d+)?", entry);
entry.normal.text=Color(163, 21, 21);
AddToken(L"\"([^\"]|\\\\/.)*\"", entry);
entry.normal.text=Color(0, 128, 0);
AddToken(L"////[^\r\n]*", entry);
AddToken(L"///*(//|[*]*[^*//])*/*+//", entry);
entry.normal.text=Color(0, 0, 255);
AddToken(L"#[a-zA-Z0-9_]*", entry);
AddToken(CppKeywords, entry);
AddToken(L"[a-zA-Z0-9_]+", GetDefaultColor());
Setup();
}
};
然后只需要把它綁定到文本框里面就可以了。在這個Demo里面,我們在下拉框的事件里面添加下面的代碼:
void comboSelector_SelectedIndexChanged(GuiGraphicsComposition* sender, GuiEventArgs& arguments)
{
switch(comboSelector->GetSelectedIndex())
{
case 0:(略)
case 1:(略)
case 2:
textBox->SetColorizer(new CppColorizer);
textBox->SetText(
L"#include <iostream>\r\n"
L"using namespace std;\r\n"
L"\r\n"
L"int main()\r\n"
L"{\r\n"
L"\t//This is a comment\r\n"
L"\t/**This*is/another\r\n"
L"\tcomment**/\r\n"
L"\tcout<<\"Hello, world!\"<<endl;\r\n"
L"\treturn 0;\r\n"
L"}\r\n"
);
break;
default:
textBox->SetColorizer(0);
}
}
當然這樣是不完整的,因為CppColorizer里面還有一個CppKeywords的常量。這實際上是一個正則表達式,里面用“|”字符把所有C++的關鍵字連了起來。內容抄自MSDN的C++ Language Reference:
1 const wchar_t* CppKeywords=
2 L"__abstract|"
3 L"__alignof|"
4 L"__asm|"
5 L"__assume|"
6 L"__based|"
7 L"__box|"
8 L"__cdecl|"
9 L"__declspec|"
10 L"__delegate|"
11 L"__event|"
12 L"__except|"
13 L"__fastcall|"
14 L"__finally|"
15 L"__forceinline|"
16 L"__gc|"
17 L"__hook|"
18 L"__identifier|"
19 L"__if_exists|"
20 L"__if_not_exists|"
21 L"__inline|"
22 L"__int16|"
23 L"__int32|"
24 L"__int64|"
25 L"__int8|"
26 L"__interface|"
27 L"__leave|"
28 L"__m128d|"
29 L"__m128|"
30 L"__m128i|"
31 L"__m64|"
32 L"__multiple_inheritance|"
33 L"__nogc|"
34 L"__noop|"
35 L"__pin|"
36 L"__property|"
37 L"__raise|"
38 L"__sealed|"
39 L"__single_inheritance|"
40 L"__stdcall|"
41 L"__super|"
42 L"__try|"
43 L"__except|"
44 L"__finally|"
45 L"__try_cast|"
46 L"__unaligned|"
47 L"__unhook|"
48 L"__uuidof|"
49 L"__value|"
50 L"__virtual_inheritance|"
51 L"__w64|"
52 L"__wchar_t|"
53 L"wchar_t|"
54 L"abstract|"
55 L"array|"
56 L"bool|"
57 L"break|"
58 L"case|"
59 L"catch|"
60 L"char|"
61 L"class|"
62 L"const_cast|"
63 L"const|"
64 L"continue|"
65 L"decltype|"
66 L"default|"
67 L"delegate|"
68 L"delete|"
69 L"do|"
70 L"double|"
71 L"dynamic_cast|"
72 L"else|"
73 L"enum|"
74 L"event|"
75 L"explicit|"
76 L"extern|"
77 L"false|"
78 L"finally|"
79 L"float|"
80 L"for|"
81 L"friend|"
82 L"gcnew|"
83 L"generic|"
84 L"goto|"
85 L"if|"
86 L"initonly|"
87 L"inline|"
88 L"int|"
89 L"interface|"
90 L"interior_ptr|"
91 L"literal|"
92 L"long|"
93 L"mutable|"
94 L"namespace|"
95 L"new|"
96 L"new|"
97 L"nullptr|"
98 L"operator|"
99 L"private|"
100 L"property|"
101 L"property|"
102 L"protected|"
103 L"public|"
104 L"register|"
105 L"reinterpret_cast|"
106 L"return|"
107 L"sealed|"
108 L"short|"
109 L"signed|"
110 L"sizeof|"
111 L"static_assert|"
112 L"static_cast|"
113 L"static|"
114 L"struct|"
115 L"switch|"
116 L"template|"
117 L"this|"
118 L"__thiscall|"
119 L"throw|"
120 L"true|"
121 L"try|"
122 L"typedef|"
123 L"typeid|"
124 L"typeid|"
125 L"typename|"
126 L"union|"
127 L"unsigned|"
128 L"using|"
129 L"virtual|"
130 L"void|"
131 L"volatile|"
132 L"while";
使用GacUI為文本框著色已經變得如此簡單。
posted @
2012-05-17 09:03 陳梓瀚(vczh) 閱讀(2216) |
評論 (2) |
編輯 收藏
摘要: GacUI的高亮Demo做了一半。現在的進度是,可以手寫著色器的狀態轉換函數,但是自動從正則表達式產生著色器的狀態轉換函數部分還沒有集成進GacUI。這篇博客還是照舊,看圖、看Demo代碼,說著色原理。 這次的Demo要做一個可以動態切換著色器的小程序,里面包含INI、XML和C++三種著色器。現在只實現了INI一中,手寫的...
閱讀全文
posted @
2012-05-11 08:58 陳梓瀚(vczh) 閱讀(3274) |
評論 (1) |
編輯 收藏
摘要: GacUI添加了一個新的Demo。這個Demo用了幾個按鈕(之所以不用菜單是因為不想讓Demo一下子包含太多新東西)來實現剪貼板操作、只讀控制和行跳轉等功能。在剪貼板里面的內容是文字的時候,Paste按鈕會被Enable。這個過程是自動的,也就是說,你在畫圖里面復制了一個圖片,這個按鈕也會變灰。Cut和Copy按鈕僅在文本框有文字被選中的時候可用,因此相應了文...
閱讀全文
posted @
2012-05-05 02:37 陳梓瀚(vczh) 閱讀(5350) |
評論 (5) |
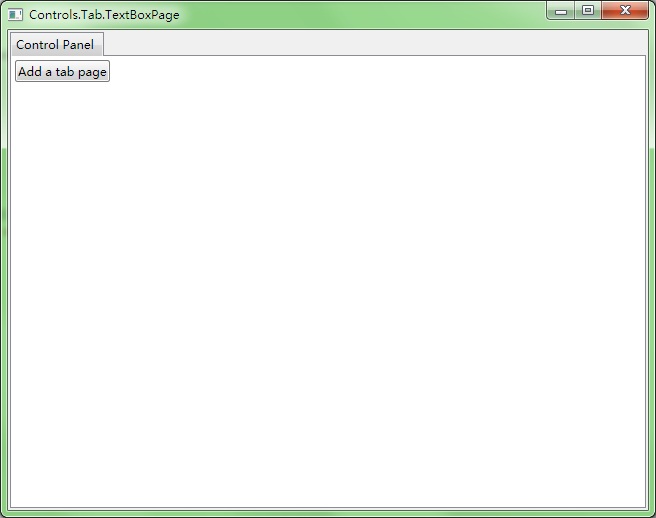
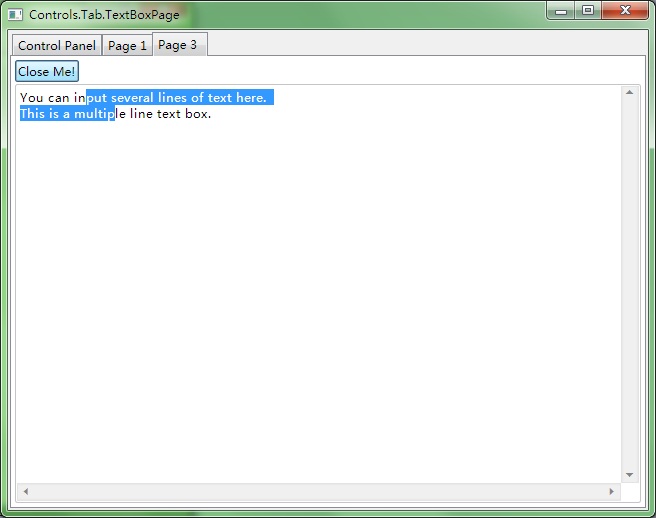
編輯 收藏 GacUI新增了一個Demo。這里模擬了一個簡單到過頭了的編輯程序。界面是一個標簽頁,第一頁里面只有一個按鈕:Add Page。點中了他之后,其它頁包含一個用來關掉自己的按鈕,和一個多行的文本框。
這個Demo要展示的其中一個問題是,在按下關閉按鈕的時候,由于那個Page會被移除并刪除,會導致按鈕自己也被刪除。但是事件發生過后,實際上還有很多事情要做的。所以這里展示了如何使用GacUI進行“延遲執行”,在事件結束之后再刪除自己。為了方便,這個Demo使用了C++11(但是庫的實現并不依賴與C++11)。先上圖:
然后我們來看代碼:
#include "..\..\Public\Source\GacUIIncludes.h"
#include <Windows.h>
int CALLBACK WinMain(HINSTANCE hInstance, HINSTANCE hPrevInstance, LPSTR lpCmdLine, int CmdShow)
{
return SetupWindowsDirect2DRenderer();
}
class TextBoxPage : public GuiTabPage
{
private:
static int pageCounter;
GuiButton* closeButton;
GuiMultilineTextBox* textBox;
void closeButton_Clicked(GuiGraphicsComposition* sender, GuiEventArgs& arguments)
{
// deleteing the tab page will also delete the button, because the button is in the page
// when an event is processing, the button is not going to be deleted
// because there are many works to do after this event
// and maybe someone has already added another event handler to this button
// so it use GetApplication()->InvokeInMainThread to send a function to the queue
// so that this function will be executed after this input message (an input message raises multiple events)
// to the user, this page is closed after cliking this button
GetApplication()->InvokeInMainThread([this]()
{
// remove the page and delete it
this->GetOwnerTab()->RemovePage(this);
delete this;
});
}
void OnPageContainerReady(GuiGraphicsComposition* sender, GuiEventArgs& arguments)
{
// create a table to place a button and a text box
GuiTableComposition* table=new GuiTableComposition;
table->SetRowsAndColumns(2, 1);
table->SetRowOption(0, GuiCellOption::MinSizeOption());
table->SetRowOption(1, GuiCellOption::PercentageOption(1.0));
table->SetColumnOption(0, GuiCellOption::PercentageOption(1.0));
table->SetAlignmentToParent(Margin(0, 0, 0, 0));
table->SetCellPadding(2);
{
GuiCellComposition* cell=new GuiCellComposition;
table->AddChild(cell);
cell->SetSite(0, 0, 1, 1);
closeButton=g::NewButton();
closeButton->SetText(L"Close Me!");
closeButton->Clicked.AttachMethod(this, &TextBoxPage::closeButton_Clicked);
cell->AddChild(closeButton->GetBoundsComposition());
}
{
GuiCellComposition* cell=new GuiCellComposition;
table->AddChild(cell);
cell->SetSite(1, 0, 1, 1);
textBox=g::NewMultilineTextBox();
textBox->GetBoundsComposition()->SetAlignmentToParent(Margin(0, 0, 0, 0));
textBox->SetText(L"You can input several lines of text here.\r\nThis is a multiple line text box.");
cell->AddChild(textBox->GetBoundsComposition());
}
this->GetContainer()->GetContainerComposition()->AddChild(table);
}
public:
TextBoxPage()
:closeButton(0)
,textBox(0)
{
PageContainerReady.AttachMethod(this, &TextBoxPage::OnPageContainerReady);
this->SetText(L"Page "+itow(++pageCounter));
}
~TextBoxPage()
{
}
};
int TextBoxPage::pageCounter=0;
class TextBoxPageWindow : public GuiWindow
{
private:
GuiTab* tabControl;
GuiTabPage* controlPanelPage;
GuiButton* buttonAddPage;
void buttonAddPage_Clicked(GuiGraphicsComposition* sender, GuiEventArgs& arguments)
{
// when the button is clicked, it creates a new TextBoxPage and adds it to the tab control
TextBoxPage* page=new TextBoxPage;
tabControl->CreatePage(page);
tabControl->SetSelectedPage(page);
}
public:
TextBoxPageWindow()
:GuiWindow(GetCurrentTheme()->CreateWindowStyle())
{
this->SetText(L"Controls.Tab.TextBoxPage");
this->GetBoundsComposition()->SetPreferredMinSize(Size(640, 480));
// create a tab control
tabControl=g::NewTab();
tabControl->GetBoundsComposition()->SetAlignmentToParent(Margin(2, 2, 2, 2));
this->AddChild(tabControl);
// the first page is a control panel
controlPanelPage=tabControl->CreatePage();
controlPanelPage->SetText(L"Control Panel");
// add a button to the control panel
buttonAddPage=g::NewButton();
buttonAddPage->SetText(L"Add a tab page");
buttonAddPage->Clicked.AttachMethod(this, &TextBoxPageWindow::buttonAddPage_Clicked);
controlPanelPage->GetContainer()->GetContainerComposition()->SetInternalMargin(Margin(2, 2, 2, 2));
controlPanelPage->GetContainer()->AddChild(buttonAddPage);
this->ForceCalculateSizeImmediately();
this->MoveToScreenCenter();
}
~TextBoxPageWindow()
{
}
};
void GuiMain()
{
GuiWindow* window=new TextBoxPageWindow();
GetApplication()->Run(window);
delete window;
}
那一大段的注釋,就是在講延遲執行的事情。看過C++11的人都知道,lambda expression實際上就是一個functor。在舊C++里面,調用InvokeInMainThread的時候,要么可以傳一個void(*)(void*)和void*,要么可以傳一個帶operator()()的struct。在新C++里面,直接把lambda expression寫在里面就好了。
如果不使用延遲執行,在事件發生的時候把自己刪掉,會導致Access Violation的發生,因為接下來要訪問的對象被你刪掉了。如果使用延遲執行,就可以在input message處理完之后,執行刪除的代碼。這樣一切都是好的。
下一個Demo就是關于文本框的操作,再下一個Demo是關于如何做用來顯示代碼的高亮文本框的事情。敬請期待,啊哈哈哈。
posted @
2012-04-30 23:28 陳梓瀚(vczh) 閱讀(2052) |
評論 (2) |
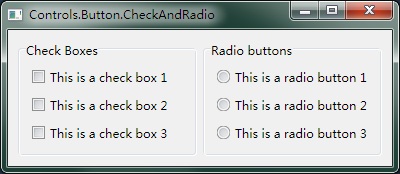
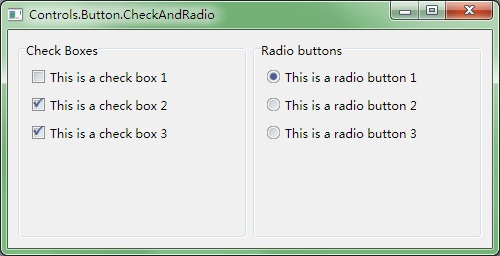
編輯 收藏 GacUI發布了一個新的Demo。這個Demo是關于多選框和單選框的。跟Windows一樣,直接創建出來的單選框其實是不會互斥的,除非你把他們放進同一個group里面。界面是左右各一個group box,使用table來保證兩邊的尺寸都一樣大。每一個group box里面放三個按鈕,而且每一個group box的最小尺寸都取決于兩邊所有6按鈕中最長的那個按鈕。每一邊的三個按鈕使用stack來排列成像一個列表一樣。左邊是多選框,右邊是單選框。現在先上圖:
第一張是剛打開的時候,窗口的尺寸自動變化到能顯示所有內容的最小的尺寸。盡管因為文字的關系,左邊的按鈕比右邊的短,但是table可以控制兩個group box一樣大,并且共享最小尺寸。
然后改變窗口的尺寸,按鈕始終靠左上角,兩個group box則保持一樣大。
大家已經看了前面的三個demo,所以有些東西其實已經不需要重復解釋了。先上代碼:
#include "..\..\Public\Source\GacUIIncludes.h"
#include <Windows.h>
int CALLBACK WinMain(HINSTANCE hInstance, HINSTANCE hPrevInstance, LPSTR lpCmdLine, int CmdShow)
{
return SetupWindowsDirect2DRenderer();
}
class CheckAndRadioWindow : public GuiWindow
{
private:
GuiCellComposition* CreateButtons(const WString& groupName, const WString& buttonName, bool checkBox, GuiSelectableButton::GroupController* groupController)
{
GuiCellComposition* cell=new GuiCellComposition;
GuiControl* groupBox=g::NewGroupBox();
groupBox->GetBoundsComposition()->SetMinSizeLimitation(GuiGraphicsComposition::LimitToElementAndChildren);
groupBox->GetContainerComposition()->SetMinSizeLimitation(GuiGraphicsComposition::LimitToElementAndChildren);
// all child controls should at least 10 pixels away from the group box
groupBox->GetContainerComposition()->SetInternalMargin(Margin(10, 10, 10, 10));
// dock the group box to fill the cell
groupBox->GetBoundsComposition()->SetAlignmentToParent(Margin(0, 0, 0, 0));
groupBox->SetText(groupName);
// add the button to the cell
cell->AddChild(groupBox->GetBoundsComposition());
// create a stack to layout the 3 buttons from top to bottom shown like a list
GuiStackComposition* stack=new GuiStackComposition;
stack->SetMinSizeLimitation(GuiGraphicsComposition::LimitToElementAndChildren);
stack->SetDirection(GuiStackComposition::Vertical);
stack->SetAlignmentToParent(Margin(0, 0, 0, 0));
stack->SetPadding(6);
groupBox->GetContainerComposition()->AddChild(stack);
// create buttons
for(int i=0;i<3;i++)
{
GuiSelectableButton* button=checkBox?g::NewCheckBox():g::NewRadioButton();
button->SetText(buttonName+itow(i+1));
button->GetBoundsComposition()->SetAlignmentToParent(Margin(0, 0, 0, 0));
if(groupController)
{
button->SetGroupController(groupController);
}
GuiStackItemComposition* stackItem=new GuiStackItemComposition;
stack->AddChild(stackItem);
stackItem->AddChild(button->GetBoundsComposition());
}
return cell;
}
public:
CheckAndRadioWindow()
:GuiWindow(GetCurrentTheme()->CreateWindowStyle())
{
this->SetText(L"Controls.Button.CheckAndRadio");
// limit the size that the window should always show the whole content without cliping it
this->GetContainerComposition()->SetMinSizeLimitation(GuiGraphicsComposition::LimitToElementAndChildren);
// create a table to layout the 2 group boxes
GuiTableComposition* table=new GuiTableComposition;
// make the table to have 2 rows
table->SetRowsAndColumns(1, 2);
table->SetRowOption(0, GuiCellOption::MinSizeOption());
table->SetColumnOption(0, GuiCellOption::PercentageOption(0.5));
table->SetColumnOption(1, GuiCellOption::PercentageOption(0.5));
// dock the table to fill the window
table->SetAlignmentToParent(Margin(4, 4, 4, 4));
table->SetCellPadding(6);
// add the table to the window;
this->GetContainerComposition()->AddChild(table);
// add group box for check boxes
{
GuiCellComposition* cell=CreateButtons(L"Check Boxes", L"This is a check box ", true, 0);
table->AddChild(cell);
// this cell is the left cell
cell->SetSite(0, 0, 1, 1);
}
// add group box for radio buttons
{
// create a group controller to group those radio buttons together
// so that select a radio button will unselect the previous one automatically
GuiSelectableButton::GroupController* groupController=new GuiSelectableButton::MutexGroupController;
this->AddComponent(groupController);
GuiCellComposition* cell=CreateButtons(L"Radio buttons", L"This is a radio button ", false, groupController);
table->AddChild(cell);
// this cell is the right cell
cell->SetSite(0, 1, 1, 1);
}
// call this to calculate the size immediately if any indirect content in the table changes
// so that the window can calcaulte its correct size before calling the MoveToScreenCenter()
this->ForceCalculateSizeImmediately();
// move to the screen center
this->MoveToScreenCenter();
}
~CheckAndRadioWindow()
{
}
};
void GuiMain()
{
GuiWindow* window=new CheckAndRadioWindow();
GetApplication()->Run(window);
delete window;
}
需要關心的就是第二次調用CreateButtons函數,用來構造單選按鈕的時候,穿進去的最后一個參數。GuiSelectableButton::GroupController類是一個虛類,用來控制選中狀況。而預定義的MutexGroupController則可以控制連接到的所有GuiSelectionButton并保證他們互斥。如果需要更加復雜的情況,譬如說“最多只能選中N個按鈕”這樣的,則自己集成一個group controller就可以了。在創建了一個group controller,要調用GuiWindow::AddComponent保持他的生命周期,然后使用GuiSelectableButton::SetGroupController來幫頂一個按鈕和一個group controller。
這個demo就介紹到這里了,下一個將是關于tab控件和文本框的demo。
posted @
2012-04-27 06:02 陳梓瀚(vczh) 閱讀(2301) |
評論 (25) |
編輯 收藏
今天為
GacUI寫了一個新的Demo,展示了一些可以自動排版的按鈕。主要的設想就是在窗口上放一個表格,分成兩行兩列。上面的按鈕占滿一整行,下面兩個單元格放兩個按鈕。然后就可以設置每個行和列占整個表格的比例,在這個Demo里面都設置成50%。這樣每當窗口縮放的時候,按鈕的位置也會隨之重新排版。然后設置表格充滿整個窗口,這樣窗口的最小值就會被表格的內容所限定,這樣試圖把窗口縮小的時候,就會有一個最小的尺寸限制著,至始至終保證所有的東西都可以顯示出來,不會因為窗口太小而只顯示一半。按鈕也是同樣,可以設置它必須顯示所有的文字。所有的過程一旦配置好之后,計算尺寸的時候所有的操作都會自動做,程序員不需要為窗口的Resize事件寫任何代碼。
下面先放圖。
第一個圖是窗口剛剛打開的時候的樣子。因為Demo里面沒有設置窗口的尺寸,所以一上來就自動變成了最小的尺寸——并且剛好可以顯示所有的內容。
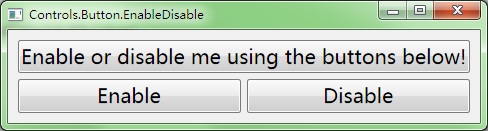
第二個圖是窗口放大之后的樣子。Disable按鈕被按下了,所以上面的按鈕就變灰。
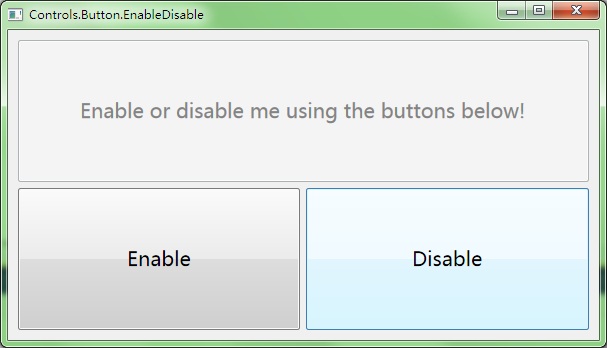
這個Demo使用了Direct2D渲染器,所有的繪制過程都十分高速。而且表格的尺寸計算也是經過優化的,在拖放窗口的時候十分流暢。事實上按鈕的漸變啊、邊框啊、文字等等也是借助表格排版的。由于尺寸計算過于復雜,除了表格之外整個框架都不保存控件的尺寸,所有的東西都在需要的時候——譬如說渲染的時候,譬如說計算鼠標點中的位置——的那一刻才開始算。因此無論是鼠標滑過,或者是窗口拖放,都拼命地執行很多虛函數。可見C++的虛函數的性能之高,幾乎永遠都不會成為程序的瓶頸。下面來看代碼:
#include "..\..\Public\Source\GacUIIncludes.h"
#include <Windows.h>
int CALLBACK WinMain(HINSTANCE hInstance, HINSTANCE hPrevInstance, LPSTR lpCmdLine, int CmdShow)
{
return SetupWindowsDirect2DRenderer();
}
class EnableDisableWindow : public GuiWindow
{
private:
GuiButton* buttonTarget;
GuiButton* buttonEnable;
GuiButton* buttonDisable;
void buttonEnable_OnClick(GuiGraphicsComposition* sender, GuiEventArgs& arguments)
{
buttonTarget->SetEnabled(true);
}
void buttonDisable_OnClick(GuiGraphicsComposition* sender, GuiEventArgs& arguments)
{
buttonTarget->SetEnabled(false);
}
public:
EnableDisableWindow()
:GuiWindow(GetCurrentTheme()->CreateWindowStyle())
{
this->SetText(L"Controls.Button.EnableDisable");
// limit the size that the window should always show the whole content without cliping it
this->GetContainerComposition()->SetMinSizeLimitation(GuiGraphicsComposition::LimitToElementAndChildren);
// create a table to layout the 3 buttons
GuiTableComposition* table=new GuiTableComposition;
// make the table to have 2 rows
table->SetRowsAndColumns(2, 2);
table->SetRowOption(0, GuiCellOption::PercentageOption(0.5));
table->SetRowOption(1, GuiCellOption::PercentageOption(0.5));
table->SetColumnOption(0, GuiCellOption::PercentageOption(0.5));
table->SetColumnOption(1, GuiCellOption::PercentageOption(0.5));
// dock the table to fill the window
table->SetAlignmentToParent(Margin(10, 10, 10, 10));
// add the table to the window;
this->GetContainerComposition()->AddChild(table);
// add the target button
{
GuiCellComposition* cell=new GuiCellComposition;
table->AddChild(cell);
// this cell is the top cell
cell->SetSite(0, 0, 1, 2);
buttonTarget=g::NewButton();
buttonTarget->SetText(L"Enable or disable me using the buttons below!");
// ensure that the buttonTarget display the whole text
buttonTarget->GetBoundsComposition()->SetMinSizeLimitation(GuiGraphicsComposition::LimitToElementAndChildren);
// dock the button to fill the cell
buttonTarget->GetBoundsComposition()->SetAlignmentToParent(Margin(0, 0, 0, 3));
// add the button to the cell
cell->AddChild(buttonTarget->GetBoundsComposition());
}
// add the enable button
{
GuiCellComposition* cell=new GuiCellComposition;
table->AddChild(cell);
// this cell is the bottom left cell
cell->SetSite(1, 0, 1, 1);
buttonEnable=g::NewButton();
buttonEnable->SetText(L"Enable");
buttonEnable->GetBoundsComposition()->SetMinSizeLimitation(GuiGraphicsComposition::LimitToElementAndChildren);
buttonEnable->GetBoundsComposition()->SetAlignmentToParent(Margin(0, 3, 3, 0));
buttonEnable->Clicked.AttachMethod(this, &EnableDisableWindow::buttonEnable_OnClick);
cell->AddChild(buttonEnable->GetBoundsComposition());
}
// add the disable button
{
GuiCellComposition* cell=new GuiCellComposition;
table->AddChild(cell);
// this cell is the bottom right cell
cell->SetSite(1, 1, 1, 1);
buttonDisable=g::NewButton();
buttonDisable->SetText(L"Disable");
buttonDisable->GetBoundsComposition()->SetMinSizeLimitation(GuiGraphicsComposition::LimitToElementAndChildren);
buttonDisable->GetBoundsComposition()->SetAlignmentToParent(Margin(3, 3, 0, 0));
buttonDisable->Clicked.AttachMethod(this, &EnableDisableWindow::buttonDisable_OnClick);
cell->AddChild(buttonDisable->GetBoundsComposition());
}
// change the button font
{
FontProperties font;
font=buttonTarget->GetFont();
font.size=20;
buttonTarget->SetFont(font);
buttonEnable->SetFont(font);
buttonDisable->SetFont(font);
}
// call this to calculate the size immediately if any indirect content in the table changes
// so that the window can calcaulte its correct size before calling the MoveToScreenCenter()
table->UpdateCellBounds();
// update the size
this->SetBounds(Rect());
// move to the screen center
this->MoveToScreenCenter();
}
~EnableDisableWindow()
{
}
};
void GuiMain()
{
GuiWindow* window=new EnableDisableWindow();
GetApplication()->Run(window);
delete window;
}
代碼里面充滿了注釋,而且主要的內容也在上面介紹了,在這里我就不羅嗦了。所有的代碼都可以在
http://gac.codeplex.com中,下載最新的代碼,然后在Libraries\GacUI\GacUIDemo\GacUIDemo.sln下面找到。
posted @
2012-04-25 02:46 陳梓瀚(vczh) 閱讀(2380) |
評論 (5) |
編輯 收藏 今天我給
GacUI添加了一個新Demo。我發現寫Demo也是一個測試的過程,可以用來檢驗類庫提供的API是否夠完整。前面這兩個Demo都促使我往類庫里面加入了新的函數。這次的Demo是用Label控件來模仿超鏈接。下載最新代碼之后,可以在“Libraries\GacUI\GacUIDemo\GacUIDemo.sln”下面找到最新的Demo代碼。
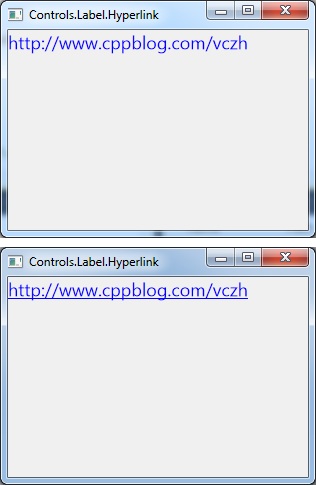
為了模仿超鏈接,我們要做兩件事情。第一件事情就是鼠標懸浮在Label上的時候需要顯示出手的光標圖,第二件事情就是在鼠標進入Label的時候顯示下劃線,離開的時候去掉下劃線。因此我們需要監聽三個事件,分別是MouseEnter,MouseLeave和LeftButtonDown。下面是Demo的圖:
上圖:鼠標在Label外。下圖:鼠標在Label內。單擊Label的時候會打開瀏覽器。
代碼如下:
#include "..\..\Public\Source\GacUIIncludes.h"
#include <Windows.h>
int CALLBACK WinMain(HINSTANCE hInstance, HINSTANCE hPrevInstance, LPSTR lpCmdLine, int CmdShow)
{
return SetupWindowsDirect2DRenderer();
}
class HyperlinkWindow : public GuiWindow
{
private:
GuiLabel* labelHyperlink;
void labelHyperlink_OnMouseEnter(GuiGraphicsComposition* sender, GuiEventArgs& arguments)
{
FontProperties font=labelHyperlink->GetFont();
font.underline=true;
labelHyperlink->SetFont(font);
}
void labelHyperlink_OnMouseLeave(GuiGraphicsComposition* sender, GuiEventArgs& arguments)
{
FontProperties font=labelHyperlink->GetFont();
font.underline=false;
labelHyperlink->SetFont(font);
}
void labelHyperlink_OnLeftButtonDown(GuiGraphicsComposition* sender, GuiMouseEventArgs& arguments)
{
ShellExecute(NULL, L"OPEN", L"http://www.shnenglu.com/vczh", NULL, NULL, SW_SHOWNORMAL);
}
public:
HyperlinkWindow()
:GuiWindow(GetCurrentTheme()->CreateWindowStyle())
{
SetText(L"Controls.Label.Hyperlink");
SetClientSize(Size(300, 200));
MoveToScreenCenter();
labelHyperlink=g::NewLabel();
labelHyperlink->SetText(L"http://www.shnenglu.com/vczh");
labelHyperlink->SetTextColor(Color(0, 0, 255));
{
FontProperties font;
font.fontFamily=L"Segoe UI";
font.size=18;
font.antialias=true;
labelHyperlink->SetFont(font);
}
{
INativeCursor* hand=GetCurrentController()->ResourceService()->GetSystemCursor(INativeCursor::Hand);
labelHyperlink->GetBoundsComposition()->SetAssociatedCursor(hand);
}
labelHyperlink->GetEventReceiver()->mouseEnter.AttachMethod(this, &HyperlinkWindow::labelHyperlink_OnMouseEnter);
labelHyperlink->GetEventReceiver()->mouseLeave.AttachMethod(this, &HyperlinkWindow::labelHyperlink_OnMouseLeave);
labelHyperlink->GetEventReceiver()->leftButtonDown.AttachMethod(this, &HyperlinkWindow::labelHyperlink_OnLeftButtonDown);
AddChild(labelHyperlink);
}
~HyperlinkWindow()
{
}
};
void GuiMain()
{
GuiWindow* window=new HyperlinkWindow();
GetApplication()->Run(window);
delete window;
}
這里展示的主要是監聽事件的方法。在使用control->GetEventReceiver()->event的時候,可以使用Attach、AttachMethod、AttachFunction和AttachLambda。AttachLambda傳入一個functor,在C++11里面可以直接使用lambda表達式。在這里使用AttachMethod給一個事件綁定類成員函數。C++運行類成員函數的時候,不僅需要參數,還需要一個this對象,所以AttachMethod有兩個參數,使用方法在Demo里面已經展現出來了。
在這里還引入了GetCurrentController函數。GetCurrentController返回的INativeController對象抽象了所有需要的操作系統的功能,其中獲得一個光標的對象就封裝在了ResourceService里面。INativeController還包含了很多其他的Service,這個留在以后的Demo展示。
posted @
2012-04-24 02:37 陳梓瀚(vczh) 閱讀(2158) |
評論 (8) |
編輯 收藏
今晚終于把
GacUI所有該加上的XML注釋都加上了,開始做起了Demo。需要做的Demo大概有幾十個,除了每個控件要那么幾個以外,還有一些其他功能,譬如換皮膚換風格啊,使用不同的渲染器啊,移植到Direct3D上什么的,好多啊,即將寫到手軟。今天寫了第一個Demo,是一個helloworld程序。創建一個GacUI程序是一件很容易的事情,首先下載
GacUI的最新代碼(在有了Release之后會有更好的文件組織和html文檔),然后將“Libraries\GacUI\Public\Source”下面的5個文件添加進建好的Visual C++的Windows工程里面,然后開始寫main函數:
#include "..\..\Public\Source\GacUIIncludes.h"
#include <Windows.h>
int CALLBACK WinMain(HINSTANCE hInstance, HINSTANCE hPrevInstance, LPSTR lpCmdLine, int CmdShow)
{
return SetupWindowsDirect2DRenderer();
}
void GuiMain()
{
GuiWindow* window=g::NewWindow();
window->SetText(L"Hello, world!");
window->SetClientSize(Size(640, 480));
window->MoveToScreenCenter();
GuiControl* label=g::NewLabel();
label->SetText(L"Welcome to GacUI Library!");
{
FontProperties font;
font.fontFamily=L"Segoe UI";
font.size=40;
font.antialias=true;
label->SetFont(font);
}
window->AddChild(label);
GetApplication()->Run(window);
delete window;
}
Main函數里面需要選擇渲染器,這里選的是Direct2D。如果要選擇GDI,則調用SetupWindowsGDIRenderer。至于void GuiMain(void)函數則是類庫自己的要求,一定要有那么一個,因為SetupWindowsDirect2DRenderer(或GDI)最終會進行一大段初始化工作之后調用一個聲明了卻沒有實現的void GuiMain(void)函數,所以一個合法的GacUI工程需要包含void GuiMain(void)的實現,也就是上面這樣。
然后接下來的就是普通的工作了,創建一個GuiWindow,加點東西,Run一下當主窗口。當主窗口被關掉的時候Run函數就會結束,這個時候進行一下必要的清理,程序就可以結束了。運行之后就是下面這個樣子:
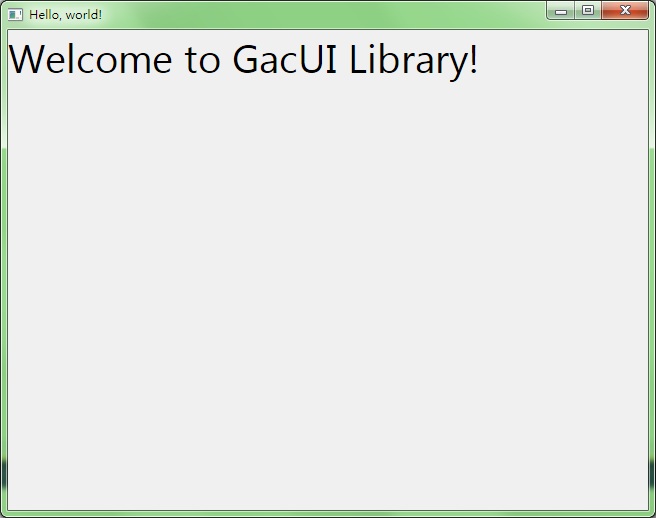
至此HelloWorld的Demo就結束了。
posted @
2012-04-23 07:37 陳梓瀚(vczh) 閱讀(2533) |
評論 (12) |
編輯 收藏