GacUI的高亮Demo做了一半。現在的進度是,可以手寫著色器的狀態轉換函數,但是自動從正則表達式產生著色器的狀態轉換函數部分還沒有集成進GacUI。這篇博客還是照舊,看圖、看Demo代碼,說著色原理。
這次的Demo要做一個可以動態切換著色器的小程序,里面包含INI、XML和C++三種著色器。現在只實現了INI一中,手寫的。另外兩種將要通過正則表達式來做。窗口包含一個表格,來排版label、選著色器用的下拉框和一個大大的文本框。先看圖:
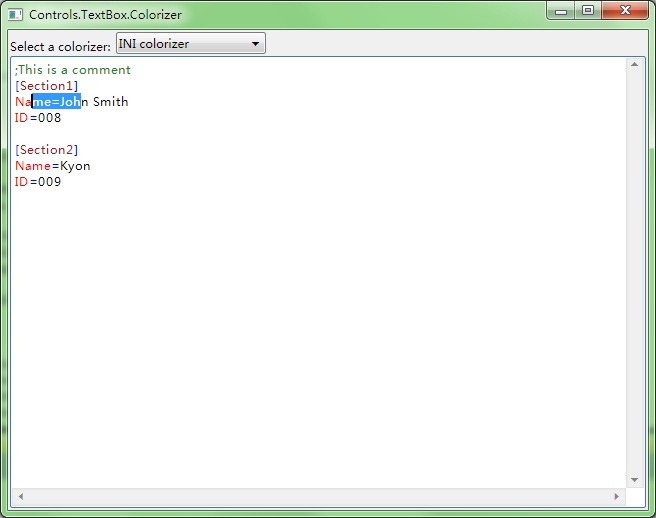
在選擇了INI Colorizer之后,里面的INI內容被識別了出來并正確著色。現在我們來看Demo的代碼怎么寫。首先是窗口自己的代碼:
class TextBoxColorizerWindow : public GuiWindow
{
private:
GuiMultilineTextBox* textBox;
GuiComboBoxListControl* comboSelector;
void comboSelector_SelectedIndexChanged(GuiGraphicsComposition* sender, GuiEventArgs& arguments)
{
switch(comboSelector->GetSelectedIndex())
{
case 0:
textBox->SetColorizer(new IniColorizer);
textBox->SetText(
L";This is a comment\r\n"
L"[Section1]\r\n"
L"Name=John Smith\r\n"
L"ID=008\r\n"
L"\r\n"
L"[Section2]\r\n"
L"Name=Kyon\r\n"
L"ID=009\r\n"
);
break;
default:
textBox->SetColorizer(0);
}
}
public:
TextBoxColorizerWindow()
:GuiWindow(GetCurrentTheme()->CreateWindowStyle())
{
this->SetText(L"Controls.TextBox.Colorizer");
this->GetContainerComposition()->SetMinSizeLimitation(GuiGraphicsComposition::LimitToElementAndChildren);
GuiTableComposition* table=new GuiTableComposition;
table->SetAlignmentToParent(Margin(0, 0, 0, 0));
table->SetCellPadding(2);
table->SetRowsAndColumns(2, 3);
table->SetRowOption(0, GuiCellOption::MinSizeOption());
table->SetRowOption(1, GuiCellOption::PercentageOption(1.0));
table->SetColumnOption(0, GuiCellOption::MinSizeOption());
table->SetColumnOption(1, GuiCellOption::MinSizeOption());
table->SetColumnOption(2, GuiCellOption::PercentageOption(1.0));
this->GetContainerComposition()->AddChild(table);
{
GuiCellComposition* cell=new GuiCellComposition;
table->AddChild(cell);
cell->SetSite(0, 0, 1, 1);
GuiLabel* label=g::NewLabel();
label->SetText(L"Select a colorizer: ");
label->GetBoundsComposition()->SetAlignmentToParent(Margin(0, -1, 0, 0));
cell->AddChild(label->GetBoundsComposition());
}
{
GuiCellComposition* cell=new GuiCellComposition;
table->AddChild(cell);
cell->SetSite(0, 1, 1, 1);
// combo box doesn't have a minimum width, so set it to 150.
cell->SetPreferredMinSize(Size(150, 0));
// create a text list control.
GuiTextList* listContent=g::NewTextList();
// insert text items.
listContent->GetItems().Add(L"INI colorizer");
listContent->GetItems().Add(L"XML colorizer");
listContent->GetItems().Add(L"C++ colorizer");
// use the text list control to create a combo box.
// items in the text list control will be the data source.
// the text list control will be displayed in the combo box dropdown.
comboSelector=g::NewComboBox(listContent);
comboSelector->GetBoundsComposition()->SetAlignmentToParent(Margin(0, 0, 0, 0));
comboSelector->SelectedIndexChanged.AttachMethod(this, &TextBoxColorizerWindow::comboSelector_SelectedIndexChanged);
cell->AddChild(comboSelector->GetBoundsComposition());
}
{
GuiCellComposition* cell=new GuiCellComposition;
table->AddChild(cell);
cell->SetSite(1, 0, 1, 3);
textBox=g::NewMultilineTextBox();
textBox->GetBoundsComposition()->SetAlignmentToParent(Margin(0, 0, 0, 0));
cell->AddChild(textBox->GetBoundsComposition());
}
comboSelector->SetSelectedIndex(0);
// set the preferred minimum client size
this->GetBoundsComposition()->SetPreferredMinSize(Size(640, 480));
// call this to calculate the size immediately if any indirect content in the table changes
// so that the window can calcaulte its correct size before calling the MoveToScreenCenter()
this->ForceCalculateSizeImmediately();
// move to the screen center
this->MoveToScreenCenter();
}
~TextBoxColorizerWindow()
{
}
};
void GuiMain()
{
GuiWindow* window=new TextBoxColorizerWindow();
GetApplication()->Run(window);
delete window;
}
對于這段代碼現在已經不需要多加解釋了。首先創造了一個table,然后第一行放label和combobox,第二行撐開了放textbox。關鍵就在與combobox的SelectedIndexChanged事件。一開始是-1,在這個函數的最后我把它改成了0,這樣就出發了事件,安裝了IniColorizer著色器。然后我們來看IniColorizer的代碼:
class IniColorizer : public GuiTextBoxColorizerBase
{
typedef collections::Array<text::ColorEntry> ColorArray;
private:
static const int NORMAL_COLOR=0;
static const int SECTION_COLOR=1;
static const int ATTRIBUTE_COLOR=2;
static const int OPERATOR_COLOR=3;
static const int COMMENT_COLOR=4;
ColorArray colors;
public:
IniColorizer()
{
text::ColorEntry entry=win7::Win7GetTextBoxTextColor();
colors.Resize(5);
// text color
colors[NORMAL_COLOR]=entry;
// section color
entry.normal.text=Color(163, 21, 21);
colors[SECTION_COLOR]=entry;
// attribute color
entry.normal.text=Color(255, 0, 0);
colors[ATTRIBUTE_COLOR]=entry;
// operator color
entry.normal.text=Color(0, 0, 255);
colors[OPERATOR_COLOR]=entry;
// operator color
entry.normal.text=Color(24, 128, 24);
colors[COMMENT_COLOR]=entry;
}
int GetStartState()
{
return 0;
}
int ColorizeLine(const wchar_t* text, unsigned __int32* colors, int length, int startState)
{
if(length>0)
{
if(text[0]==L';')
{
for(int i=0;i<length;i++)
{
colors[i]=COMMENT_COLOR;
}
}
else if(text[0]==L'[')
{
for(int i=0;i<length;i++)
{
colors[i]=(text[i]==L'[' || text[i]==L']')?OPERATOR_COLOR:SECTION_COLOR;
}
}
else
{
bool afterAssign=false;
for(int i=0;i<length;i++)
{
if(text[i]==L'=' && !afterAssign)
{
afterAssign=true;
colors[i]=OPERATOR_COLOR;
}
else
{
colors[i]=afterAssign?NORMAL_COLOR:ATTRIBUTE_COLOR;
}
}
}
}
return 0;
}
const ColorArray& GetColors()
{
return colors;
}
};
著色器的規格是這樣的。首先有一個起始狀態。其次對每一行進行著色的時候,文本框會把文本的內容和上一行的中介狀態傳給著色器。因為第一行并沒有“上一行”,所以第一行的起始狀態就是需要著色器自己給出的。第三個是指定所有支持的顏色。在這里ColorizeLine函數是異步的,也就是說不會在GUI線程里面運行。這樣哪怕是著色器寫得很慢,用戶看起來也就是一行一行的顏色依次出現,對于編輯文字則毫無影響。不過上面這個著色器因為相當簡單,所以他的速度其實是非常快的。我測試了一下,貼了10M的代碼進去(這個過程會很慢,因為每一行都new了兩個buffer,下個星期我會修掉他。不過一旦貼進去了,以后編輯相當流暢,這這個速度跟文本框有多少行字符是獨立的。),大概有30多萬行。在所有的文字最終都被貼進去之后,著色器會開始異步執行。黏貼之后光標直接跳到了最后,然后顏色也立刻就出來了。10M的代碼著色花的時間相當的短。
每一次文字修改之后,著色器會從修改的那一行開始著色。如果那一行以前還沒有被著色過,則會從上一次的最后一行開始著色。這樣總是可以一邊打字,著色器一邊額外運算。在著色器開始運算的時候,會把當前著色的行復制一份,然后異步算好顏色。這個時候就開始對文本框進行加鎖,看看著色的這一行和上面的所有行是不是沒有被修改過(修改的時候記錄一個最小行號就可以了),如果有則丟掉結果從上一次修改的第一行開始著色,否則就把顏色復制進文本框。這個過程的代碼基本上如下所示:
(下面這段代碼屬于GacUI,使用GacUI開發著色器的時候,只要直接從GuiTextBoxColorizerBase繼承即可)
void GuiTextBoxColorizerBase::ColorizerThreadProc(void* argument)
{
GuiTextBoxColorizerBase* colorizer=(GuiTextBoxColorizerBase*)argument;
while(!colorizer->isFinalizing)
{
int lineIndex=-1;
wchar_t* text=0;
unsigned __int32* colors=0;
int length=0;
int startState=-1;
{
SpinLock::Scope scope(*colorizer->elementModifyLock);
if(colorizer->colorizedLineCount>=colorizer->element->GetLines().GetCount())
{
colorizer->isColorizerRunning=false;
break;
}
lineIndex=colorizer->colorizedLineCount++;
TextLine& line=colorizer->element->GetLines().GetLine(lineIndex);
length=line.dataLength;
text=new wchar_t[length];
colors=new unsigned __int32[length];
memcpy(text, line.text, sizeof(wchar_t)*length);
startState=lineIndex==0?colorizer->GetStartState():colorizer->element->GetLines().GetLine(lineIndex-1).lexerFinalState;
}
int finalState=colorizer->ColorizeLine(text, colors, length, startState);
{
SpinLock::Scope scope(*colorizer->elementModifyLock);
if(lineIndex<colorizer->colorizedLineCount)
{
TextLine& line=colorizer->element->GetLines().GetLine(lineIndex);
line.lexerFinalState=finalState;
for(int i=0;i<length;i++)
{
line.att[i].colorIndex=colors[i];
}
}
delete[] text;
delete[] colors;
}
}
colorizer->colorizerRunningEvent.Leave();
}
void GuiTextBoxColorizerBase::StartColorizer()
{
if(!isColorizerRunning)
{
isColorizerRunning=true;
colorizerRunningEvent.Enter();
ThreadPoolLite::Queue(&GuiTextBoxColorizerBase::ColorizerThreadProc, this);
}
}
void GuiTextBoxColorizerBase::StopColorizer()
{
isFinalizing=true;
colorizerRunningEvent.Enter();
colorizerRunningEvent.Leave();
colorizedLineCount=0;
isFinalizing=false;
}
GuiTextBoxColorizerBase::GuiTextBoxColorizerBase()
:element(0)
,elementModifyLock(0)
,colorizedLineCount(0)
,isColorizerRunning(false)
,isFinalizing(false)
{
}
GuiTextBoxColorizerBase::~GuiTextBoxColorizerBase()
{
StopColorizer();
}
void GuiTextBoxColorizerBase::Attach(elements::GuiColorizedTextElement* _element, SpinLock& _elementModifyLock)
{
if(_element)
{
SpinLock::Scope scope(_elementModifyLock);
element=_element;
elementModifyLock=&_elementModifyLock;
StartColorizer();
}
}
void GuiTextBoxColorizerBase::Detach()
{
if(element && elementModifyLock)
{
StopColorizer();
SpinLock::Scope scope(*elementModifyLock);
element=0;
elementModifyLock=0;
}
}
void GuiTextBoxColorizerBase::TextEditNotify(TextPos originalStart, TextPos originalEnd, const WString& originalText, TextPos inputStart, TextPos inputEnd, const WString& inputText)
{
if(element && elementModifyLock)
{
SpinLock::Scope scope(*elementModifyLock);
int line=originalStart.row<originalEnd.row?originalStart.row:originalEnd.row;
if(colorizedLineCount>line)
{
colorizedLineCount=line;
}
StartColorizer();
}
}
由于每一次加鎖做的事情都是檢查幾個int,復制幾個buffer,花的時間相當的短,所以這里都用spinlock來做。由于spinlock的內在性質,就算按鍵盤每一次都wait了一次spinlock,其性能損失也是不可察覺的。因此整個編輯過程顯得相當的流暢。
接下來我要繼續補充這個Demo,寫一下如何通過正則表達式綁定顏色,用GacUI輕松制造上下文無關文本框著色效果。