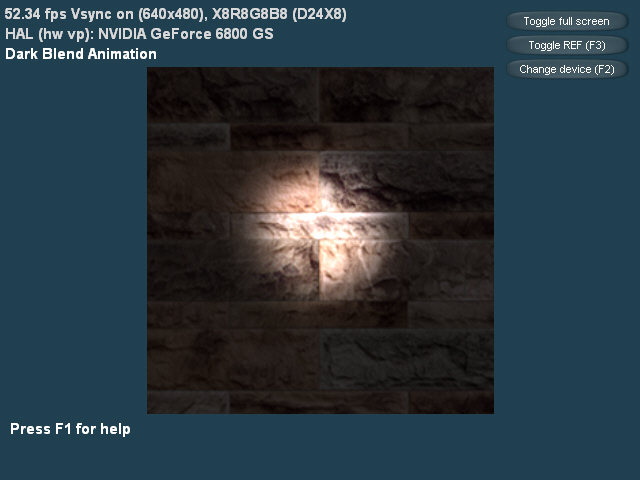
黑暗貼圖動畫
可以通過黑暗貼圖三種調制操作的切換來創建一個動畫示例���,代碼如下所示:
pd3dDevice->SetTexture(0, g_base_texture);
pd3dDevice->SetTextureStageState(0, D3DTSS_TEXCOORDINDEX,	0);
pd3dDevice->SetTextureStageState(0, D3DTSS_COLORARG1,		D3DTA_TEXTURE);
pd3dDevice->SetTextureStageState(0, D3DTSS_COLOROP,		D3DTOP_SELECTARG1);
pd3dDevice->SetTexture(1, g_dark_texture);
pd3dDevice->SetTextureStageState(1, D3DTSS_TEXCOORDINDEX,	0);
pd3dDevice->SetTextureStageState(1, D3DTSS_COLORARG1,		D3DTA_TEXTURE);
pd3dDevice->SetTextureStageState(1, D3DTSS_COLORARG2,		D3DTA_CURRENT);
static double last_time = 0.0f;
double interval = fTime - last_time;
if(interval < 0.5f)
	pd3dDevice->SetTextureStageState(1, D3DTSS_COLOROP, D3DTOP_MODULATE);
else if(interval > 0.5f && interval < 1.0f)
	pd3dDevice->SetTextureStageState(1, D3DTSS_COLOROP, D3DTOP_MODULATE2X);
else if(interval > 1.0f && interval < 1.5f)
	pd3dDevice->SetTextureStageState(1, D3DTSS_COLOROP, D3DTOP_MODULATE4X);
else if(interval > 1.5f)
	last_time = fTime;
效果如下:
混合紋理與頂點漫反射顏色
當很強的陽光照射在物體表面上時,會使它表面的顏色變得更加明亮�����,這可以通過將紋理與頂點的漫反射顏色相混合來模擬這種效果���。當一個白色材質反射一個方向光時���,反射量越多���,就意味著紋理顏色在最終顯示結果中所占的成分越少��。因此���,那些被光直接照射到表面會呈現出白色��。示例代碼如下:
// setup light
ZeroMemory(&g_light, sizeof(D3DLIGHT9));
g_light.Type = D3DLIGHT_DIRECTIONAL;
g_light.Diffuse.r = 0.5f;
g_light.Diffuse.g = 0.5f;
g_light.Diffuse.b = 0.5f;
D3DXVECTOR3 light_dir(0, 0, 10);
D3DXVec3Normalize((D3DXVECTOR3*) &g_light.Direction, &light_dir);
// setup material
ZeroMemory(&g_material, sizeof(D3DMATERIAL9));
g_material.Ambient.r = 1.0f;
g_material.Ambient.g = 1.0f;
g_material.Ambient.b = 1.0f;
g_material.Ambient.a = 1.0f;
g_material.Diffuse.r = 0.7f;
g_material.Diffuse.g = 0.7f;
g_material.Diffuse.b = 0.7f;
g_material.Diffuse.a = 0.5f;
pd3dDevice->SetRenderState(D3DRS_LIGHTING, TRUE);
pd3dDevice->SetRenderState(D3DRS_AMBIENT, 0x00808080);
pd3dDevice->SetLight(0, &g_light);
pd3dDevice->LightEnable(0, TRUE);
pd3dDevice->SetMaterial(&g_material);
pd3dDevice->SetTexture(0, g_base_texture);
pd3dDevice->SetTextureStageState(0, D3DTSS_TEXCOORDINDEX, 0);
pd3dDevice->SetTextureStageState(0, D3DTSS_COLORARG1, D3DTA_TEXTURE);
pd3dDevice->SetTextureStageState(0, D3DTSS_COLORARG2, D3DTA_DIFFUSE);
pd3dDevice->SetTextureStageState(0, D3DTSS_COLOROP, D3DTOP_ADD);
pd3dDevice->SetTextureStageState(1, D3DTSS_COLOROP, D3DTOP_DISABLE);
運行效果:
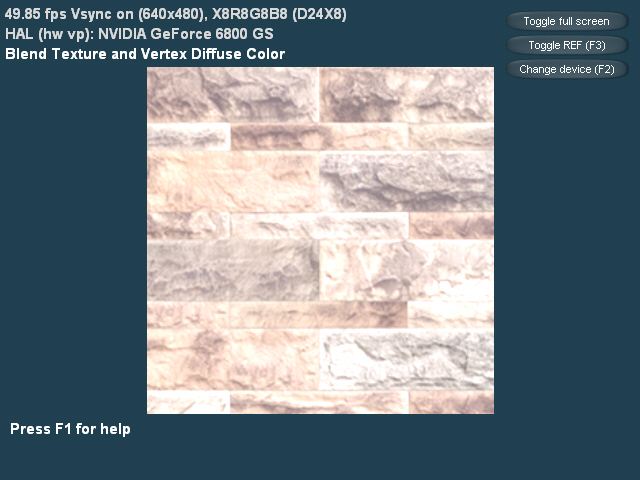
這個效果只需一次渲染,因此這里沒有多重紋理的代碼�����,對這段代碼的簡單描述就是"基礎貼圖 + 漫反射插值"��。
在固定函數流水線中有三種獲取漫反射顏色的途徑(在可編程流水線中則有更多的途徑):材質、漫反射頂點顏色���、鏡面反射頂點顏色。從何處獲取漫反射顏色取決于渲染狀態D3DRS_DIFFUSEMATERIALSOURCE的設定�����。例如��,如果調用:
pd3dDevice->SetRenderState(D3DRS_DIFFUSEMATERIALSOURCE, D3DMCS_MATERIAL);
- D3DRS_DIFFUSEMATERIALSOURCE
- Diffuse color source for lighting calculations.
Valid values are members of the D3DMATERIALCOLORSOURCE enumerated type. The
default value is D3DMCS_COLOR1. The value for this render state is used only
if the D3DRS_COLORVERTEX render state is set to TRUE.
D3DMATERIALCOLORSOURCE
Defines the location at which a color or color
component must be accessed for lighting calculations.
typedef enum D3DMATERIALCOLORSOURCE
{
    D3DMCS_MATERIAL = 0,
    D3DMCS_COLOR1 = 1,
    D3DMCS_COLOR2 = 2,
    D3DMCS_FORCE_DWORD = 0x7fffffff,
} D3DMATERIALCOLORSOURCE, *LPD3DMATERIALCOLORSOURCE;
Constants
- D3DMCS_MATERIAL
- Use the color from the current material.
- D3DMCS_COLOR1
- Use the diffuse vertex color.
- D3DMCS_COLOR2
- Use the specular vertex color.
- D3DMCS_FORCE_DWORD
- Forces this enumeration to compile to 32 bits in
size. Without this value, some compilers would allow this enumeration to
compile to a size other than 32 bits. This value is not used.
Remarks
These flags are used to set the value of the following
render states in the D3DRENDERSTATETYPE enumerated type.
- D3DRS_AMBIENTMATERIALSOURCE
- D3DRS_DIFFUSEMATERIALSOURCE
- D3DRS_EMISSIVEMATERIALSOURCE
- D3DRS_SPECULARMATERIALSOURCE
混合黑暗貼圖與頂點漫反射顏色
試想���,當你站在一間伸手不見五指的房間內��,無法看清周圍的任何顏色。于是你打開燈光,突然之間物體的顏色便呈現了出來�����,就好像是被火焰點燃了一樣�����。對于這種效果��,可以通過黑暗貼圖和頂點漫反射顏色的混合來模擬。
先將一張紋理與一個頂點的漫反射顏色相混合,再將這個結果與黑暗貼圖相混合:
pd3dDevice->SetRenderState(D3DRS_LIGHTING, TRUE);
pd3dDevice->SetRenderState(D3DRS_AMBIENT, 0x0080FFFF);
pd3dDevice->SetLight(0, &g_light);
pd3dDevice->LightEnable(0, TRUE);
pd3dDevice->SetMaterial(&g_material);
pd3dDevice->SetTexture(0, g_base_texture);
pd3dDevice->SetTextureStageState(0, D3DTSS_TEXCOORDINDEX, 0);
pd3dDevice->SetTextureStageState(0, D3DTSS_COLORARG1, D3DTA_TEXTURE);
pd3dDevice->SetTextureStageState(0, D3DTSS_COLORARG2, D3DTA_DIFFUSE);
pd3dDevice->SetTextureStageState(0, D3DTSS_COLOROP, D3DTOP_MODULATE);
pd3dDevice->SetTexture(1, g_dark_texture);
pd3dDevice->SetTextureStageState(1, D3DTSS_TEXCOORDINDEX, 0);
pd3dDevice->SetTextureStageState(1, D3DTSS_COLORARG1, D3DTA_TEXTURE);
pd3dDevice->SetTextureStageState(1, D3DTSS_COLORARG2, D3DTA_CURRENT);
pd3dDevice->SetTextureStageState(1, D3DTSS_COLOROP, D3DTOP_MODULATE);
運行效果:
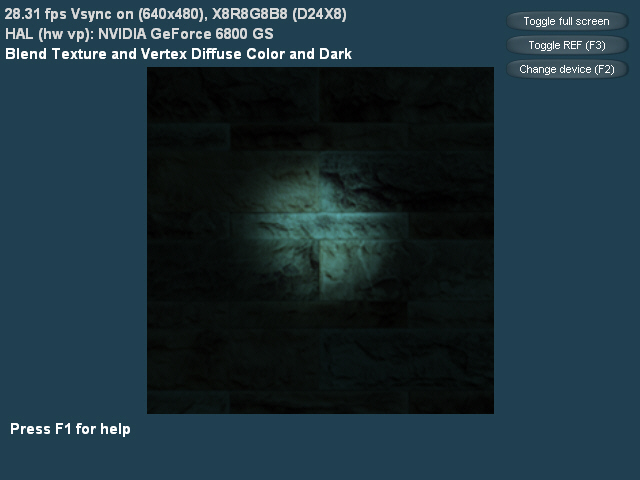
如果沒有光照���,則紋理顏色會乘以0,因此就看不到墻壁紋理了,在這種情況下將只能看到第二張紋理�����。如果第一張紋理是不可見的���,則第一階段的顏色值0與第二階段的顏色相乘的結果仍將為0(黑色)���。當沒有光照在物體的某個表面上時���,該面的第一張紋理顏色會減弱為黑色���。當你身處一個真正漆黑的地方時�����,由于光照微弱,你是無法看到周圍物體的顏色的�����,因此上面這段代碼對于模擬這種情況非常有效��。
這個過程可以描述為"(基礎貼圖 x 頂點的漫反射顏色)
x 黑暗貼圖"