紋理映射在三維圖形程序設計中具有非常重要的作用,三維場景中的許多特殊效果都是通過紋理映射來實現的。例如通過紋理映射模擬復雜的光照效果,物體表面對周圍環境的反射效果等。
多層紋理映射
Direct3D最多支持8層紋理,也就是說,在一個三維物體的表面可以同時擁有1~8張不同的紋理貼圖。Direct3D能夠在一個渲染過程中把這些紋理顏色依次混合,渲染到同一個物體的表面。每一個紋理層對應0~7的索引序號,多層紋理映射能夠模擬更為真實的三維世界。例如,要顯示具有周圍景物倒影的光滑大理石地板,可以把大理石地板貼圖設置為紋理層0,把具有周圍景物倒影的貼圖設置為紋理層1,然后通過設置Direct3D多層紋理混合操作,把紋理層0和紋理層1相混合,這時繪制出的三維物體就同時具有大理石地板和景物倒影的紋理顏色。利用Direct3D多達8層的紋理混合,可以在圖形顯示系統中顯示豐富多彩的圖像。Direct3D多層紋理混合過程如下圖所示:
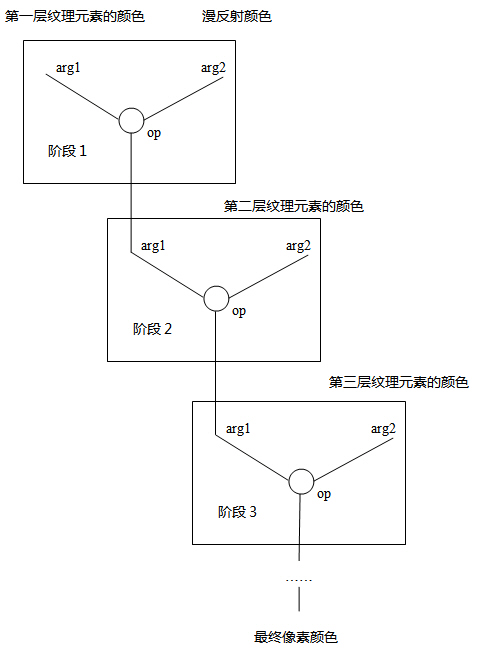
從上圖可以看出8層紋理是逐層混合然后輸出的,也就是說,最對需要8個階段完成紋理映射,而且每一階段都是獨立進行的,針對每一階段都需要設置相應的顏色和alpha混合方法。所以一個紋理層就相當于一個紋理階段,多層紋理映射有時也稱為多階段紋理混合。其中,是否應用紋理層0~7,即是否進行0~7紋理階段的操作,可由應用程序指定,但它們的選擇必須是順序的。也就是說,在沒有使用第n層的情況下,第n+1層不能使用。
默認情況下,第一個紋理階段操作(階段0)的默認操作是D3DTOP_MODULATE,其他紋理操作階段的默認操作是D3DTOP_DISABLE。即默認情況下Direct3D使用單層紋理映射繪制圖形,除紋理層0外,紋理層1~7都是禁用的。
在使用多層紋理映射之前,應先查詢當前設備是否支持紋理混合,以及最多能支持幾層紋理混合:
// check whether device support
multi textures render
if(pCaps->MaxTextureBlendStages <= 1)
return false;
- MaxTextureBlendStages
- Maximum number of texture-blending stages
supported in the fixed function pipeline. This value is the number of
blenders available. In the programmable pixel pipeline, this corresponds to
the number of unique texture registers used by pixel shader instructions.
為了將多層紋理映射到物體表面,需要為每層紋理指定使用的紋理坐標,各層紋理可以使用相同的紋理坐標,也可以使用不同的紋理坐標。紋理坐標包含在頂點數據中,如果需要使用不同的紋理坐標,那么在頂點數據中就需要包括多組紋理坐標,然后通過索引為每層紋理指定使用哪組紋理坐標:
pd3dDevice->SetTextureStageState(0,
D3DTSS_TEXCOORDINDEX, 0);
pd3dDevice->SetTextureStageState(1, D3DTSS_TEXCOORDINDEX, 1);
- D3DTSS_TEXCOORDINDEX
- Index of the texture coordinate set to use with
this texture stage. You can specify up to eight sets of texture coordinates
per vertex. If a vertex does not include a set of texture coordinates at the
specified index, the system defaults to the u and v coordinates (0,0).
When rendering using vertex shaders, each stage's
texture coordinate index must be set to its default value. The default index
for each stage is equal to the stage index. Set this state to the zero-based
index of the coordinate set for each vertex that this texture stage uses.
Additionally, applications can include, as logical
OR with the index being set, one of the constants to request that Direct3D
automatically generate the input texture coordinates for a texture
transformation. For a list of all the constants, see D3DTSS_TCI.
With the exception of D3DTSS_TCI_PASSTHRU, which
resolves to zero, if any of the following values is included with the index
being set, the system uses the index strictly to determine texture wrapping
mode. These flags are most useful when performing environment mapping.
這里指定了兩組紋理坐標:
struct sCustomVertex
{
	float x, y, z;
	DWORD color;
	float u0, v0;
	float u1, v1;
};
#define D3DFVF_CUSTOM_VERTEX (D3DFVF_XYZ | D3DFVF_DIFFUSE | D3DFVF_TEX2)
sCustomVertex vertices[] =
{
    { -3.0f, -3.0f,  0.0f,  0xffffffff, 0.0f, 1.0f, 0.0f, 1.0f},
    { -3.0f,  3.0f,  0.0f,  0xffffffff, 0.0f, 0.0f, 0.0f, 0.0f},
    {  3.0f, -3.0f,  0.0f,  0xffffffff, 1.0f, 1.0f, 1.0f, 1.0f},
    {  3.0f,  3.0f,  0.0f,  0xffffffff, 1.0f, 0.0f, 1.0f, 0.0f}
};
這里指定的兩組紋理坐標值完全相同,你可以改變其中任何一組坐標,使兩層紋理使用不同的紋理坐標。
設置紋理層混合方法的代碼如下:
// set color blend operation and
texture coordinate index for texture stage 0
pd3dDevice->SetTexture(0, g_texture_0);
pd3dDevice->SetTextureStageState(0, D3DTSS_COLOROP, D3DTOP_MODULATE);
pd3dDevice->SetTextureStageState(0, D3DTSS_COLORARG1, D3DTA_TEXTURE);
pd3dDevice->SetTextureStageState(0, D3DTSS_COLORARG2, D3DTA_DIFFUSE);
pd3dDevice->SetTextureStageState(0, D3DTSS_ALPHAOP, D3DTOP_DISABLE);
pd3dDevice->SetTextureStageState(0, D3DTSS_TEXCOORDINDEX, 0);
pd3dDevice->SetSamplerState(0, D3DSAMP_MAGFILTER, D3DTEXF_LINEAR);
pd3dDevice->SetSamplerState(0, D3DSAMP_MINFILTER, D3DTEXF_LINEAR);
// set color blend operation and texture coordinate index for texture stage 1
pd3dDevice->SetTexture(1, g_texture_1);
pd3dDevice->SetTextureStageState(1, D3DTSS_COLOROP, D3DTOP_ADD);
pd3dDevice->SetTextureStageState(1, D3DTSS_COLORARG1, D3DTA_TEXTURE);
pd3dDevice->SetTextureStageState(1, D3DTSS_COLORARG2, D3DTA_CURRENT);
pd3dDevice->SetTextureStageState(1, D3DTSS_ALPHAOP, D3DTOP_DISABLE);
pd3dDevice->SetTextureStageState(1, D3DTSS_TEXCOORDINDEX, 1);
pd3dDevice->SetSamplerState(1, D3DSAMP_MAGFILTER, D3DTEXF_LINEAR);
pd3dDevice->SetSamplerState(1, D3DSAMP_MINFILTER, D3DTEXF_LINEAR);
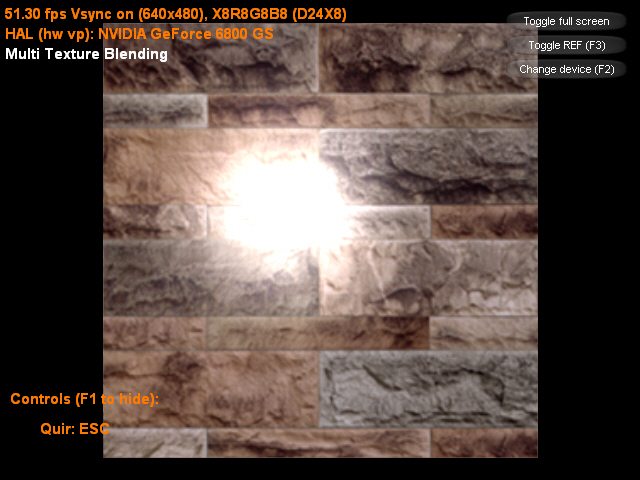
這里先將物體的漫反射顏色和紋理層0的紋理顏色相乘,得到的結果再與紋理層1的紋理顏色相加后輸出。
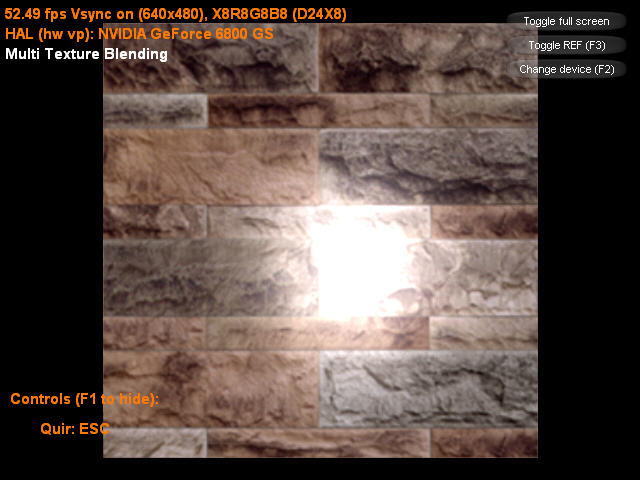
該示例將物體紋理和光照紋理相混合后輸出:
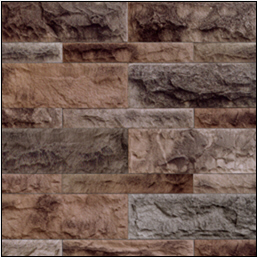
物體紋理
|
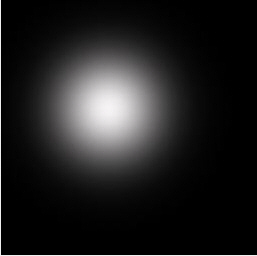
光照紋理
|
運行效果圖如下:
我們可以修改頂點的紋理坐標為:
sCustomVertex vertices[] =
{
    { -3.0f, -3.0f,  0.0f,  0xffffffff, 0.0f, 1.0f, 1.0f, 0.0f},
    { -3.0f,  3.0f,  0.0f,  0xffffffff, 0.0f, 0.0f, 1.0f, 1.0f},
    {  3.0f, -3.0f,  0.0f,  0xffffffff, 1.0f, 1.0f, 0.0f, 0.0f},
    {  3.0f,  3.0f,  0.0f,  0xffffffff, 1.0f, 0.0f, 0.0f, 1.0f}
};
這時的運行效果圖如下:
主程序:
#include "dxstdafx.h"
#include "resource.h"
#pragma warning(disable : 4127)
#define IDC_TOGGLE_FULLSCREEN 1
#define IDC_TOGGLE_REF 2
#define IDC_CHANGE_DEVICE 3
#define release_com(p) do { if(p) { (p)->Release(); (p) = NULL; } } while(0)
struct sCustomVertex
{
float x, y, z;
DWORD color;
float u0, v0;
float u1, v1;
};
#define D3DFVF_CUSTOM_VERTEX (D3DFVF_XYZ | D3DFVF_DIFFUSE | D3DFVF_TEX2)
ID3DXFont* g_font;
ID3DXSprite* g_text_sprite;
bool g_show_help = true;
CDXUTDialogResourceManager g_dlg_resource_manager;
CD3DSettingsDlg g_settings_dlg;
CDXUTDialog g_button_dlg;
IDirect3DVertexBuffer9* g_vertex_buffer;
IDirect3DTexture9* g_texture_0;
IDirect3DTexture9* g_texture_1;
//--------------------------------------------------------------------------------------
// Rejects any devices that aren't acceptable by returning false
//--------------------------------------------------------------------------------------
bool CALLBACK IsDeviceAcceptable( D3DCAPS9* pCaps, D3DFORMAT AdapterFormat,
D3DFORMAT BackBufferFormat, bool bWindowed, void* pUserContext )
{
// Typically want to skip backbuffer formats that don't support alpha blending
IDirect3D9* pD3D = DXUTGetD3DObject();
if( FAILED( pD3D->CheckDeviceFormat( pCaps->AdapterOrdinal, pCaps->DeviceType, AdapterFormat,
D3DUSAGE_QUERY_POSTPIXELSHADER_BLENDING, D3DRTYPE_TEXTURE, BackBufferFormat ) ) )
return false;
// check whether device support multi textures render
if(pCaps->MaxTextureBlendStages <= 1)
return false;
return true;
}
//--------------------------------------------------------------------------------------
// Before a device is created, modify the device settings as needed.
//--------------------------------------------------------------------------------------
bool CALLBACK ModifyDeviceSettings( DXUTDeviceSettings* pDeviceSettings, const D3DCAPS9* pCaps, void* pUserContext )
{
// If video card does not support hardware vertex processing, then uses sofaware vertex processing.
if((pCaps->DevCaps & D3DDEVCAPS_HWTRANSFORMANDLIGHT) == 0)
pDeviceSettings->BehaviorFlags = D3DCREATE_SOFTWARE_VERTEXPROCESSING;
static bool is_first_time = true;
if(is_first_time)
{
is_first_time = false;
// if using reference device, then pop a warning message box.
if(pDeviceSettings->DeviceType == D3DDEVTYPE_REF)
DXUTDisplaySwitchingToREFWarning();
}
return true;
}
//--------------------------------------------------------------------------------------
// Create any D3DPOOL_MANAGED resources here
//--------------------------------------------------------------------------------------
HRESULT CALLBACK OnCreateDevice( IDirect3DDevice9* pd3dDevice,
const D3DSURFACE_DESC* pBackBufferSurfaceDesc,
void* pUserContext )
{
HRESULT hr;
V_RETURN(g_dlg_resource_manager.OnCreateDevice(pd3dDevice));
V_RETURN(g_settings_dlg.OnCreateDevice(pd3dDevice));
D3DXCreateFont(pd3dDevice, 18, 0, FW_BOLD, 1, FALSE, DEFAULT_CHARSET, OUT_DEFAULT_PRECIS, DEFAULT_QUALITY,
DEFAULT_PITCH | FF_DONTCARE, L"Arial", &g_font);
V_RETURN(D3DXCreateTextureFromFile(pd3dDevice, L"Wall.bmp", &g_texture_0));
V_RETURN(D3DXCreateTextureFromFile(pd3dDevice, L"light.jpg", &g_texture_1));
// create vertex buffer and fill data
sCustomVertex vertices[] =
{
{ -3.0f, -3.0f, 0.0f, 0xffffffff, 0.0f, 1.0f, 0.0f, 1.0f},
{ -3.0f, 3.0f, 0.0f, 0xffffffff, 0.0f, 0.0f, 0.0f, 0.0f},
{ 3.0f, -3.0f, 0.0f, 0xffffffff, 1.0f, 1.0f, 1.0f, 1.0f},
{ 3.0f, 3.0f, 0.0f, 0xffffffff, 1.0f, 0.0f, 1.0f, 0.0f}
/*
{ -3.0f, -3.0f, 0.0f, 0xffffffff, 0.0f, 1.0f, 1.0f, 0.0f},
{ -3.0f, 3.0f, 0.0f, 0xffffffff, 0.0f, 0.0f, 1.0f, 1.0f},
{ 3.0f, -3.0f, 0.0f, 0xffffffff, 1.0f, 1.0f, 0.0f, 0.0f},
{ 3.0f, 3.0f, 0.0f, 0xffffffff, 1.0f, 0.0f, 0.0f, 1.0f}
*/
};
pd3dDevice->CreateVertexBuffer(sizeof(vertices), 0, D3DFVF_CUSTOM_VERTEX, D3DPOOL_MANAGED, &g_vertex_buffer, NULL);
void* ptr;
g_vertex_buffer->Lock(0, sizeof(vertices), (void**)&ptr, 0);
memcpy(ptr, vertices, sizeof(vertices));
g_vertex_buffer->Unlock();
return S_OK;
}
//--------------------------------------------------------------------------------------
// Create any D3DPOOL_DEFAULT resources here
//--------------------------------------------------------------------------------------
HRESULT CALLBACK OnResetDevice( IDirect3DDevice9* pd3dDevice,
const D3DSURFACE_DESC* pBackBufferSurfaceDesc,
void* pUserContext )
{
HRESULT hr;
V_RETURN(g_dlg_resource_manager.OnResetDevice());
V_RETURN(g_settings_dlg.OnResetDevice());
V_RETURN(g_font->OnResetDevice());
V_RETURN(D3DXCreateSprite(pd3dDevice, &g_text_sprite));
// set dialog position and size
g_button_dlg.SetLocation(pBackBufferSurfaceDesc->Width - 170, 0);
g_button_dlg.SetSize(170, 170);
// setup view matrix
D3DXMATRIX mat_view;
D3DXVECTOR3 eye(0.0f, 0.0f, -8.0f);
D3DXVECTOR3 at(0.0f, 0.0f, 0.0f);
D3DXVECTOR3 up(0.0f, 1.0f, 0.0f);
D3DXMatrixLookAtLH(&mat_view, &eye, &at, &up);
pd3dDevice->SetTransform(D3DTS_VIEW, &mat_view);
// set projection matrix
D3DXMATRIX mat_proj;
float aspect = (float)pBackBufferSurfaceDesc->Width / pBackBufferSurfaceDesc->Height;
D3DXMatrixPerspectiveFovLH(&mat_proj, D3DX_PI/4, aspect, 1.0f, 100.0f);
pd3dDevice->SetTransform(D3DTS_PROJECTION, &mat_proj);
// set color blend operation and texture coordinate index for texture stage 0
pd3dDevice->SetTexture(0, g_texture_0);
pd3dDevice->SetTextureStageState(0, D3DTSS_COLOROP, D3DTOP_MODULATE);
pd3dDevice->SetTextureStageState(0, D3DTSS_COLORARG1, D3DTA_TEXTURE);
pd3dDevice->SetTextureStageState(0, D3DTSS_COLORARG2, D3DTA_DIFFUSE);
pd3dDevice->SetTextureStageState(0, D3DTSS_ALPHAOP, D3DTOP_DISABLE);
pd3dDevice->SetTextureStageState(0, D3DTSS_TEXCOORDINDEX, 0);
pd3dDevice->SetSamplerState(0, D3DSAMP_MAGFILTER, D3DTEXF_LINEAR);
pd3dDevice->SetSamplerState(0, D3DSAMP_MINFILTER, D3DTEXF_LINEAR);
// set color blend operation and texture coordinate index for texture stage 1
pd3dDevice->SetTexture(1, g_texture_1);
pd3dDevice->SetTextureStageState(1, D3DTSS_COLOROP, D3DTOP_ADD);
pd3dDevice->SetTextureStageState(1, D3DTSS_COLORARG1, D3DTA_TEXTURE);
pd3dDevice->SetTextureStageState(1, D3DTSS_COLORARG2, D3DTA_CURRENT);
pd3dDevice->SetTextureStageState(1, D3DTSS_ALPHAOP, D3DTOP_DISABLE);
pd3dDevice->SetTextureStageState(1, D3DTSS_TEXCOORDINDEX, 1);
pd3dDevice->SetSamplerState(1, D3DSAMP_MAGFILTER, D3DTEXF_LINEAR);
pd3dDevice->SetSamplerState(1, D3DSAMP_MINFILTER, D3DTEXF_LINEAR);
pd3dDevice->SetRenderState(D3DRS_LIGHTING, FALSE);
return S_OK;
}
//--------------------------------------------------------------------------------------
// Release resources created in the OnResetDevice callback here
//--------------------------------------------------------------------------------------
void CALLBACK OnLostDevice( void* pUserContext )
{
g_dlg_resource_manager.OnLostDevice();
g_settings_dlg.OnLostDevice();
g_font->OnLostDevice();
release_com(g_text_sprite);
}
//--------------------------------------------------------------------------------------
// Release resources created in the OnCreateDevice callback here
//--------------------------------------------------------------------------------------
void CALLBACK OnDestroyDevice( void* pUserContext )
{
g_dlg_resource_manager.OnDestroyDevice();
g_settings_dlg.OnDestroyDevice();
release_com(g_font);
release_com(g_vertex_buffer);
release_com(g_texture_0);
release_com(g_texture_1);
}
//--------------------------------------------------------------------------------------
// Handle updates to the scene
//--------------------------------------------------------------------------------------
void CALLBACK OnFrameMove( IDirect3DDevice9* pd3dDevice, double fTime, float fElapsedTime, void* pUserContext )
{
}
//--------------------------------------------------------------------------------------
// Render the helper information
//--------------------------------------------------------------------------------------
void RenderText()
{
CDXUTTextHelper text_helper(g_font, g_text_sprite, 20);
text_helper.Begin();
// show frame and device states
text_helper.SetInsertionPos(5, 5);
text_helper.SetForegroundColor( D3DXCOLOR(1.0f, 0.475f, 0.0f, 1.0f) );
text_helper.DrawTextLine( DXUTGetFrameStats(true) );
text_helper.DrawTextLine( DXUTGetDeviceStats() );
// show other simple information
text_helper.SetForegroundColor( D3DXCOLOR(1.0f, 1.0f, 1.0f, 1.0f) );
text_helper.DrawTextLine(L"Multi Texture Blending");
// show helper information
const D3DSURFACE_DESC* surface_desc = DXUTGetBackBufferSurfaceDesc();
if(g_show_help)
{
text_helper.SetInsertionPos(10, surface_desc->Height - 15 * 6);
text_helper.SetForegroundColor( D3DXCOLOR(1.0f, 0.475f, 0.0f, 1.0f) );
text_helper.DrawTextLine(L"Controls (F1 to hide):");
text_helper.SetInsertionPos(40, surface_desc->Height - 15 * 4);
text_helper.DrawTextLine(L"Quir: ESC");
}
else
{
text_helper.SetInsertionPos(10, surface_desc->Height - 15 * 4);
text_helper.SetForegroundColor( D3DXCOLOR(1.0f, 1.0f, 1.0f, 1.0f) );
text_helper.DrawTextLine(L"Press F1 for help");
}
text_helper.End();
}
//--------------------------------------------------------------------------------------
// Render the scene
//--------------------------------------------------------------------------------------
void CALLBACK OnFrameRender( IDirect3DDevice9* pd3dDevice, double fTime, float fElapsedTime, void* pUserContext )
{
HRESULT hr;
if(g_settings_dlg.IsActive())
{
g_settings_dlg.OnRender(fElapsedTime);
return;
}
// Clear the render target and the zbuffer
V( pd3dDevice->Clear(0, NULL, D3DCLEAR_TARGET | D3DCLEAR_ZBUFFER, D3DCOLOR_ARGB(0, 0, 0, 0), 1.0f, 0) );
// Render the scene
if( SUCCEEDED( pd3dDevice->BeginScene() ) )
{
pd3dDevice->SetStreamSource(0, g_vertex_buffer, 0, sizeof(sCustomVertex));
pd3dDevice->SetFVF(D3DFVF_CUSTOM_VERTEX);
pd3dDevice->DrawPrimitive(D3DPT_TRIANGLESTRIP, 0, 2);
RenderText();
V(g_button_dlg.OnRender(fElapsedTime));
V( pd3dDevice->EndScene() );
}
}
//--------------------------------------------------------------------------------------
// Handle messages to the application
//--------------------------------------------------------------------------------------
LRESULT CALLBACK MsgProc( HWND hWnd, UINT uMsg, WPARAM wParam, LPARAM lParam,
bool* pbNoFurtherProcessing, void* pUserContext )
{
*pbNoFurtherProcessing = g_dlg_resource_manager.MsgProc(hWnd, uMsg, wParam, lParam);
if(*pbNoFurtherProcessing)
return 0;
if(g_settings_dlg.IsActive())
{
g_settings_dlg.MsgProc(hWnd, uMsg, wParam, lParam);
return 0;
}
*pbNoFurtherProcessing = g_button_dlg.MsgProc(hWnd, uMsg, wParam, lParam);
if(*pbNoFurtherProcessing)
return 0;
return 0;
}
//--------------------------------------------------------------------------------------
// Handle keybaord event
//--------------------------------------------------------------------------------------
void CALLBACK OnKeyboardProc(UINT charater, bool is_key_down, bool is_alt_down, void* user_context)
{
if(is_key_down)
{
switch(charater)
{
case VK_F1:
g_show_help = !g_show_help;
break;
}
}
}
//--------------------------------------------------------------------------------------
// Handle events for controls
//--------------------------------------------------------------------------------------
void CALLBACK OnGUIEvent(UINT event, int control_id, CDXUTControl* control, void* user_context)
{
switch(control_id)
{
case IDC_TOGGLE_FULLSCREEN:
DXUTToggleFullScreen();
break;
case IDC_TOGGLE_REF:
DXUTToggleREF();
break;
case IDC_CHANGE_DEVICE:
g_settings_dlg.SetActive(true);
break;
}
}
//--------------------------------------------------------------------------------------
// Initialize dialogs
//--------------------------------------------------------------------------------------
void InitDialogs()
{
g_settings_dlg.Init(&g_dlg_resource_manager);
g_button_dlg.Init(&g_dlg_resource_manager);
g_button_dlg.SetCallback(OnGUIEvent);
int x = 35, y = 10, width = 125, height = 22;
g_button_dlg.AddButton(IDC_TOGGLE_FULLSCREEN, L"Toggle full screen", x, y, width, height);
g_button_dlg.AddButton(IDC_TOGGLE_REF, L"Toggle REF (F3)", x, y += 24, width, height);
g_button_dlg.AddButton(IDC_CHANGE_DEVICE, L"Change device (F2)", x, y += 24, width, height, VK_F2);
}
//--------------------------------------------------------------------------------------
// Initialize everything and go into a render loop
//--------------------------------------------------------------------------------------
INT WINAPI WinMain( HINSTANCE, HINSTANCE, LPSTR, int )
{
// Enable run-time memory check for debug builds.
#if defined(DEBUG) | defined(_DEBUG)
_CrtSetDbgFlag( _CRTDBG_ALLOC_MEM_DF | _CRTDBG_LEAK_CHECK_DF );
#endif
// Set the callback functions
DXUTSetCallbackDeviceCreated( OnCreateDevice );
DXUTSetCallbackDeviceReset( OnResetDevice );
DXUTSetCallbackDeviceLost( OnLostDevice );
DXUTSetCallbackDeviceDestroyed( OnDestroyDevice );
DXUTSetCallbackMsgProc( MsgProc );
DXUTSetCallbackFrameRender( OnFrameRender );
DXUTSetCallbackFrameMove( OnFrameMove );
DXUTSetCallbackKeyboard(OnKeyboardProc);
// TODO: Perform any application-level initialization here
InitDialogs();
// Initialize DXUT and create the desired Win32 window and Direct3D device for the application
DXUTInit( true, true, true ); // Parse the command line, handle the default hotkeys, and show msgboxes
DXUTSetCursorSettings( true, true ); // Show the cursor and clip it when in full screen
DXUTCreateWindow( L"AddControl" );
DXUTCreateDevice( D3DADAPTER_DEFAULT, true, 640, 480, IsDeviceAcceptable, ModifyDeviceSettings );
// Start the render loop
DXUTMainLoop();
// TODO: Perform any application-level cleanup here
return DXUTGetExitCode();
}
在DirectX 6.0引入多紋理單元時,其中最有趣的一項特征便是它可以通過多次渲染將多張紋理映射到同一個多邊形上,因為這是通過多次渲染不同的紋理來實現的,所以該技術稱為多通道渲染(multipass
rendering)。這里講的是多重紋理渲染,是指將多張紋理在一次渲染中映射到同一個多邊形上,而多通道渲染是指分多次將多張紋理映射到同一個多邊形上,前者更快,多通道渲染技術目前已經很少使用了。
下載示例工程