Morphing in Action
Back in the early 90s, a revolutionary computer−graphics animation technique
known as morphing hit the big league and was brought into the mainstream, thanks
to a man known as Michael Jackson. No, I'm not referring to one of his plastic
surgery fiascos−rather, the use of morphing in one of his music videos. Yep, the
King of Pop used morphing techniques in his video for the song "Black or White"
and created an animation phenomenon that continues to this day.
In case you haven't seen the video, let me explain. It includes a segment in
which a person is grooving to the tune, and the camera is centered on that
person's face. Every few seconds, the person's face morphs into another person's
face. This continues while the face morphs more than 10 times. The results of
the morphing in the video are incredible, and I still remember them clearly to
this day!
As the years rolled by, morphing eventually made its way to gaming. Whereas
the older days of morphing involved digitally editing video footage to smoothly
change one image into another (such as in "Black or White" ), nowadays morphing
(or at least the morphing we're going to discuss here) involves the smooth
change of 3D meshes over time.
Probably the most popular example of morphing in gaming has got to be with
id's Quake. In Quake, all of the characters' animation sequences are constructed
from a series of morphing meshes. One mesh slowly changes shape to a second
mesh, the second mesh changes shape to match a third mesh, and so on.
Spaced over a short period of time and using enough meshes from which to
morph, all animation sequences are smooth and extremely easy to process. Even
the lowliest of computer systems can run Quake decently. That's because morphing
animation is extremely easy to work with, as you'll see in the next few
chapters.
So as you can surmise, morphing−or tweening, as it is sometimes referred to
(such as in the DirectX SDK)−is the process of changing one shape into another
over time. For you, those shapes are meshes. The process of morphing a mesh
involves slowly changing the coordinates of the mesh vertices, starting at one
mesh's shape and progressing to another.
The mesh that contains the orientation of the vertices at the beginning of
the morphing cycle is called the source mesh. The second mesh, which contains
the orientation of the vertices at the end of the morphing cycle, is called the
target mesh. Take a closer look at these two meshes to better understand the
whole morphing process.
Defining Source and Target Meshes
The source and target meshes you'll deal with are everyday ID3DXMesh objects.
However, you can't use just any two meshes for a morphing operation; there are
some rules to follow. First, each mesh must share the same number of vertices.
The morphing operation merely moves vertices from the source mesh positions to
match the target mesh positions. This brings up the second rule: Each vertex in
the source mesh must have a matching vertex (that is, a matching index number)
in the target mesh. Take the meshes shown in Figure 8.1 as an example.
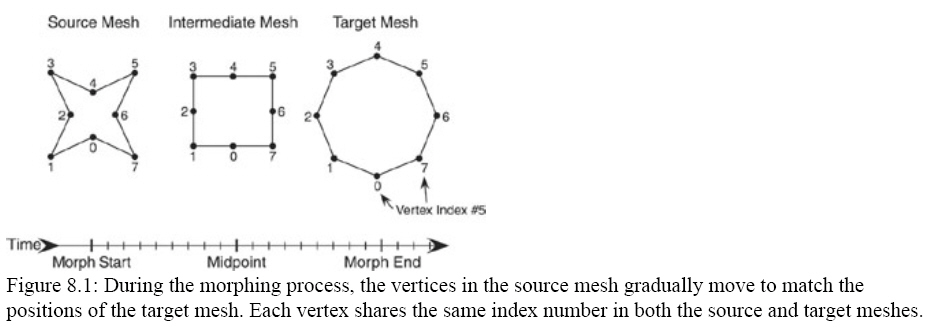
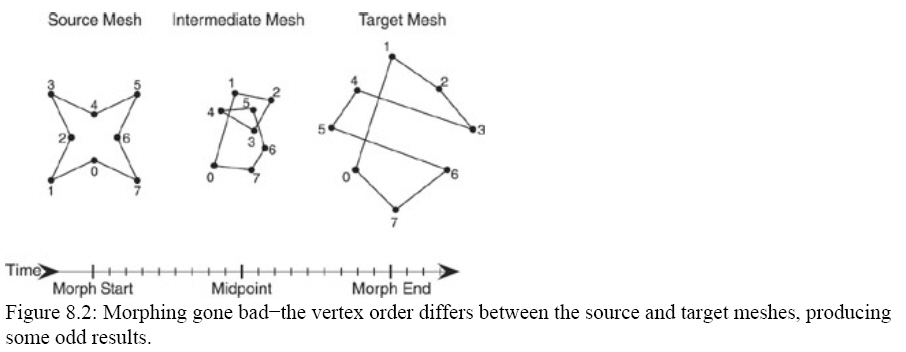
Vertex ordering is important here. For a vertex to move from the source
position to the target position, it must share the same index number. If you
were to renumber the order, the vertices would move in the wrong direction while
morphing and produce some funky−looking results such as those shown in Figure
8.2:
As long as you design the meshes to have the same number of vertices and so
that the vertex ordering matches up, you'll do just fine. As for getting the
actual mesh data, I'll leave that in your capable hands. You can use the
D3DXLoadMeshFromX function to load your meshes. After you've got two valid
meshes loaded and ready to use, you can begin morphing them!
Morphing the Meshes
Now that you have two meshes to work with (the source and target meshes), you
can begin the morphing process. Remember that morphing is the technique of
changing one shape to another. You want the vertices in the source mesh, in
their initial positions, to gradually move to match the positions of the target
mesh's vertices.
You can measure the time period used to track the motion of the vertices from
the source mesh coordinates to the target mesh coordinates using a scalar value
(ranging from 0 to 1). With a scalar value of 0 the vertices will be positioned
at the source mesh coordinates, whereas with a scalar value of 1 the vertices
will be positioned at the target mesh coordinates. As Figure 8.3 illustrates,
any scalar value between 0 and 1 will place the vertices somewhere between the
source mesh and target mesh coordinates.
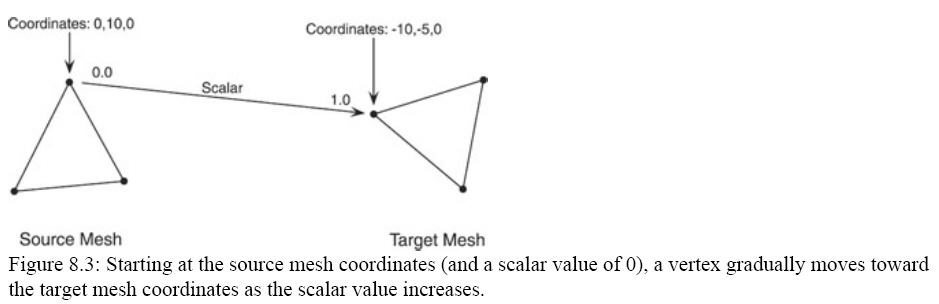
It is quite simple to calculate the coordinates in which to position a vertex
between the source mesh coordinates and target mesh coordinates. Take a vertex
from the source mesh and multiply the vertex's coordinates by the inversed
scalar value (1.0−scalar). Using the inversed scalar means that the original
vertex coordinates will use 100 percent of the vertex's coordinate position when
the scalar is at 0.0, and zero percent of the vertex's coordinate position when
the scalar is at 1.0.
Next, using the same indexed vertex's coordinates from the target mesh,
multiply the vertex's coordinates by the scalar value. Adding the two resulting
values gives you the final coordinates to use for the vertex during the morphing
animation.
At first, this concept of multiplying the vertex coordinates by a scalar
value and adding the results together might seem strange. If you're unsure of
the math, perform the following calculations to see that the results are indeed
correct. Use a one−dimensional value to represent the vertex coordinates. Set
the source vertex coordinate to 10 and the target vertex coordinate to 20. To
make things easy, use a scalar value of 0.5, which should give you a resulting
morphing vertex coordinate of 15.
Multiplying the source coordinate (10) by 1−0.5 gives you 5. Multiplying the
target coordinate (20) by 0.5 gives you 10. Adding the two results (5 and 10)
gives you 15. Isn't that special−it comes out to the correct value after all!
This procedure would resemble the following code, assuming that the vertex's
source coordinates are stored in vecSource, the target coordinates are stored in
vecTarget, and the scalar is stored in Scalar.
// vecSource = D3DXVECTOR3 with source coordinates
// vecTarget = D3DXVECTOR3 with target coordinates
// Scalar = FLOAT with scalar value
// Multiply source coordinates by inversed scalar
D3DXVECTOR3 vecSourcePos = vecSource * (1.0f−Scalar);
// Multiply target coordinates by scalar
D3DXVECTOR3 vecTargetPos = vecTarget * Scalar;
// Add the two resulting vectors together
D3DXVECTOR vecPos = vecSourcePos + vecTargetPos;
After that last bit of code, the vecPos vector will contain the coordinates
to use for positioning a vertex during the morphing animation. Of course, you
would repeat the same calculations for each vertex in the source mesh. In the
next section, you'll get to see how to perform these calculations to build your
own morphing meshes. Before that, however, I'd like to mention something about
timing your morphing animations.
Up to this point, I've been ignoring the factor of time−both the length of
the animation cycle (how long the morphing animation takes to progress from the
source coordinates to the target coordinates) and exactly what point in time you
are sampling the coordinates from in the animation sequence. Assuming you are
measuring time in milliseconds, with the animation's length stored as Length (a
FLOAT value) and the time at which you are sampling the coordinates stored as
Time (also a FLOAT value), you can compute a proper scalar value to use in your
calculations as follows:
Scalar = Time / Length;
Using the calculations you've already seen in this section, you can use the
scalar value to compute the coordinates of the vertices to build your morphing
mesh.
That's the second time I've mentioned building a morphing mesh, so I won't
keep delaying things. Read on to see how to build a morphing mesh you can use to
render. Although I previously hinted at using a vertex shader, first I will show
you the easiest way to build a morphing mesh−by manipulating the mesh's vertex
buffers directly.