Defining Templates
Since an .X file's open−ended design is so, well, open−ended, you must
predefine each template that you intend to use for DirectX to understand how to
access the template's data. Typically templates are defined inside an .X file,
although you can define them from within your program (as I mentioned earlier).
You define a template (contained in an .X file) by assigning it a unique
class name preceded by the word template, as I have done in the following line
of text. (Notice the opening bracket, which signifies the start of the
template's definition.)
template ContactEntry {
Cool−now you've started the declaration of a template that you will use to
store a person's contact information. We're calling the template class
ContactEntry, as you can see from the code. Even though you have assigned your
template a unique class name, you need to go one step further and also assign it
a unique identification number−a GUID.
When you get around to reading an .X file into your program, you'll only have
access to the GUIDs of each template, not the class names. The class names are
important only to your .X file data objects; you want your program to
differentiate those data objects by their template GUIDs.
To define a GUID for your template, fire up the guidgen.exe program that
comes with your Microsoft Visual C/C++ compiler installation (located in the
\Common\Tools directory of your MSVC installation). After you've found and
executed the guidgen.exe file, you'll be presented with a small dialog box,
shown in Figure 3.1.
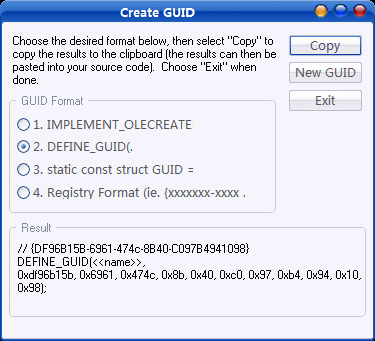
Figure 3.1: The guidgen.exe's Create GUID dialog box allows you to create a
unique identification number in various formats.
As you can see in Figure 3.1, the Create GUID dialog box allows you to choose
the format of the GUID you want to create. In this case you'll use format #2,
DEFINE_GUID(). Select the option and click the Copy button.
Now a completely unique identification number is on the Clipboard, waiting
for you to paste it into your code. Go back to the .X file you are creating and
paste the contents of the Clipboard into your template declaration.
template ContactEntry {
// {4C9D055B−C64D−4bfe−A7D9−981F507E45FF}
DEFINE_GUID(<<name>>,
0x4c9d055b, 0xc64d, 0x4bfe, 0xa7, 0xd9, 0x98, 0x1f, 0x50, 0x7e, 0x45, 0xff);
Whoops! That's a little too much text for the template, so you need to cut
out the DEFINE_GUID macro stuff and paste that into your project's source code.
Yes, that's right−every template you define requires a matching GUID definition
(via the DEFINE_GUID macro, for example) inside your code. This means you need
to include the initguid.h file in your code and use DEFINE_GUID, as I have done
here.
#include "initguid.h"
// At beginning of source code file − add DEFINE_GUIDs
DEFINE_GUID(ContactEntry, 0x4c9d055b, 0xc64d, 0x4bfe, 0xa7, 0xd9, 0x98,
0x1f, 0x50, 0x7e, 0x45, 0xff);
Notice that in the DEFINE_GUID macro, I've replaced the <<name>> text with
the actual class name of the template I am defining. In this case, I am using
ContactEntry as a macro name. From this point on, the ContactEntry macro will
contain a pointer to my template's GUID (which must match the template's GUID in
the .X file).
Getting back to the ContactEntry template, you also need to remove the
comment tag from the pasted text and change the GUID's brackets to angle
brackets, as I have done here:
template ContactEntry {
<4C9D055B−C64D−4bfe−A7D9−981F507E45FF>
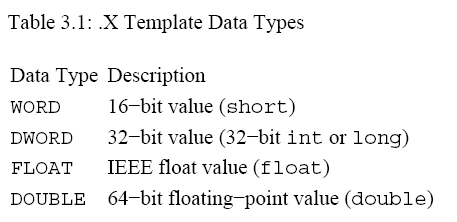
Now you're ready to move on and define the template's data. Templates are
much like C structures and classes; they contain variables and pointers to other
templates, as well as access restrictions. The types of variables you can use
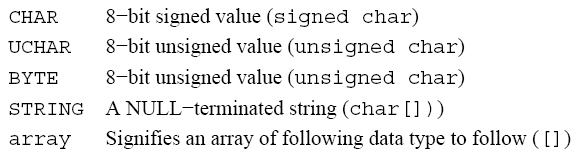
are much like the ones you use in C. Table 3.1 shows you the data types at your
disposal for defining templates, as well as matching C/C++ data types.
Much like C/C++ variable declarations, you follow the data type keyword with
an instance name and finish with a semicolon (signifying the end of the variable
declaration).
DWORD Value;
In Table 3.1, you'll notice the array keyword, which defines an array of data
types. To define an array, you specify the array keyword followed by the data
type, instance name, and array size (enclosed in square brackets). For example,
to declare an array of 20 STRING data types, you could use:
array STRING Text[20];
Note The cool thing about arrays is that you can use another data type to
define the array size, as I have done here:
DWORD ArraySize;
array STRING Names[ArraySize];
Now you need to go back to the ContactEntry template and define a person's
name, phone number, and age. The three variables−two strings (name and phone
number) and one numerical value (age)−can be defined in the ContactEntry
template as follows.
template ContactEntry {
<4C9D055B−C64D−4bfe−A7D9−981F507E45FF>
STRING Name; // The contact's name
STRING PhoneNumber; // The contact's phone number
DWORD Age; // The contact's age
}
Cool! You finish your template definition with a closing bracket, and you're
ready to go.
Creating Data Objects from Templates
After you have defined a template, you can begin creating data objects and
defining their data. Data objects are defined by their respective template class
types and an optional instance name. You can use this instance name to later
reference the data object inside the .X file or from within your project (a
feature you'll read about later in this chapter).
Moving on with the example, take the ContactEntry template and create a data
object from it. This data object will contain a person's name, phone number, and
age.
ContactEntry JimsEntry {
"Jim Adams";
"(800) 555−1212";
30;
}
Notice that I've declared the data object's instance name as JimsEntry. From
now on, I can reference this data object by using the name enclosed in brackets,
like this:
{JimsEntry}
Referencing a data object in this manner is called data referencing, or
referencing (as if you couldn't guess!), and it allows you to point one data
object to another. For example, an animation sequence template (AnimationSet)
requires you to reference a Frame data object for the sequence's embedded
objects.
You can also use referencing to duplicate an object's data without having to
retype it. This is useful when you are creating a few identical Mesh data
objects in an .X file, with each Mesh object being oriented differently inside
various Frame objects.