11.2.4
產生頂點法線
一個X文件不包含頂點法線數據,這是很有可能的。假如是這種情況,那么手動計算頂點法線以便我們能夠使用燈光這是很有必要的。現在知道了ID3DXMesh接口和它的父接口ID3DXBaseMesh,我們能夠使用下面的函數來產生任何mesh的頂點法線:
Computes unit normals for each vertex in a mesh.
Provided to support legacy applications. Use D3DXComputeTangentFrameEx for
better results.
HRESULT D3DXComputeNormals(
  LPD3DXBASEMESH pMesh,
  CONST DWORD * pAdjacency
);
Parameters
- pMesh
- [in, out] Pointer to an ID3DXBaseMesh interface,
representing the normalized mesh object. This function may not take an
ID3DXPMesh progressive mesh as input.
- pAdjacency
- [in] Pointer to an array of three DWORDs per face
that specify the three neighbors for each face in the created progressive
mesh. This parameter is optional and should be set to NULL if it is unused.
Return Values
If the function succeeds, the return value is S_OK. If
the function fails, the return value can be one of the following:
D3DERR_INVALIDCALL, D3DXERR_INVALIDDATA, E_OUTOFMEMORY.
Remarks
The input mesh must have the D3DFVF_NORMAL flag
specified in its flexible vertex format (FVF).
A normal for a vertex is generated by averaging the
normals of all faces that share that vertex.
If adjacency is provided, replicated vertices are
ignored and "smoothed" over. If adjacency is not provided, replicated vertices
will have normals averaged in from only the faces explicitly referencing them.
This function simply calls D3DXComputeTangentFrameEx
with the following input parameters:
D3DXComputeTangentFrameEx( pMesh,
                           D3DX_DEFAULT,
                           0,
                           D3DX_DEFAULT,
                           0,
                           D3DX_DEFAULT,
                           0,
                           D3DDECLUSAGE_NORMAL,
                           0,
                           D3DXTANGENT_GENERATE_IN_PLACE | D3DXTANGENT_CALCULATE_NORMALS,
                           pAdjacency,
                           -1.01f,
                           -0.01f,
                           -1.01f,
                           NULL,
                           NULL);
這個函數通過使用平均法線的方法來產生頂點法線。假如有鄰接信息,那么重復的頂點是被忽略的。假如沒有鄰接信息,那么重復的頂點也會被重復計算。了解這些是很重要的,我們檢查pMash必須有一個包含D3DFVF_NORMAL標記的頂點格式。
注意假如X文件不包含頂點法線數據,那么通過D3DXLoadMeshFromX創建的ID3DXMesh對象在它的頂點格式中沒有指定的D3DFVF_NORMAL標記。因此,在我們能夠使用D3DXComputeNormals之前,我們必須克隆mesh并且為其指定包含D3DFVF_NORMAL的頂點格式。下面就是相應的代碼:
|
// does the
mesh have a D3DFVF_NORMAL in its vertex format?
if
( !(pMesh->GetFVF() & D3DFVF_NORMAL) )
{
// no, so clone a new mesh and add
D3DFVF_NORMAL to its format:
ID3DXMesh* pTempMesh
= 0;
pMesh->CloneMeshFVF(
D3DXMESH_MANAGED,
pMesh->GetFVF() | D3DFVF_NORMAL, // add it
here
Device,
&pTempMesh );
// compute the normals:
D3DXComputeNormals(
pTempMesh, NULL );
pMesh->Release();
// get rid of the old mesh
pMesh = pTempMesh;
// save the new mesh with normals
}
|
11.3漸進網格(Progressive
Meshes)
漸進網格,它通過ID3DXPMesh接口來表現,允許我們通過邊縮減轉換(edge
collapse transformations,ECT)來簡化mesh。每執行一次ECT就移除一個頂點和一或2個面。因為每個ECT是可逆的(它的逆過程叫頂點分裂),我們能夠逆轉簡化過程并且恢復mesh為它的原始狀態。當然,我們不可能得到比原始情況還要精細的網格。我們僅僅只能簡化然后恢復簡化操作。圖11.2顯示了同一個mesh的三種不同精細級別(levels
of detail,LOD):高,中,低。

漸進網格和mipmaps紋理非常相似。當使用紋理時,我們已經注意到在一個小或遠的圖元上使用高分辨率的紋理簡直就是浪費。對于mesh也是同樣的道理,一個小或遠的mesh不需要太多三角形,多了也是浪費。因此,我們不會花費渲染高三角形模型的時間來渲染一個只需要表現小的低三角形模型。
我們可以使用漸進網格來根據模型距離攝象機的距離來調整模型的LOD。也就是說,當距離減少時,我們增加mesh的細節,當距離增加時我們減少mesh的細節。
11.3.1
產生一個漸進網格
我們能夠使用下面的函數來創建一個ID3DXPMesh對象:
|
HRESULT D3DXGeneratePMesh(
LPD3DXMESH pMesh,
CONST DWORD
*pAdjacency,
CONST
LPD3DXATTRIBUTEWEIGHTS pVertexAttributeWeights,
CONST FLOAT
*pVertexWeights,
DWORD MinValue,
DWORD Options,
LPD3DXPMESH *ppPMesh
);
|
pMesh— 輸入原始mesh,它包含了我們想要生成的漸進網格的mesh數據。
pAdjacency
— 指向一個包含pMesh鄰接信息的DWORD數組。
pVertexAttributeWeights — 指向一個D3DXATTRIBUTEWEIGHTS數組,它的大小是pMesh->GetNumVertices()。它的第i項與pMesh中的第i個頂點相對應并且指定的是它的品質權重。品質權重被用來確定一個頂點被刪除的可能性大小。你能夠將此參數設置為null,對于每個頂點一個默認的頂點品質權重將被設置。
pVertexWeights
— 指向一個float數組,它的大小是pMesh->GetNumVertices(),它的第i項與pMesh中的第i個頂點相對應并且指定的是它的頂點權重。頂點權重越高被刪除的可能性越小。你能夠將此參數設置為null,對于每個頂點一個默認的頂點品質權重1.0將被設置。
MinValue
— 我們想要簡化到的最小頂點或面數。注意該值是必須的,而且與頂點/品質權重有關,最終可能達不到該值。
Options
— 只能取D3DXMESHSIMP枚舉類型中的一個值:
D3DXMESHSIMP_VERTEX —
指定在上一個參數MinValue中提到的數為頂點數。
D3DXMESHSIMP_FACE
—指定在上一個參數MinValue中提到的數為面數。
ppPMesh
— 返回生成好的漸進網格。
11.3.2
頂點品質權重
Specifies mesh weight attributes.
typedef struct D3DXATTRIBUTEWEIGHTS {
    FLOAT Position;
    FLOAT Boundary;
    FLOAT Normal;
    FLOAT Diffuse;
    FLOAT Specular;
    FLOAT Texcoord[8];
    FLOAT Tangent;
    FLOAT Binormal;
} D3DXATTRIBUTEWEIGHTS, *LPD3DXATTRIBUTEWEIGHTS;
Members
- Position
- Position.
- Boundary
- Blend weight.
- Normal
- Normal.
- Diffuse
- Diffuse lighting value.
- Specular
- Specular lighting value.
- Texcoord
- Eight texture coordinates.
- Tangent
- Tangent.
- Binormal
- Binormal.
Remarks
This structure describes how a simplification operation
will consider vertex data when calculating relative costs between collapsing
edges. For example, if the Normal field is 0.0, the simplification operation
will ignore the vertex normal component when calculating the error for the
collapse. However, if the Normal field is 1.0, the simplification operation will
use the vertex normal component. If the Normal field is 2.0, double the amount
of errors; if the Normal field is 4.0, then quadruple the number of errors, and
so on.
The LPD3DXATTRIBUTEWEIGHTS type is defined as a pointer
to the D3DXATTRIBUTEWEIGHTS structure.
typedef D3DXATTRIBUTEWEIGHTS* LPD3DXATTRIBUTEWEIGHTS;
頂點權重結構允許我們為每個頂點屬性指定一個權值。0.0表示該屬性沒有權重。頂點屬性的權重越高在簡化過程中被移除的可能性越小。默認的權值如下:
|
D3DXATTRIBUTEWEIGHTS
AttributeWeights;
AttributeWeights.Position =
1.0;
AttributeWeights.Boundary =
1.0;
AttributeWeights.Normal =
1.0;
AttributeWeights.Diffuse =
0.0;
AttributeWeights.Specular =
0.0;
AttributeWeights.Tex[8] =
{0.0, 0.0, 0.0, 0.0, 0.0, 0.0, 0.0, 0.0};
|
默認的權值是被推薦的,除非你的應用程序有一個重要的理由而不使用它。
11.3.3 ID3DXPMesh方法
ID3DXPMesh接口是繼承自ID3DXBaseMesh接口,下面是一些方法:
DWORD
GetMaxFaces(VOID)——返回漸進網格能夠被設置的最大面數。
DWORD
GetMaxVertices(VOID)——返回漸進網格能夠被設置的最大頂點數。
DWORD
GetMinFaces(VOID)——返回漸進網格能夠被設置的最小面數。
DWORD
GetMinVertices(VOID)——返回漸進網格能夠被設置的最小頂點數。
HRESULT
SetNumFaces(DWORD Faces)——這個方法允許我們設置面的個數,以便讓mesh簡化/復雜化。例如,假設mesh目前有50個面,我們現在想將它簡化到30個面;我們將寫成:
注意調整后的面數可能并不是我們設定的面數。假如面數小于了GetMinFaces(),那么面數將為GetMinFaces()。同樣的,假如面數大于了GetMaxFaces(),那么面數將為GetMaxFaces()。
HRESULT
SetNumVertices(DWORD Vertices)——這個方法允許我們設置頂點的個數,以便讓mesh簡化/復雜化。例如,假設mesh目前有20個頂點,我們現在想將它增加到40個;我們將寫成:
|
pmesh->SetNumVertices(40);
|
注意調整后的頂點數可能并不是我們設定的數。假如頂點數小于了GetMinVertices(),那么頂點數將為GetMinVertices()。同樣的,假如頂點數大于了GetMaxVertices(),那么頂點數將為GetMaxVertices()。
HRESULT TrimByFaces(
DWORD NewFacesMin,
DWORD NewFacesMax,
DWORD *rgiFaceRemap,
// Face remap info.
DWORD *rgiVertRemap
// Vertex remap info.
);
這個方法允許我們設置新的最小和最大面數,分別通過NewFacesMin和NewFacesMax指定。注意新的最小和最大值必須在現有最小和最大面數之間;也就是說,必須在[GetMinFaces(),GetMaxFaces()]之中。該函數也返回面和頂點的重影射信息。
HRESULT
TrimByVertices(
DWORD
NewVerticesMin,
DWORD
NewVerticesMax,
DWORD *rgiFaceRemap,
// Face remap info.
DWORD *rgiVertRemap
// Vertex remap info.
);
這個方法允許我們設置新的最小和最大頂點數,分別通過NewVerticesMin和NewVerticesMax指定。注意新的最小和最大值必須在現有最小和最大頂點數之間;也就是說,必須在[GetMinVertices(),GetMaxVertices()]之中。
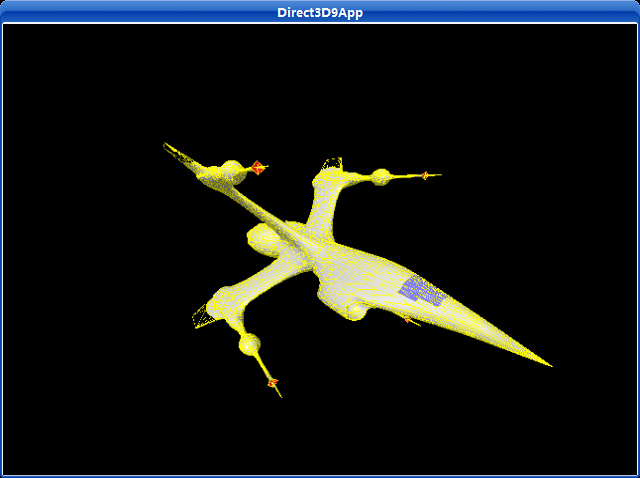
11.3.4實例程序:漸進網格
漸進網格例子與X文件例子很相似,除了實際上我們創建和渲染的是一個漸進網格,通過ID3DXPMesh接口來表現。我們允許用戶通過鍵盤輸入進行交互式地改變漸進網格。你能通過按A鍵來增加mesh的面數,按S鍵來減少mesh的面數。
運行截圖:
主程序:


/**************************************************************************************
  Demonstrates how to use the progressive mesh interface (ID3DXPMesh).
  Use the 'A' key to add triangles, use the 'S' key to remove triangles.
  Note that we outline the triangles in yellow so that you can see them get
  removed and added.
 **************************************************************************************/

#include <vector>
#include "d3dUtility.h"

#pragma warning(disable : 4100)

using namespace std;

const int WIDTH  = 640;
const int HEIGHT = 480;

IDirect3DDevice9*            g_device;
ID3DXMesh*                    g_source_mesh;
ID3DXPMesh*                    g_pmesh;
vector<D3DMATERIAL9>        g_materials;
vector<IDirect3DTexture9*>    g_textures;

////////////////////////////////////////////////////////////////////////////////////////////////////

bool setup()
{
    // load the XFile data

    ID3DXBuffer*    adjacency_buffer = NULL;
    ID3DXBuffer*    material_buffer  = NULL;
    DWORD            num_material     = 0;

    HRESULT hr = D3DXLoadMeshFromX("bigship1.x", D3DXMESH_MANAGED, g_device, &adjacency_buffer, &material_buffer,
                                   NULL, &num_material, &g_source_mesh);

    if(FAILED(hr))
    {
        MessageBox(NULL, "D3DXLoadMeshFromX() - FAILED", "ERROR", MB_OK);
        return false;
    }

    // extract the materials, and load textures.
    if(material_buffer != NULL && num_material != 0)
    {
        D3DXMATERIAL* materials = (D3DXMATERIAL*) material_buffer->GetBufferPointer();

        for(DWORD i = 0; i < num_material; i++)
        {
            // the MatD3D property doesn't have an ambient value set when it load, so set it now.
            materials[i].MatD3D.Ambient = materials[i].MatD3D.Diffuse;

            // save the ith material
            g_materials.push_back(materials[i].MatD3D);

            // check if the ith material has an associative texture
            if(materials[i].pTextureFilename != NULL)
            {
                // yes, load the texture for the ith subset.
                IDirect3DTexture9* texture;
                D3DXCreateTextureFromFile(g_device, materials[i].pTextureFilename, &texture);

                // save the loaded texture
                g_textures.push_back(texture);
            }
            else
            {
                // no texture for the ith subset
                g_textures.push_back(NULL);
            }
        }
    }

    safe_release<ID3DXBuffer*>(material_buffer);

    // optimize the mesh
    hr = g_source_mesh->OptimizeInplace(D3DXMESHOPT_ATTRSORT | D3DXMESHOPT_COMPACT | D3DXMESHOPT_VERTEXCACHE,
        (DWORD*) adjacency_buffer->GetBufferPointer(),
        (DWORD*) adjacency_buffer->GetBufferPointer(), // new adjacency info
        NULL, NULL);

    if(FAILED(hr))
    {
        MessageBox(NULL, "OptimizeInplace() - FAILED", "ERROR", MB_OK);
        safe_release<ID3DXBuffer*>(adjacency_buffer);
        return false;
    }

    // generate the progressive mesh
    hr = D3DXGeneratePMesh(
        g_source_mesh,
        (DWORD*) adjacency_buffer->GetBufferPointer(),
        NULL,                // default vertex attribute weights
        NULL,                // default vertex weights
        1,                    // simply as low as possible
        D3DXMESHSIMP_FACE,    // simplify by face count
        &g_pmesh);

    safe_release<ID3DXMesh*>(g_source_mesh);
    safe_release<ID3DXBuffer*>(adjacency_buffer);

    if(FAILED(hr))
    {
        MessageBox(NULL, "D3DXGeneratePMesh() - FAILED", "ERROR", MB_OK);
        return false;
    }

    // set to original detail
    DWORD max_faces = g_pmesh->GetMaxFaces();
    g_pmesh->SetNumFaces(max_faces);

    // set texture filters
    g_device->SetSamplerState(0, D3DSAMP_MAGFILTER, D3DTEXF_LINEAR);
    g_device->SetSamplerState(0, D3DSAMP_MINFILTER, D3DTEXF_LINEAR);
    g_device->SetSamplerState(0, D3DSAMP_MIPFILTER, D3DTEXF_LINEAR);

    // set lights

    D3DXVECTOR3 dir(1.0f, -1.0f, 1.0f);
    D3DXCOLOR color(1.0f, 1.0f, 1.0f, 1.0f);
    D3DLIGHT9 light = init_directional_light(&dir, &color);

    g_device->SetLight(0, &light);
    g_device->LightEnable(0, TRUE);
    g_device->SetRenderState(D3DRS_NORMALIZENORMALS, TRUE);
    g_device->SetRenderState(D3DRS_SPECULARENABLE, TRUE);

    // set camera

    D3DXVECTOR3 pos(-8.0f, 4.0f, -12.0f);
    D3DXVECTOR3 target(0.0f, 0.0f, 0.0f);
    D3DXVECTOR3 up(0.0f, 1.0f, 0.0f);

    D3DXMATRIX view_matrix;
    D3DXMatrixLookAtLH(&view_matrix, &pos, &target, &up);
    g_device->SetTransform(D3DTS_VIEW, &view_matrix);

    // set the projection matrix
    D3DXMATRIX proj;
    D3DXMatrixPerspectiveFovLH(&proj, D3DX_PI * 0.5f, (float)WIDTH/HEIGHT, 1.0f, 1000.0f);
    g_device->SetTransform(D3DTS_PROJECTION, &proj);

    return true;
}

///////////////////////////////////////////////////////////////////////////////////////////////////////

void cleanup()
{
    safe_release<ID3DXPMesh*>(g_pmesh);

    for(DWORD i = 0; i < g_textures.size(); i++)
        safe_release<IDirect3DTexture9*>(g_textures[i]);
}

///////////////////////////////////////////////////////////////////////////////////////////////////////

bool display(float time_delta)
{
    // update: rotate the mesh

    // get the current number of faces the pmesh has
    DWORD num_faces = g_pmesh->GetNumFaces();

    // Add a face, note the SetNumFaces() will automatically clamp the specified value
    // if it goes out of bounds.
    if(GetAsyncKeyState('A') & 0x8000f)
    {
        // Sometimes we must add more than one face to invert an edge collaps transformation
        // because of the internal implementation details of the ID3DXPMesh interface.
        // In other words, adding one face may possibly result in a mesh with the same number
        // of faces as before. Thus to increase the face count we may some times have to add
        // two faces at once.

        g_pmesh->SetNumFaces(num_faces + 1);

        if(g_pmesh->GetNumFaces() == num_faces)
            g_pmesh->SetNumFaces(num_faces + 2);
    }

     // Remove a face, note the SetNumFaces() will automatically clamp the specified value
    // if it goes out of bounds.
    if(GetAsyncKeyState('S') & 0x8000f)
        g_pmesh->SetNumFaces(num_faces - 1);

    // render now

    g_device->Clear(0, NULL, D3DCLEAR_TARGET | D3DCLEAR_ZBUFFER, 0x00000000, 1.0f, 0);

    g_device->BeginScene();

    for(DWORD i = 0; i < g_materials.size(); i++)
    {
        // draw pmesh
        g_device->SetMaterial(&g_materials[i]);
        g_device->SetTexture(0, g_textures[i]);
        g_pmesh->DrawSubset(i);

        // draw wireframe outline
        g_device->SetMaterial(&YELLOW_MATERIAL);
        g_device->SetRenderState(D3DRS_FILLMODE, D3DFILL_WIREFRAME);
        g_pmesh->DrawSubset(i);

        // restore solid mode
        g_device->SetRenderState(D3DRS_FILLMODE, D3DFILL_SOLID);
    }

    g_device->EndScene();

    g_device->Present(NULL, NULL, NULL, NULL);

    return true;
}

///////////////////////////////////////////////////////////////////////////////////////////////////////

LRESULT CALLBACK wnd_proc(HWND hwnd, UINT msg, WPARAM word_param, LPARAM long_param)
{
    switch(msg)
    {
    case WM_DESTROY:
        PostQuitMessage(0);
        break;

    case WM_KEYDOWN:
        if(word_param == VK_ESCAPE)
            DestroyWindow(hwnd);
        break;
    }

    return DefWindowProc(hwnd, msg, word_param, long_param);
}

///////////////////////////////////////////////////////////////////////////////////////////////////////

int WINAPI WinMain(HINSTANCE inst, HINSTANCE, PSTR cmd_line, int cmd_show)
{
    if(! init_d3d(inst, WIDTH, HEIGHT, true, D3DDEVTYPE_HAL, &g_device))
    {
        MessageBox(NULL, "init_d3d() - failed.", 0, MB_OK);
        return 0;
    }

    if(! setup())
    {
        MessageBox(NULL, "Steup() - failed.", 0, MB_OK);
        return 0;
    }

    enter_msg_loop(display);

    cleanup();
    g_device->Release();

    return 0;
}
下載源程序