
|
Polygon Offset
|
Tutorials > OpenGL > Polygon?Offset
LINK:http://www.zeuscmd.com/tutorials/opengl/15-PolygonOffset.php
ull Source |
Introduction
 It is often quite useful to accentuate the edges of your objects by rendering your object once in fill mode and once in line mode. This often produces unsatisfactory results as the line may move into and out of the polygon. This effect is commonly known as stitching.
You may have also noticed in the past that when rendering two polygons that overlap each other, Z-fighting occurs and parts of each polygon are rendered.
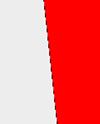
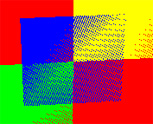
The results of stitching and z-fighting can be seen in the figures below.
|
|
| Stitching Effect |
Z-Fighting Effect |
This tutorial expands on tutorial 13 and shows how you can overcome these effects by making use of polygon offsets.
Contents of main.cpp :
One variable is kept to indicate whether polygon offsets are currently being used. This will allow you to toggle polygon offsets on and off to see exactly how this technique improves the program.
bool offset = true;
The drawBox function remains exactly the same except that the calls to change the current color have been removed.
void drawBox()
{
glBegin(GL_QUADS);
glVertex3f(-0.5f, -0.5f, 0.5f);
glVertex3f( 0.5f, -0.5f, 0.5f);
glVertex3f( 0.5f, 0.5f, 0.5f);
glVertex3f(-0.5f, 0.5f, 0.5f);
glVertex3f(-0.5f, -0.5f, -0.5f);
glVertex3f(-0.5f, 0.5f, -0.5f);
glVertex3f( 0.5f, 0.5f, -0.5f);
glVertex3f( 0.5f, -0.5f, -0.5f);
glVertex3f(-0.5f, -0.5f, 0.5f);
glVertex3f(-0.5f, 0.5f, 0.5f);
glVertex3f(-0.5f, 0.5f, -0.5f);
glVertex3f(-0.5f, -0.5f, -0.5f);
glVertex3f( 0.5f, -0.5f, -0.5f);
glVertex3f( 0.5f, 0.5f, -0.5f);
glVertex3f( 0.5f, 0.5f, 0.5f);
glVertex3f( 0.5f, -0.5f, 0.5f);
glVertex3f(-0.5f, 0.5f, 0.5f);
glVertex3f( 0.5f, 0.5f, 0.5f);
glVertex3f( 0.5f, 0.5f, -0.5f);
glVertex3f(-0.5f, 0.5f, -0.5f);
glVertex3f(-0.5f, -0.5f, 0.5f);
glVertex3f(-0.5f, -0.5f, -0.5f);
glVertex3f( 0.5f, -0.5f, -0.5f);
glVertex3f( 0.5f, -0.5f, 0.5f);
glEnd();
}
To show the effects of z-fighting, we will be displaying some polygons on top of a cube. A drawPolygon function has therefore been created to simplify creation of multiple quads.
				void drawPolygon()
{
	glBegin(GL_QUADS);
		glVertex3f(-0.5f, -0.5f,  0.0f);
		glVertex3f( 0.5f, -0.5f,  0.0f);
		glVertex3f( 0.5f,  0.5f,  0.0f);
		glVertex3f(-0.5f,  0.5f,  0.0f);
	glEnd();
}
The beginning of our display function remains the same.
				void display()
{
	glClear(GL_COLOR_BUFFER_BIT | GL_DEPTH_BUFFER_BIT);
	glLoadIdentity();

	gluLookAt(
		0.0f, 0.0f, 3.0f,
		0.0f, 0.0f, 0.0f,
		0.0f, 1.0f, 0.0f);

	glRotatef(xrot, 1.0f, 0.0f, 0.0f);
	glRotatef(yrot, 0.0f, 1.0f, 0.0f);
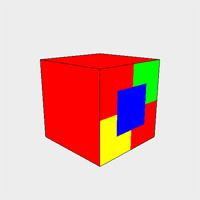
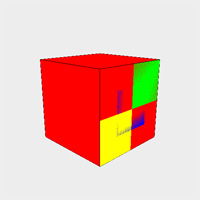
The object we will be creating can be seen at the beginning of this tutorial. It is a red cube, outlined by a black line. The one side of the red cube has 3 overlapping polygons on top of it.
Polygon offsets can be used in a number of ways to reduce the errors caused by these overlapping primitives. One possible solution is to offset the polygons of the cube to make it slightly smaller. This will allow the lines and additional polygons from being rendered without interfering with the cube.
There are three different ways to enable polygon offset, one for each rasterization mode (GL_POINT, GL_LINE and GL_FILL). This is specified by a single call to glEnable with one of the parameters, GL_POLYGON_OFFSET_POINT, GL_POLYGON_OFFSET_LINE and GL_POLYGON_OFFSET_FILL respectively.
The cube will first be rendered, so we pass the GL_POLYGON_OFFSET_FILL flag onto the glEnable function.
				if (offset)
	{
		glEnable(GL_POLYGON_OFFSET_FILL);
It is necessary to specify how much a polygon must be offset. This is achieved with a call to the glPolygonOffset function. This function accepts 2 parameters, GLfloatfactor and GLfloatunits.
The depth value of each fragment is added to an offset value which is calculate in the following way?:
offset = (m * factor) + (r * units)
where m is the maximum depth slope of the polygon and r is the smallest value guaranteed to produce a resolvable difference in window coordinate depth values. The value r is an implementation-specific constant.
A positive offset will push the object away from you whereas a negative offset will pull the object towards you.
The depth slope is the change in z (depth) value divided by the change in either x or y coordinates as you traverse the polygon. Therefore, polygons that are parallel to the near and far clipping planes will have a depth slope of zero. The closer the depth slope is to 0, the smaller the offset needs to be.
There is quite a bit of maths involved but luckily it is often good enough to simply use values such as 1.0 or 0.0 for the factor and units parameters, which is what we will be doing in this tutorial. As we want the polygons of the cube to be pushed away from us, we pass positive 1 as both parameters to glPolygonOffset.
				glPolygonOffset(1.0f, 1.0f);
	}
The cube is then rendered as per normal in the GL_FILL rasterization mode. After this has been done, polygon offset is disabled.
				glColor3f(1.0f, 0.0f, 0.0f);
	glPolygonMode(GL_FRONT_AND_BACK, GL_FILL);
	drawBox();

	if (offset)
		glDisable(GL_POLYGON_OFFSET_FILL);
The green and yellow polygons on the front of the cube can now be rendered without worrying about z-fighting.
				glColor3f(0.0f, 1.0f, 0.0f);
	glPushMatrix();
		glTranslatef(-0.25f, -0.25f, 0.5f);
		glScalef(0.5f, 0.5f, 0.5f);
		drawPolygon();
	glPopMatrix();

	glColor3f(1.0f, 1.0f, 0.0f);
	glPushMatrix();
		glTranslatef(0.25f, 0.25f, 0.5f);
		glScalef(0.5f, 0.5f, 0.5f);
		drawPolygon();
	glPopMatrix();
If we now try to render the blue polygon, it will cause z-fighting with the green and yellow polygons on the front of the cube.
A way around this is to pull the blue polygon towards us to prevent z-fighting with both the cube and the front polygons. This is done by passing -1 as both parameters to the glPolygonOffset function.
				if (offset)
	{
		glEnable(GL_POLYGON_OFFSET_FILL);
		glPolygonOffset(-1.0f, -1.0f);
	}

	glColor3f(0.0f, 0.0f, 1.0f);
	glPushMatrix();
		glTranslatef(0.0f, 0.0f, 0.5f);
		glScalef(0.5f, 0.5f, 0.5f);
		drawPolygon();
	glPopMatrix();

	if (offset)
		glDisable(GL_POLYGON_OFFSET_FILL);
If we were to now render the outline of the cube, stitching would occur with the front polygons. The lines can therefore be pulled towards us in the same way that the blue polygon was. The only difference is that now we need to pass GL_POLYGON_OFFSET_LINE onto the glEnable function instead.
				if (offset)
	{
		glEnable(GL_POLYGON_OFFSET_LINE);
		glPolygonOffset(-1.0f, -1.0f);
	}

	glColor3f(0.0f, 0.0f, 0.0f);
	glPolygonMode(GL_FRONT_AND_BACK, GL_LINE);
	drawBox();

	if (offset)
		glDisable(GL_POLYGON_OFFSET_LINE);

	glFlush();
}
Our idle function remains the same except that now polygon offset can be toggled on and off by pressing the O key.
				void idle()
{
	.
	.

	if (opengl->isKeyDown('O'))
	{
		opengl->keyUp('O');
		offset = !offset;
	}
}
By enabling and disabling polygon offset, you can clearly see how it affects your program. The result is shown below?:
|
|
| Polygon Offset Enabled |
Polygon Offset Disabled |
You should now be able to effectively combat z-buffering and stitching. This is a great feature of OpenGL and can be used to greatly enhance the appearance of your application.
Please let me know of any comments you may have : Contact Me
|
Win32?Source?Files?: |

|

|
|
|
GLUT?Source?Files?: |
|
|

|