|
|
2008年10月19日
我選擇的是ubuntu8.04 + codeblocks8.02的開發(fā)環(huán)境。 Ogre用的是1.4.5的版本。 下面是用SDL進(jìn)行的一個(gè)簡(jiǎn)單的代碼.
#include <Ogre.h>
#include <iostream>
#include <SDL/SDL.h>
#include <SDL/SDL_syswm.h>
#include <SDL/SDL_events.h>
using namespace std;
using namespace Ogre;
class AppListener : public FrameListener
{
public:
AppListener( RenderWindow *_win ) : win( _win )
{
}
public:
bool frameStarted(const FrameEvent& evt)
{
if ( !FrameListener::frameStarted( evt ) )
return false;
SDL_PollEvent( &event );
return true;
}
bool frameEnded(const FrameEvent& evt)
{
if ( !FrameListener::frameEnded( evt ) )
return false;
SDL_PollEvent( &event );
if ( event.type == SDL_KEYDOWN )
{
if ( event.key.keysym.sym == SDLK_ESCAPE )
return false;
}
return true;
}
private:
RenderWindow *win;
SDL_Event event;
};
void parseWindowGeometry( Ogre::ConfigOptionMap& config, unsigned int& width, unsigned int& height, bool& fullscreen );
int main()
{
Root *root = new Root( "plugins.cfg" );
RenderWindow *win;
if ( !root->showConfigDialog() )
return 0;
if ( SDL_WasInit( SDL_INIT_VIDEO ) == 0 )
{
unsigned int height = 300, width = 400;
bool fullscreen;
parseWindowGeometry( root->getRenderSystem()->getConfigOptions(), width, height, fullscreen );
root->initialise( false );
SDL_Init( SDL_INIT_VIDEO );
SDL_SetVideoMode( width, height / 2, 0, 0 );
SDL_WM_SetCaption( "OgreTest", "ogretest" );
SDL_SysWMinfo info;
SDL_VERSION(&info.version);
SDL_GetWMInfo(&info);
std::string dsp(&(DisplayString(info.info.x11.display)[1]));
std::vector<Ogre::String> tokens = Ogre::StringUtil::split(dsp, ".");
Ogre::NameValuePairList misc;
std::string s = Ogre::StringConverter::toString((long)info.info.x11.display);
s += ":" + tokens[1] +":";
s += Ogre::StringConverter::toString((long)info.info.x11.window);
misc["parentWindowHandle"] = s;
win = root->createRenderWindow("ogre", width, height, fullscreen, &misc);
///we need to set the window to be active by ourselves, since GLX by default sets it to false, but then activates it upon recieving some X event (which it will never recieve since we'll use SDL).
///see OgreGLXWindow.cpp
win->setActive(true);
win->setAutoUpdated(true);
}
else
{
win = root->initialise( true );
}
root->addFrameListener( new AppListener( win ) );
root->startRendering();
return 0;
}
void parseWindowGeometry( Ogre::ConfigOptionMap& config, unsigned int& width, unsigned int& height, bool& fullscreen )
{
Ogre::ConfigOptionMap::iterator opt = config.find( "Video Mode" );
if ( opt != config.end() )
{
Ogre::String val = opt->second.currentValue;
Ogre::String::size_type pos = val.find( 'x' );
if ( pos != Ogre::String::npos )
{
width = Ogre::StringConverter::parseUnsignedInt( val.substr( 0, pos ) );
height = Ogre::StringConverter::parseUnsignedInt( val.substr( pos + 1 ) );
}
opt = config.find( "Full Screen" );
if ( opt != config.end() )
{
fullscreen = ( opt->second.currentValue == "Yes" );
}
}
}
原理很簡(jiǎn)單。 圖: 
2008年9月29日
摘要: FreeImage is an Open Source library project for developers who would like to support popular graphics image formats like PNG, BMP, JPEG, TIFF and others as needed by today's multimedia applications. F... 閱讀全文
2008年9月28日
午夜時(shí)分,分外寂靜,喧囂爭(zhēng)客源的場(chǎng)面在這時(shí)已叫停,真的很難打到車,更何況我這個(gè)帶血的傷員?
我使勁地?fù)]手給他們,他們走近看到我流血的手,連招呼都不招呼,利馬走人,而你不一樣,你不相信迷信。
你沒有告訴我你的名字,甚至連姓都沒有,因?yàn)檠鳎泐櫜患岸嗾f一句話。
將我?guī)У搅俗罱尼t(yī)院掛了急診,當(dāng)我要付錢的時(shí)候,你卻推辭了。然后連招呼沒打就走了,這一切好像都是真的。我真的很難相信這個(gè)金錢的社會(huì)還會(huì)有這樣的一位好人。我真的不知道怎么感謝,畢竟我窮學(xué)生一個(gè)。你挽救的不只是我的一只手,更多的是我的夢(mèng)想,作為一個(gè)程序員要用我的手來創(chuàng)造未來。我現(xiàn)在不能給你物質(zhì)方面的感謝,也不能為你做些什么。但是我真的發(fā)自內(nèi)心希望你好人一生平安,全家幸福。我一直想辦法去感謝您,今天我就通過blog吧。為你祈福!!!
2008年9月27日
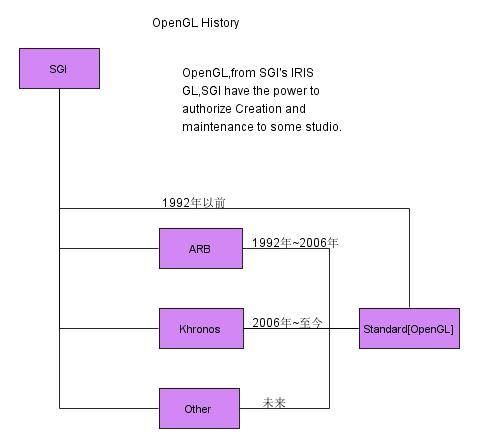
OpenGL發(fā)展的歷史:
OpenGL的前身是SGI公司所開發(fā)的IRIS GL圖形函數(shù)庫(kù),OpenGL不是一種編程語(yǔ)言,而是一個(gè)更像C運(yùn)行時(shí)函數(shù)庫(kù)。OpenGL是一個(gè)開放的工業(yè)標(biāo)準(zhǔn),雖然它是由SGI首創(chuàng),但它的標(biāo)準(zhǔn)不是控制在SGI手中,而是由OpenGL體系結(jié)構(gòu)審核委員會(huì)(ARB)掌管。ARB是由SGC、DEC、IBM、Intel和Microsoft等著名公司于1992年創(chuàng)立,后來陸續(xù)加了nVidia、ATI等圖形芯片領(lǐng)域的巨擎。ARB每4年開一次會(huì),對(duì)OpenGL規(guī)范進(jìn)行維護(hù)和改善,并出臺(tái)計(jì)劃對(duì)OpenGL標(biāo)準(zhǔn)進(jìn)行升級(jí),使OpenGL一直與時(shí)代保持同步。
2006年,SGI公司把OpenGL標(biāo)準(zhǔn)的控制從ARB移交給Khronos小組(www.khronos.org)。Khronos是一個(gè)由成員提供資金的行業(yè)協(xié)會(huì),專注于開放媒體標(biāo)準(zhǔn)的創(chuàng)建和維護(hù)。目前Khronos負(fù)責(zé)OpenGL的發(fā)展和升級(jí)。
如圖:
與OpenGL相關(guān)的函數(shù)庫(kù):
OpenGL工具函數(shù)庫(kù)(GLU)包含了一些函數(shù),它們利用低層的OpenGL函數(shù)來執(zhí)行一些特定的任務(wù)。設(shè)定特定的矩陣(gluLookAt等),OpenGL中的GLU必須以glu開頭。
對(duì)于窗口系統(tǒng)的功能也進(jìn)行了擴(kuò)展,如果在linux下使用x窗口的話,使用GLX函數(shù)庫(kù),而必須以glX開頭。對(duì)于微軟來說,以wgl開頭。IBM的os/2而言,PGL是顯示管理器與OpenGL之間的接口,以pgl開頭。對(duì)于Apple,AGL是支持OpenGL的系統(tǒng)接口,所有的AGL函數(shù)都以agl開頭。
OpenGL實(shí)用工具庫(kù)( GLUT,OpenGL Utility Toolkit )是Mark Kilgrad所編寫的一個(gè)獨(dú)立于窗口系統(tǒng)的工具包,它的目的是隱藏不同窗口系統(tǒng)所帶來的復(fù)雜性。GLUT是下一節(jié)的主題,GLUT函數(shù)以glut開頭。
在OpenGL中,我們常用到軌跡球,下面就對(duì)軌跡球來做點(diǎn)東西:
當(dāng)我們觀察三維空間的物體有很多種方法讓一個(gè)用戶來選擇一個(gè)視點(diǎn),但是我認(rèn)為軌跡球是最好的。
軌跡球的基本原理是:
創(chuàng)建一個(gè)圍繞著物體的球,然后用戶單擊球上面的一個(gè)點(diǎn),再拖動(dòng)這個(gè)點(diǎn)到一個(gè)位置(在屏幕上),讓對(duì)象跟著這個(gè)向量旋轉(zhuǎn)。
尋找鼠標(biāo)位置:
第一步就是尋找到鼠標(biāo)的位置,我們可以通過獲得視見變換矩陣。
可以通過下面的形式來獲得狀態(tài)矩陣:
  GLdouble projection_matrix[16] = GLdouble projection_matrix[16] =  { 1, 0, 0, 0, 0, 1, 0, 0, 0, 0, 1, 0, 0, 0, 0, 1 }; { 1, 0, 0, 0, 0, 1, 0, 0, 0, 0, 1, 0, 0, 0, 0, 1 };
GLdouble modelview_matrix[16] = { 1, 0, 0, 0, 0, 1, 0, 0, 0, 0, 1, 0, 0, 0, 0, 1 };
int viewport_matrix[4] = { 0, 0, 640, 480 };

glGetDoublev( GL_PROJECTION_MATRIX, projection_matrix );
glGetDoublev( GL_MODELVIEW, modelview_matrix );
glGetIntegerv( GL_VIEWPORT, viewport_matrix );我們獲取這些矩陣后面使用,我們可以使用他們來處理鼠標(biāo)輸入,鼠標(biāo)坐標(biāo)mouse_x和mouse_y,可以通過gluUnProject來獲得鼠標(biāo)下面場(chǎng)景中的一個(gè)點(diǎn)。
GLdouble x, y, z;
gluUnProject( mouse_x, mouse_y,
modelview_matrix,
projection_matrix,
viewport_matrix,
&x, &y, &z );
一旦場(chǎng)景中的這個(gè)點(diǎn)被找到,問題的關(guān)鍵就是建立一個(gè)從攝象機(jī)位置到這個(gè)點(diǎn)的光線,然后尋找這個(gè)光線和這個(gè)軌跡球的交點(diǎn)。這個(gè)光線是E + t * ( P - E )的點(diǎn)集,這里E是眼睛點(diǎn)位置,P是場(chǎng)景中的那個(gè)點(diǎn),t是一個(gè)變量,而軌跡球是S的點(diǎn)集,這里S^2 = r,r是軌跡球的半徑。如果S = E + t * ( P - E ),那么存在一個(gè)點(diǎn)既在軌跡球上,又在光線上,這樣,我們可以通過帶入法推出:( E + t * ( P - E ) ) ^ 2 = r。我們知道向量E、P以及標(biāo)量r,所以可以推出來t,這是一個(gè)二次方程,如果無解,說明光線和軌跡球無交點(diǎn)。如果有2個(gè)解,應(yīng)當(dāng)選擇最靠近眼睛的那個(gè)解。
軌跡球的旋轉(zhuǎn)問題:
如果你單擊拖拽軌跡球上的一個(gè)點(diǎn)到另一個(gè)位置,該如何做呢?
一個(gè)簡(jiǎn)單的方法,做起點(diǎn)到結(jié)束點(diǎn)的x乘為旋轉(zhuǎn)軸,然后尋找將要旋轉(zhuǎn)的角度,這個(gè)可以通過做點(diǎn)乘得到。
計(jì)算旋轉(zhuǎn)矩陣:
我們通過四元數(shù)來解決它。四元數(shù)是二維復(fù)數(shù)的擴(kuò)展,特別適合做旋轉(zhuǎn)。
如果我們有一個(gè)單位向量( x, y, z ),我們可以通過乘以旋轉(zhuǎn)角度的正弦的一半獲得四元數(shù)的x, y, z部分的修正值,w是由旋轉(zhuǎn)角的的余弦的一半決定。大家知道所有的這么值可以被組裝進(jìn)一個(gè)旋轉(zhuǎn)矩陣:
w * w + x *x - y * y - z * z, 2 * x * y + 2 * w * z, 2 * x * z - 2 * w * y, 0
2 * x * y - 2 * w * z, w * w - x * x + y * y - z * z, 2 * y * z + 2 * w * x, 0
2 * x * z + 2 * w * y, 2 * y * z - 2 * w * x, w * w - x * x - y * y + z * z, 0
0, 0, 0, w * w + x * x + y * y + z * z
2008年9月24日
最新的Ogre穩(wěn)定版本是1.6.0RC1[shoggoth],在1.6.0版本中OgreFrameListener.h中的類FrameListener多出了一個(gè)叫virtual bool frameRenderingQueued( const FrameEvent& evt ) { return true; }的函數(shù)。這個(gè)函數(shù)和virtual bool frameStarted( const FrameEvent& evt ) { return true; }有明顯的區(qū)別。
在源代碼中對(duì)frameStarted的注釋是:
/** Called when a frame is about to begin rendering.
@remarks
This event happens before any render targets have begun updating.
@return
True to go ahead, false to abort rendering and drop
out of the rendering loop.
*/
大體翻譯是:
當(dāng)一幀將要開始渲染的時(shí)候被調(diào)用。
這個(gè)事件發(fā)生在所有渲染目標(biāo)已經(jīng)開始更新之前。
而在源代碼中對(duì)frameRenderingQueued的注釋是:
/** Called after all render targets have had their rendering commands
issued, but before render windows have been asked to flip their
buffers over.
@remarks
The usefulness of this event comes from the fact that rendering
commands are queued for the GPU to process. These can take a little
while to finish, and so while that is happening the CPU can be doing
useful things. Once the request to 'flip buffers' happens, the thread
requesting it will block until the GPU is ready, which can waste CPU
cycles. Therefore, it is often a good idea to use this callback to
perform per-frame processing. Of course because the frame's rendering
commands have already been issued, any changes you make will only
take effect from the next frame, but in most cases that's not noticeable.
@return
True to continue rendering, false to drop out of the rendering loop.
*/
翻譯為:
在所有渲染目標(biāo)已經(jīng)傳出他們的渲染命令之后,并且在渲染窗口被要求去釋放他們的幀之前。
這個(gè)事件的用途其實(shí)是為了把GPU處理的渲染命令推入隊(duì)列,這些只花費(fèi)一點(diǎn)功夫去完成,
而就這一段時(shí)間cpu可以被用來處理一些有用的事情。一旦釋放幀這個(gè)時(shí)間發(fā)生,這條線程請(qǐng)求將要被
堵塞直到GPU準(zhǔn)備好了,這可能浪費(fèi)了cpu的渲染時(shí)間,然而,作為回調(diào)函數(shù)去逐幀處理也是一個(gè)好注意。
當(dāng)然因?yàn)閹匿秩久钜呀?jīng)被放出,任何你做的改變只對(duì)下一幀有效,但是大多數(shù)情況下這不是很明顯的。
加入了這個(gè)函數(shù)也說明了Ogre1.6.0對(duì)gpu重視了。
在ogre自帶的例子中,幾乎都是用examplelistener來處理游戲循環(huán)。這明顯不符合比較大點(diǎn)的游戲開發(fā)。而如果
你想要在大型游戲中應(yīng)用這個(gè)游戲循環(huán)。我感覺首先應(yīng)該有一個(gè)單件的幀監(jiān)聽系統(tǒng)通過游戲主應(yīng)用程序來初始化。然后就是用設(shè)計(jì)模式中的Bridge的將聲明和執(zhí)行分開的功能來處理這個(gè)方法。
偽代碼:
//一個(gè)部件的類
class BrilyfWidgets
{
 bool frameRenderingQueued( const FrameEvent& evt ); bool frameRenderingQueued( const FrameEvent& evt );
 }; };
//類的前向聲明
class BrilyfApplication;
class BrilyfListenSystem : public Singleton<BrilyfListenSystem>, public FrameListener
{
bool frameRenderingQueued( const FrameEvent& evt )
  { {
//一些系統(tǒng)缺省的設(shè)置
//關(guān)鍵部分
BrilyfApplication::getSingletonPtr()->frameRenderQueued( const FrameEvent& evt );
BrilyfApplication::getSingletonPtr()->frameEnded( const FrameEvent& evt );
 } }
bool frameEnded( const FrameEvent& evt );
};
//所有的其他一些部件的初始化都要通過BrilyfApplication,它就是游戲的主管道,控制著所有部件的生命周期,提供了
//frameRenderingQueued和frameEnded的接口供其他的部件來填充。
class BrilyfApplication : public Singleton<BrilyfApplication>
{
//一些對(duì)于單件初始化的處理
//對(duì)應(yīng)的事件
bool frameRenderingQueued( const FrameEvent& evt )
{
for ( int i = 0; i < 16; i++ )
BrilyfWidgets.frameRenderingQueued( );
}
bool frameEnded( const FrameEvent& evt );
BrilyfWidgets mWidgets[16];
};
|