時不時總是聽見有些"人"說,什么軟件不開源**(此處省略2個字)。
其實平心而論,從開發者角度講軟件開源與否并不重要,主要的是開源軟件的意義何在?
對于使用者而言,她只需要能夠熟練掌握軟件同時在一定程度上熟悉原理即可并不需要完全閱讀軟件源碼?
我們以后越來越多的軟件將會使用Qt開發但是我并不打算編譯QT和閱讀QT源碼。
同樣有些代碼即使給你也不一定看得懂。
再者有些軟件適合開源,有些軟件不適合開源
開源與否不是有些"人"罵幾句就可以改變的了。
我的博客動不動就跑進來幾個"人"上門開罵(想想其他人也有類似情況吧)
而且我刪除了評論竟然還發帖繼續開罵(我似乎沒有影響到他人吧)(有的話把博客注銷還是為好吧.)
題外話:我感覺能上cppblog的基本上都是受過高等教育的人,可是印象中感覺其中帶引號的"人"還是不少啊。
-----------------------------------------------------------------------------------------------
以后不允許匿名發帖咯
首先上代碼吧
個人感覺寫的很清爽
/*!==========================================================================
*
* 蓋莫游戲引擎(GaiMo Game Engine)
*
* 版權所有 (C) 2009-2009 成都蓋莫軟件技術工作室 保留所有權利
* Copyright (C) 成都蓋莫軟件技術工作室. All Rights Reserved.
*
* 了解更多情況,請訪問 http://www.gaimo.net
****************************************************************************/
//! 本demo測試引擎渲染到紋理功能
#include <iostream>
#include <GEngine/Header_Config.hpp>
using namespace std;
using namespace core;
#define FRAME_NUMBER 12
//! 定義圖形紋理指針
RefPtr<core::Texture> texture_ptr[FRAME_NUMBER];
//! 渲染到紋理指針
RefPtr<Renderable> rendertotexture;
core::TextDesc* text = NULL;
Matrix4f mat;
float pos[] = {0,0,0};
float length[] = {16,16,16};
void CreateTexture();
void InitCamera();
void Render();
int main(int argc, char *argv[])
{
//! 窗體描述符
ScreenDesc desc;
desc.name_ = "RenderToTextureTest";
//! 生成窗體
RefPtr<Screen> screen = CreateScreen(desc);
//! 生成紋理
CreateTexture();
//! 初始化攝像機
InitCamera();
while(screen->IsOpen())
{
Render();
}
DestroyScreen();
return EXIT_SUCCESS;
}
//! 構造紋理
void CreateTexture()
{
//! 載入資源包
GLOBAL_FILESYSTEM_PTR->RegisterPackage("..\\package\\logo.zip");
RefPtr<core::ReadFile> imagefile;
RefPtr<Image> image[FRAME_NUMBER];
for(int i = 0;i < FRAME_NUMBER ;i++)
{
std::string name = ToString<int>(i);
imagefile = GLOBAL_FILESYSTEM_PTR->GetRead("logo.jpg");
image[i] = GLOBAL_IMAGEMANAGER_PTR->CreateImage(name,imagefile);
}
//! 反色
image[0]->GetInvertImage();
GLOBAL_TEXTUREMANAGER_PTR->CreateTexture2(ToString<int>(0),image[0]);
//! 水平翻轉
image[1]->FlipImage(Image::IMAGE_FLIP_X);
GLOBAL_TEXTUREMANAGER_PTR->CreateTexture2(ToString<int>(1),image[1]);
//! 豎直翻轉
image[2]->FlipImage(Image::IMAGE_FLIP_Y);
GLOBAL_TEXTUREMANAGER_PTR->CreateTexture2(ToString<int>(2),image[2]);
//! Gamma調整
image[3]->AdjustGamma(0.4);
GLOBAL_TEXTUREMANAGER_PTR->CreateTexture2(ToString<int>(3),image[3]);
//! 亮度調整
image[4]->AdjustBrightness(0.4);
GLOBAL_TEXTUREMANAGER_PTR->CreateTexture2(ToString<int>(4),image[4]);
//! 對比度調整
image[5]->AdjustContrast(0.6);
GLOBAL_TEXTUREMANAGER_PTR->CreateTexture2(ToString<int>(5),image[5]);
//! 翻轉
image[6]->FlipImage(Image::IMAGE_FLIP_XY);
GLOBAL_TEXTUREMANAGER_PTR->CreateTexture2(ToString<int>(6),image[6]);
//! 旋轉
image[7]->RotatedImage(Image::IMAGE_ROTATE_90);
GLOBAL_TEXTUREMANAGER_PTR->CreateTexture2(ToString<int>(7),image[7]);
//! Gamma調整
image[8]->AdjustGamma(0.1);
GLOBAL_TEXTUREMANAGER_PTR->CreateTexture2(ToString<int>(8),image[8]);
//! 亮度調整
image[9]->AdjustBrightness(0.8);
GLOBAL_TEXTUREMANAGER_PTR->CreateTexture2(ToString<int>(9),image[9]);
//! 對比度調整
image[10]->AdjustContrast(0.3);
GLOBAL_TEXTUREMANAGER_PTR->CreateTexture2(ToString<int>(10),image[10]);
GLOBAL_TEXTUREMANAGER_PTR->CreateTexture2(ToString<int>(11),image[11]);
for(int i = 0; i < FRAME_NUMBER; i++)
{
//! 紋理構建
GLOBAL_TEXTUREMANAGER_PTR->GetObject(ToString<int>(i))->Generate();
}
text = new core::TextDesc("..\\package\\accid.ttf",12,0,0,3,Color::Cyan);
text->SetText(engine_wstring(L"maker:gaimosoft,ccsdu2004@yahoo.com.cn"));
//! 獲取渲染到紋理指針
rendertotexture = GLOBAL_RENDERER_PTR->GetRenderToTexture(640,480,GL_RGBA,GL_FLOAT);
glEnable(GL_DEPTH_TEST);
}
void InitCamera()
{
RefPtr<Camera> orthocamera = GLOBAL_CAMERAMANAGER_PTR->CreateCamera("orthocamera");
orthocamera->SetOrtho(0,640,480,0,-1.2,0.8);
RefPtr<Camera> camera = GLOBAL_CAMERAMANAGER_PTR->GetActiveCamera();
camera->GetViewPort()->Render();
camera->SetPerspective(45.0f,640.0f/480.0f,1.0f,600.0f);
camera->SetPosition(Vector3f(20,20,20));
camera->SetView(Vector3f());
camera->ApplayProjectMatrix();
}
void RenderTexture()
{
std::string texturename;
for(int i = 0; i < FRAME_NUMBER; i++)
{
texturename = ToString<int>(i);
GLOBAL_TEXTUREMANAGER_PTR->GetObject(texturename)->AttachRenderTarget();
UI_Brush::RenderTexture((i%4)*160,(i/4)*160,160,160);
}
}
//! 處理鼠標響應
void MouseCheck()
{
if(GLOBAL_INPUT_PTR->IsPressedKey(KEY_F1))
{
mat*=mat.Rotate((rand()%200)/900.0f,1,0,0);
}
else if(GLOBAL_INPUT_PTR->IsPressedKey(KEY_F2))
{
mat*=mat.Rotate((rand()%200)/900.0f,0,1,0);
}
else if(GLOBAL_INPUT_PTR->IsPressedKey(KEY_F3))
{
mat*=mat.Rotate((rand()%200)/900.0f,0,0,1);
}
}
void RenderText()
{
UI_Brush::PreRender();
static int offset = 0;
text->Render(Rectf(offset,460,400,20));
offset ++;
if(offset >= 600)
offset = -500;
UI_Brush::PostRender();
}
void RenderToTexture()
{
rendertotexture->BeginRender();
GLOBAL_RENDERER_PTR->Clear(GL_COLOR_BUFFER_BIT | GL_DEPTH_BUFFER_BIT);
GLOBAL_CAMERAMANAGER_PTR->GetObject("orthocamera")->ApplayProjectMatrix();
RenderTexture();
RenderText();
rendertotexture->AfterRender();
}
void RenderToScreen()
{
GLOBAL_RENDERER_PTR->Clear(GL_COLOR_BUFFER_BIT | GL_DEPTH_BUFFER_BIT);
GLOBAL_CAMERAMANAGER_PTR->GetActiveCamera()->ApplayProjectMatrix();
GLOBAL_CAMERAMANAGER_PTR->GetActiveCamera()->ApplayViewMatrix();
GLOBAL_RENDERER_PTR->DrawCube(pos,mat.ptr(),length);
}
void Render()
{
MouseCheck();
RenderToTexture();
RenderToScreen();
}
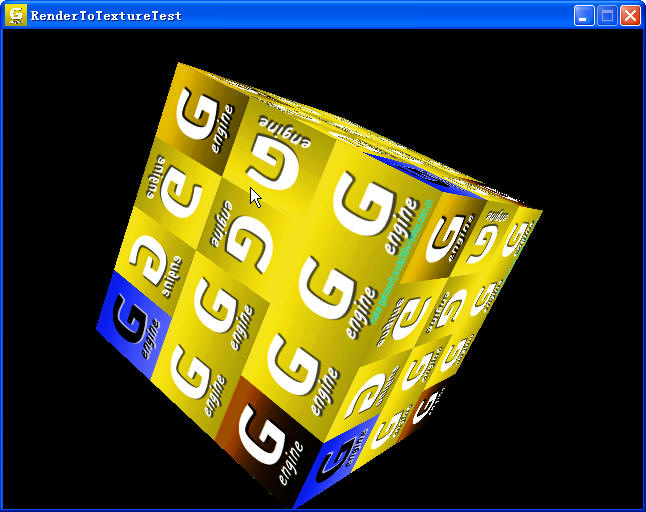
基本步驟就是生成窗體
初始化攝像機
生成紋理
渲染到紋理
渲染到窗體
完了
圖圖如下:
似乎我比較喜歡貼立方體啊 呵呵
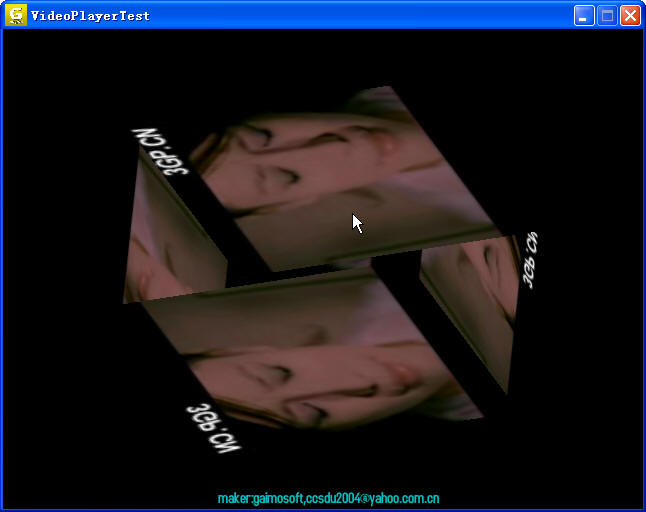
重新修改了引擎的視頻播放這塊
并把視頻等幾個模塊做成了插件的形式
具體代碼和截圖如下:
//! 本代碼測試引擎視頻播放,插件系統,鍵盤測試和立方體繪制
#include <iostream>
#include <GEngine/Header_Config.hpp>
Matrix4f mat;
float pos[] = {0,0,0};
float length[] = {1,1,1};
float offset = -500;
using namespace core;
void MouseCheck();
VideoPlayer* video_player_instance = NULL;
int main(int argc,char *argv[])
{
ScreenDesc desc;
desc.name_ = "VideoPlayerTest";
RefPtr<Screen> screen = CreateScreen(desc);
GLOBAL_PLUGINMANAGER_PTR->SetPluginFolder("..\\plugin");
GLOBAL_PLUGINMANAGER_PTR->InstallPlugin();
VideoPlayerFactory factory;
GLOBAL_PLUGINMANAGER_PTR->RegisterPluginFactory(&factory);
factory.SetData(1,screen->GetHDC());
factory.SetData(2,screen->GetHGLRC());
video_player_instance = factory.Create();
core::TextDesc* text = new core::TextDesc("..\\package\\accid.ttf",12,0,0,3,Color::Cyan);
text->SetText(L"maker:gaimosoft,ccsdu2004@yahoo.com.cn");
video_player_instance->Play("..\\package\\video.mp4");
while(screen->IsOpen())
{
GLOBAL_RENDERER_PTR->Clear(GL_COLOR_BUFFER_BIT | GL_DEPTH_BUFFER_BIT);
video_player_instance->Update();
GLOBAL_RENDERER_PTR->AttachThreadRender();
GLOBAL_RENDERER_PTR->Clear(GL_COLOR_BUFFER_BIT | GL_DEPTH_BUFFER_BIT);
uint id = video_player_instance->GetFrame();
GLOBAL_TEXTUREMANAGER_PTR->BindTexture2(id);
GLOBAL_RENDERER_PTR->DrawCube(pos,mat.ptr(),length);
UI_Brush::PreRender();
text->Render(Rectf(offset,460,400,20));
offset ++;
if(offset >= 600)
offset = -500;
UI_Brush::PostRender();
GLOBAL_RENDERER_PTR->DetachThreadRender();
MouseCheck();
}
video_player_instance->Stop();
delete text;
DestroyScreen();
return EXIT_SUCCESS;
}
//! 處理鼠標響應
void MouseCheck()
{
if(GLOBAL_INPUT_PTR->IsPressedKey(KEY_F1))
{
mat*=mat.Rotate((rand()%200)/900.0f,1,0,0);
}
else if(GLOBAL_INPUT_PTR->IsPressedKey(KEY_F2))
{
mat*=mat.Rotate((rand()%200)/900.0f,0,1,0);
}
else if(GLOBAL_INPUT_PTR->IsPressedKey(KEY_F3))
{
mat*=mat.Rotate((rand()%200)/900.0f,0,0,1);
}
}
這次并沒有做成全窗體播放的樣子而是從播放器獲取紋理標識
然后再渲染之 這樣可以作出滿意的樣子了
截圖為:

1.
opengl中
gluBuild2DMipmaps()與glTexImage2D()
是很常用的函數
他們的作用是綁定函數
但是有時候使用
glTexImage2D
并不能正確綁定紋理
其原因據我所知有2個
1個是圖形大小不是2的整數次冪
還有一個就是
如果使用glTexImage2D,則在紋理包裹模式中不適用MIPMAP系列
摘要: 文件系統的功能:1.資源包裹2.提供資源載入速度3.資源加密在蓋莫游戲引擎中文件系統由讀文件,寫文件,XML序列化對象,ConfigFile構成文件系統的接口如下:1.讀文件
Code highlighting produced by Actipro CodeHighlighter (freeware)http://www.CodeHighlighter.com/-->/////////////...
閱讀全文
使用boost pool的簡單例子如下:
#include <cstdlib>
#include <iostream>
#include <boost/pool/pool.hpp>
#include <boost/pool/object_pool.hpp>
using namespace std;
using namespace boost;
class Object
{
public:
Object(){cout<<"new obj"<<endl;}
~Object(){cout<<"delete obj"<<endl;}
};
int main(int argc, char *argv[])
{
//!每次分配的塊的大小
const int blocksize = sizeof(int);
boost::pool<> alloc(blocksize);
for(int i = 0; i < 100; i++)
{
//! 分配
int* ptr = (int*)alloc.malloc();
cout<<*ptr<<endl;
//! 釋放
alloc.free(ptr);
}
//!object pool每次需要指定對象大小
boost::object_pool<Object> pool_alloc;
for(int i = 0;i < 100;i++)
{
//! 分配內存
void* mem = pool_alloc.malloc();
//! 構造
Object *obj = new(mem)Object();
//! 析構
pool_alloc.destroy(obj);
}
system("PAUSE");
return EXIT_SUCCESS;
}
//! ccsdu2004
本篇主要說明boost function的使用例子
設計頭文件:
#include <boost/function.hpp>
基本的function對象例子
boost::function<int(const char*,&int)> f;
代碼該函子對應的函數其返回值為int類型,她有個2個參數分別為const char*和&int類型
一個簡單的例子如下所示:
#include <iostream>
#include <boost/function.hpp>
inline int Sum(const int a,const int b)
{
return a + b;
}
int main()
{
boost::function<int(const int,const int)> sum_ptr;
sum_ptr = ∑
std::cout<<"1+2=:?"<<sum_ptr(1,2);
system("PAUSE");
return EXIT_SUCCESS;
}
如果對應的函數為類的成員函數則其使用例子可參考下面的說明:
#include <iostream>
#include <boost/function.hpp>
#include <functional>
struct Adder
{
Adder(int val):value(val){}
int Add(int x){return x*value;}
int value;
};
int main()
{
//! 對應函數返回值int參數為int
boost::function<int(int)>f;
Adder add(7);
//! 綁定成員函數到boost::function< >
>
f = std::bind1st(std::mem_fun(&Adder::Add),&add);
std::cout<<f(5)<<std::endl;
system("PAUSE");
return EXIT_SUCCESS;
}
對于仿函子則可以這樣做:
#include <iostream>
#include <boost/function.hpp>
#include <functional>
struct Div
{
float operator()(int x, int y)const
{
return((float)x)/y;
}
};
int main()
{
//! 2
boost::function<float(int,int)> div;
div = Div();
std::cout<<div(1,2)<<std::endl;
system("PAUSE");
return EXIT_SUCCESS;
}
//! ccsdu2004
使用c++如何獲取cpu溫度
當前在偵測cpu溫度方面做得最好的是core temp,
其他的相關軟件有cpu Informer,cpu-z,優化大師,魯大師等等
可能獲取cpu溫度的途徑(win2下)
有winio,ring0,smbus,匯編,wmi,apic,bios等等
但是效果都很差
有人有什么好的辦法可以獲得
歡迎討論
這是使用Boost assigne小庫的例子
包括map,vector,array的賦值操作
#include <cstdlib>
#include <iostream>
#include <boost/assign.hpp>
#include <boost/array.hpp>
#include <algorithm>
#include <iterator>
using namespace std;
using namespace boost;
using namespace boost::assign;
int main(int argc, char *argv[])
{
//! vector賦值
vector<int> v;
v += 1,2,3,4,5,6,7,8,9;
copy(v.begin(),v.end(),ostream_iterator<int>(cout,"\n"));
//! map
map<string,int> m;
insert(m)("foo",1)("bar",2)("ss",3);
std::cout<<m.size()<<std::endl;
//! boost array.
typedef array<float,6> Array;
#if BOOST_WORKAROUND(BOOST_DINKUMWARE_STDLIB, == 1) || BOOST_WORKAROUND(__BORLANDC__, BOOST_TESTED_AT(0x564))
Array a = list_of(1.1)(2.2)(3.3)(4.4)(5.5)(6.6).to_array(a);
#else
Array a = list_of(1.1)(2.2)(3.3)(4.4)(5.5)(6.6);
#endif
copy(a.begin(),a.end(),ostream_iterator<float>(cout,"\n"));
typedef boost::tuple<int,std::string,int> tuple;
std::vector<tuple> vt = tuple_list_of(1,"foo",2)(3,"bar",4);
std::map<std::string,int> mp = pair_list_of("foo",3)("bar",5);
system("PAUSE");
return EXIT_SUCCESS;
}
//! ccsdu2004
這是簡單的使用boost文件系統的例子
在devc++下編譯需要2個庫一個libboostsystem一個libboostfilesystem
基本的研發如下:
#include <cstdlib>
#include <iostream>
#include <boost/filesystem.hpp>
using namespace std;
namespace fs = boost::filesystem;
int main(int argc, char *argv[])
{
std::cout<<"sizeof(intmax_t)is:"<<sizeof(boost::intmax_t)<<'\n';
fs::path path("main.cpp",fs::native);
if(!fs::exists(path))
{
return -1;
}
if(!fs::is_regular(path))
return -1;
std::cout<<"size is:"<<fs::file_size(path)<<"字節"<<std::endl;
fs::path full_path(fs::initial_path<fs::path>());
full_path = fs::system_complete(fs::path("main.cpp"));
//! 獲取給定文件全路徑
cout<<"full path name is:"<<full_path.file_string()<<std::endl;
//! 檢測是不是路徑
cout<<"is path:"<<fs::is_directory(full_path)<<std::endl;
unsigned long file_count = 0;
unsigned long dir_count = 0;
unsigned long other_count = 0;
unsigned long err_count = 0;
full_path = fs::system_complete(fs::path("C:\\WINDOWS"));
//! 目錄迭代
fs::directory_iterator end_iter;
for(fs::directory_iterator dir_itr(full_path);dir_itr != end_iter;++dir_itr)
{
try
{
if(fs::is_directory(dir_itr->status()))
{
++dir_count;
std::cout<<dir_itr->path().filename()<<"[directory]\n";
}
else if(fs::is_regular_file(dir_itr->status()))
{
++file_count;
std::cout<<dir_itr->path().filename()<<"\n";
//! 全路徑名字
std::cout<<dir_itr->path().native_file_string()<<std::endl;
}
else
{
++other_count;
std::cout << dir_itr->path().filename() <<"[other]\n";
}
}
catch(const std::exception & ex)
{
++err_count;
std::cout<<dir_itr->path().filename()<<" "<<ex.what()<<std::endl;
}
}
std::cout<<"\n"<<file_count<<"files\n"<<dir_count<<" directories\n"<<other_count<<" others\n"<<err_count<<" errors\n";
//! 生成文件目錄
fs::create_directories(fs::path("filesystem"));
system("PAUSE");
return EXIT_SUCCESS;
}
//! ccsdu2004
boost文件系統還不錯
要是再加入對壓縮包或者資源包的支持就更好了!