Introduction
I like the .X file format: its organisation and structure suits me. But why would I need to load and display X files without DirectX? My needs were simple:
- I often use Borland C++ 5.01 compiler. The dxguid.lib cannot simply be converted from COFF to OMF without losing much information and rendering the DirectX SDK almost useless.
- I wanted to be platform independent.
- I wanted to understand how DirectX was rendering meshes and what was hidden in the helper functions.
The code samples use Freeglut and were written using DevCpp 5.0 (4.9.9.1) and minGw 3.4.2. This article is designed to be read while referencing the sample source code.
1. Loading and displaying the Mesh from an X File
Before getting into any kind of development, we need to define first what a mesh is and how it is stored within the X file. We will then derive and implement a design.
1.1. Design
1.1.1. Descriptions
A polygonal mesh is a structured list of points (called vertices) connected together to describe a surface. In our case, the mesh will define the surface of our model.
To texture the polygonal mesh, we associate texture coordinates with each vertex to know which part of an associated bitmap to draw on the mesh (e.g.: drawing tiny's jacket on the mesh part modelling the jacket).
Each face of a mesh can also be associated with a material. A material describes the colour reflected by an illuminated model. The colour is often defined as a set of Red, Green, Blue and Alpha components.
Let's now look into the X File format.
The .X File format can be either in plain text or in binary. This is given in the header of the file. We will look into the text format. The binary format will be addressed in the fifth chapter.
The X file format is structured into blocks describing elements of the model. You can browse [MSDN] to find descriptions of all the different blocks. A pair of braces delimits each block. An opening brace must always be paired with a closing brace. There is a hierarchical relationship between the blocks since some may contain others. The table below will outline the hierarchies non-exhaustively:
| Block |
Contains |
| Frame |
FrameTransformMatrix |
| Frame |
| Mesh |
| Mesh |
MeshNormals |
| MeshTextureCoords |
| MeshMaterialList |
| SkinMeshHeader |
| SkinWeights |
| MeshMaterialList |
Material |
| Material |
TextureFileName |
| AnimationSet |
Animation |
| Animation |
AnimationKey |
We are interested in the Mesh Block. This block can be either directly accessible or embedded within a frame. We may find many meshes within the same X file. For example, there are two meshes in tiny_4anim.x. The mesh block holds all the necessary information for its display:
- MeshNormals: a list of normal vectors used in case the model is illuminated.
- MeshTextureCoords: Texture coordinates for each Material.
- MeshMaterialList: the list of Materials for the mesh. This block also associate a Material index to each face of the model.
Since we want to have a working demo, we need to support the following:
- Recognise the type of the format of the file (text or binary),
- Extract all the meshes and their associated blocks into a model,
- Concatenate the meshes of a model to simplify the use of the model,
- Create a mesh subset for each material used,
- Calculate the bounding box coordinates of the mesh,
- Display the model mesh under OpenGL.
Whew! Though that list is small, there is much work to do before we are able to display a mesh.
1.1.2. Code Design
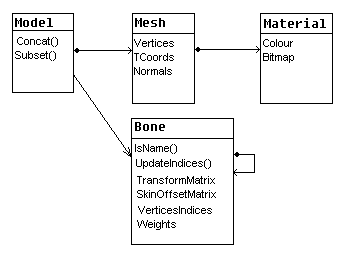
The graph below sums up the class hierarchy for the Model object derived from the descriptions above:

The Model class has a single method to concatenate meshes.
The Mesh class maintains static lists of vertices, texture coordinates and normal vectors.
The Material class holds a colour and the Bitmap texture.
Wait a minute! How are we going to draw the model?
We could use the Model Object and add a Draw method. But doing this will cause some problems down the road: when we get into mesh animation, we will calculate a new set of vertices from the original mesh vertices at each animation frame. If we want to display the same model but with different poses (say like in a mob of monsters), we would have to calculate the model mesh for each monster. Instead we will create an Object3D class which will be used to perform all calculations on a model mesh. This Object3D class will be initiated with a Model class and will contain the methods to draw and calculate the bounding box of the mesh.
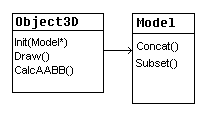
Why don't we have a Load method within the Model object?
There is a simple answer. There are many 3D-model file formats. We would need to implement a load method for each existing file format plus a function to get the correct loading function from the file extension. This would transform our code into some ungainly spaghetti.
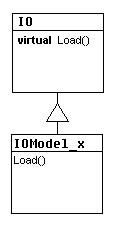
We will use a loading interface for ease of implementing future loading functionality. From this loading interface, we will derive our X File loading class.
1.2. Implementation
At last! We can now begin coding. But before diving into the implementation of our design, I will quickly describe the framework into which our code will be embedded. You can find the framework in the file Sample0.zip.
1.2.1. Quick description of the framework (file Sample0.zip)
This framework is built on top of Glut. All the screen manipulations are encapsulated within a Screen object. This Screen object is also responsible for Font manipulation and texture loading and registration under OpenGL.
The Sample0 example shows how the OpenGL logo texture is loaded and selected before being displayed on the screen.
There is also a timer class used to calculate the elapsed time since the last call. This class is based on the Win32 function GetTickCount. This can easily be replaced by the function glutGet(GLUT ELAPSED TIME)).
Finally, there are some tracing macros defined in ToolBox\MyTrace.h.:
- DECLARE_TRACE: declares the tracing object.
- START_TRACE: initialises the tracing file in the directory Debug.
- END_TRACE: removes and deletes the tracing object.
- MYTRACE: prints the data in the Glut console window and in the tracing file.
All code modifications explained in this article will be signalled within the source by the following tags:
/***********************************************
NEW-NEW- NEW- NEW- NEW- NEW- NEW*/
…
Code modification
…
/***END***************************************/
All right! Let's first look at the code in the file Sample1.zip.
1.2.2. Parsing the file (file Sample1.zip)
The loading interface is defined in framework\Frm_IO.h. This is a template interface with two protected methods to help users to convert text to floating point numbers and to remove all occurrences of a character from a string.
The X File loading class is defined in files ToolBox\IOModel_x.h and cpp.
This is what happens in pseudo-code:
Open the file
Check the file Header
Grab a reference to the Model Object to fill in
Enter the main processing loop:
While we have not reached the end of file
Read the block name (ProcessBlock)
If the block name is recognised, process it.
Else avoid the block (AvoidTemplate)
The file Header is checked by comparing the value read from the file with macros defined in the file XfileStructs.h and given by Microsoft in [MSDN]. These macros are important since they can also be used to process binary files.
There are two main utility functions:
- ProcessBlock: This function checks the current character to identify the start of a block name and avoid comments (which start by the characters # or //). If a valid character is detected, this function reads in the string until it finds a space, then calls the utility function Block. This second function will look up in the list of XOF_TEMPLATEID structure (this structure pairs a block name with a token identifier). If it recognises the string as a valid Block Name, it will return the corresponding Token Identifier else this function returns a X_UNKNOWN Token.
- AvoidTemplate: This function will avoid all the data enclosed between a matched pair of braces. It consumes an opening brace character then checks each successive character. If it finds another opening brace character, this function will call itself recursively. This function returns whenever it finds a closing brace.
These utility functions are invaluable to process a text X File since they help us narrow down the blocks we want to process. If a block is contained within another one like in the Frame structure, it will suffice to duplicate the processing loop inside a specialised processing function for the frame structure (see the function ProcessBone(void)).
We found a mesh! Hallelujah! Now we have to process it. This is the task of the specialised function ProcessMesh. Here is what happens in pseudo-code:
Create an empty Mesh object and initialise it.
Read in the name of the mesh.
If there is no name, assign a name to that mesh.
Read in the number of vertices.
Load the list of vertices into the Mesh object.
Read in the number of faces
Load the list of faces into the Mesh object.
Enter the mesh processing loop:
While we have not reached the end of the block
Read the block name (ProcessBlock)
If the block name is recognised, process it.
Else avoid the block (AvoidTemplate)
Once the Mesh block is fully processed we add the Mesh object to the Model's list of Meshes.
Why do we need a mesh name? The X file format either declares the mesh or only references the mesh name within the block that is concerned by it. To be able to trace what happens and check that the mesh is correctly associated, we need a unique mesh name. If there are no names, we need to create a unique name (this is done by the utility function SetUID).
Next we process the Mesh block data (see [MSDN] for the description of that data). Then we enter a loop to process all embedded blocks.
The Texture Coordinates block is very simple to process: we read in the number of texture coordinates, and then we load in the list of texture coordinates. The block is processed.
The Mesh Normal Vectors block isn't any more difficult. We read in the number of vectors, and then we load in the list of vectors. Next we load in the list of vector indices per face: this gives us the vertex normals for each face allowing for correct illumination of the model.
Material list blocks are a little trickier. Here is the pseudo-code:
Read in the number of Materials used by that mesh.
Read in the material index for each face
Enter the material list processing loop:
While we have not reached the end of the block
Read the block name (ProcessBlock)
If the block name is recognised, process it.
Else avoid the block (AvoidTemplate)
All that is left is to process each Material description block within the Material list. Here we go:
Read in the face colour.
Read in the emissive power.
Read in the specular colour.
Read in the emissive colour.
Enter the material description processing loop
While we have not reached the end of the block
Read the block name (ProcessBlock)
If the block is TextureFileName, we read in the bitmap name.
Else avoid the block (AvoidTemplate)
Once the material is processed, we add it to the mesh's list of materials.
And that's it! All the meshes are loaded into the model object.
1.2.3. Concatenating meshes and creating subsets
We will now look into the files framework\Frm_Mesh.h and cpp.
We can't yet display the meshes loaded within the model. First, we want to concatenate the meshes because:
- This simplifies the mesh maintenance (only one material list, one normal vectors list and one list of vertices and faces).
- This simplifies the drawing step further down the line: we remove a loop through a list of meshes and we only draw a single vertex array.
If you look closely at the Mesh block parsing code, you see at the beginning the initialisation of a series of values for the mesh: these values are the sum of the previous meshes indexes (number of vertices, number of faces, … ). These values will be used:
- To deduce the final size of the concatenated mesh.
- To increment all index references by their starting values to have a correctly displayed mesh.
Now let's have a look at the pseudo-code:
Create a new mesh and retrieve its dimension from the last mesh in the list.
Check the new mesh dimensions and resolve all discrepancies.
Create all the new mesh arrays.
Process each mesh from the model list
For each mesh increment the index references.
Copy each mesh data into the new mesh.
Move each mesh material into the new mesh material list.
Delete the model mesh list.
Add to the model mesh list the new concatenated one.
When we calculate the new mesh dimensions, we need to take care of differences between mesh descriptions. One mesh may use textures and thus have texture coordinates while another may just be coloured and have no texture coordinates. To solve that problem, we duplicate the vertex array size to initialise the texture coordinates array. If we didn't do that, the face list would be divided between indexed faces with colour information and indexed faces with texture coordinates.
Now that we have concatenated our meshes, there is one step left: we need to create subsets. Let me explain: we have created a mesh with multiple materials. We want to divide our array of faces into a list of faces for each material used. The aim is to have only one call to set a material before drawing our mesh subset.
The code is very straightforward:
For each Material in the material list
Count the number of occurrences of that material in the FaceMaterial list
Initialise the subset
For each occurrence of that material in the face material list copy the face data to the subset
Add the subset to the list of subsets
1.2.4. Displaying the result
At last, we have parsed our X File, we have concatenated our Meshes and our Model Object is ready for display. Only one part of our design is left for implementation: the Object3D class that will be in charge of all the calculations based on the original mesh.
Let's look at the file Sample1.cpp. During the initialization of the Glut demo, we call our specialised loader object to parse the file tiny_4anim.x into our Model instance. If the Model was successfully loaded, we concatenate the meshes. We load up into OpenGL all bitmap textures declared within the Meshes material list.
Now we enter the meat of our subject: we initialise an instance of Object3D with our loaded Model. This initialisation keeps a pointer to the Model, gets a pointer to the first mesh of the Model Mesh list and initialises an empty vertex array with the same size as the Model Vertex Array. Then we call the Object3D Update method, which copies the Model Vertex Array into its own array. Last but not least we compute the bounding box coordinates and deduce the centre of the bounding sphere.
Let's display our Object3D! First, we calculate our camera position with the centre of the bounding sphere, and then we call the draw method with our Screen object as a parameter. This draw method will parse the mesh material and subset lists. It will set up each material and draw the corresponding subset until there are no more materials to process.
In the Idle function, we clear the Object3D vertex array and call back the Update function. That's all there is to it. Whew! We finally made it.
Let's increase the complexity. Time for us to look into tiny's skeleton and skin her.
2. Bone hierarchy and skinning
We know how to process a mesh. Still we are not any closer to skeletal animation. We are missing the model skeleton. The example code in Sample2.zip builds upon the previous code to support skinning information.
2.1. Design
2.1.1. Descriptions
In drawing courses, the first thing taught to students for drawing a character is anatomy. To correctly draw a character in a pose, students must know how the body is composed (how the skeleton is made, where the muscles go, how the skin drapes the muscles and the skeleton). Computer graphics are no exception.
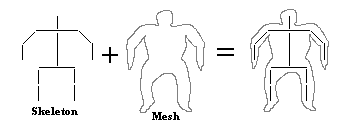
A 3D model of a character consists of a skeleton and a skin. The skeleton describes the underlying structure of the model: it helps modelling any pose for a given 3D character. The skin is represented by a polygonal mesh. Below you see below an outline for a gorilla (that's all my drawing capabilities permit ;) ): the skeleton is black and the skin is grey.

The skeleton is a hierarchic set of bones. The bones are represented by matrices. What does that mean? All bones are defined with a joint at the origin, this is called bone space. The associated matrix of a bone scales, rotates and translates the bone to connect it to its immediate parent. This is a local transform matrix since the bone is placed relative to its immediate parent. To place all the bones of a skeleton in character space we must combine the bone local matrix with its parent combined matrix:
Combined_Matrixbone = Local_Matrixbone * Combined_Matrixparent
This combined matrix will be used to display our vertebrate model. There still is one problem: how do we link the polygonal mesh to the underlying skeleton?
The brute polygonal mesh (like the one we extracted in sample1) is said to be in bind space. To combine the skeleton with the mesh in bone space, we use another set of matrices called skin offset transform matrices. These matrices displace the mesh vertices to conform it to the bones. To display the boned mesh into character space, we combine the skin offset matrix of each bone with its corresponding combined matrix:
Final_Matrixbone = Skin_Offsetbone * Combined_Matrixbone
This means we first displace the mesh from bind space to bone space, and then we transform the skinned mesh from bone space to character space. Now the mesh is draped around the bones in character space simply by multiplying each vertex by its corresponding bone final matrix.
There still is one problem. When bones are making an angle the mesh may show ungainly angles or gaps (see drawing below).
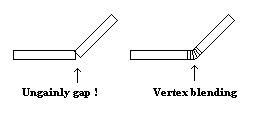
We need to weight each vertex to define the influence of each bone Final Matrix. Thus the final vertex position in character space is defined by:
Vertexdest = SUM ( Vertexsource * Underlying_Bone_Final_Matrix * Underlying_Bone_Weight[Vertexsource])
Where shall we find the information in the X file format? Microsoft uses two different blocks:
- Frame: this block describes the bone. It names the bone. It contains one FrameTransformMatrix block describing the bone local matrix and other Frame blocks defining all the children bones. The frame also references the mesh it applies to either by name or by declaration of a Mesh Block. The children of a frame inherit the mesh reference if they do not define their own.
- SkinWeight: this block contains the bone name, the skin offset matrix, the list of vertices to apply this matrix on and the list of weights for these vertices. We find this block within the Mesh block.
Now let's look at the functionalities we need this time:
- Extract the bone hierarchy with all its related matrices.
- Concatenate the meshes and update the bone references
- Calculate the character space matrices
- Display the skinned model.
2.1.2. Code Design
If we look closely at the way matrices are combined, we won't be able to rely on the glMultMatrix function: The glMultMatrix function multiplies the current Matrix on top of the stack with the matrix passed as a parameter:
Top_of_Stack = Top_of_Stack * Parameter Matrix
We need to combine matrices the other way around:
Top_of_Stack = Parameter Matrix * Top_of_Stack
Since matrix multiplication is not commutative ( A*B != B*A), we need our own matrix class with overloaded multiplication operators for Matrix multiplication (for calculating Bone combined matrices) and scalar multiplication (for weighting the final transformation matrix).
We need a Bone class to store the local transform matrix, the skin offset matrix, the list of vertices the bone is linked to and their associated weights, and pointers to the children bones. The Model stores a pointer to the first bone of the hierarchy.
Now let's draw our model. We first want an ObjectBone class. This class holds and does all the matrix calculations (Combined and final transform matrices). It references a bone from the Model to get the Local Transform Matrix and the Skin Offset Matrix. The Object3D class evolves to store a reference to a hierarchical list of ObjectBones strictly replicating the Model-Bone structure.
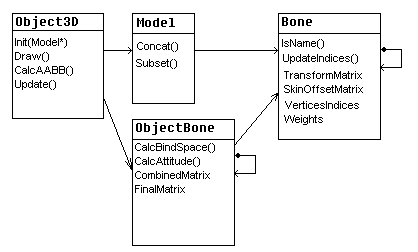
Thus whenever we need to update the skinned mesh, we call the update function from Object3D that will calculate all the matrices in the hierarchical set of ObjectBone before multiplying each of the final matrices by the Model Mesh to get the final skinned mesh.
That's all for the design.
2.2. Implementation
I will not discuss the Matrix class implementation. This is pretty standard and any quick search on the web will give you all you need to know about matrices operations. There are also existing implementations of Matrix classes like the [WML] library you can reuse.
2.2.1. Parsing the file (file sample2.zip)
The modified X File loading class is in files ToolBox\IOModel_x.h and cpp.
We must modify our Frame processing function. This function gets a pointer to a model Bone as a parameter. You will understand when you look at the pseudo-code:
Create an empty Bone object.
Read in the name of the bone.
If there is no name, assign a name to that bone.
If the Parent Bone parameter is null
Store the bone as the head of the hierarchy in the variable _Skeleton
Else
Push the current bone into the parent bone children list
Enter the Bone processing loop:
While we have not reached the end of the block
Read the block name (ProcessBlock)
If the block name is recognised, process it.
If it is an open brace token, read in the mesh name reference.<
> Else avoid the block (AvoidTemplate)
In the Bone processing loop, if the recognised block name is Frame, we recursively call this processing function with the current bone as a parameter.
Processing the FrameTransformMatrix block is simple. We just read in the 16 values into the bone Local Transform matrix.
Processing the SkinWeight block is a little bit trickier since we need to map the SkinWeight data to the bone class. Let's look at the pseudo-code:
Get the bone name
Retrieve the correct bone object from its name
Read in the number of vertices attached to this bone
Load in the vertex indices
Load in the vertex weights
Read in the Skin Offset matrix
To retrieve the correct bone object, we use the IsName method from the bone object. This method checks first if the bone is the one searched for. If not, then it processes all the children bones. If no bones are found, the method returns null.
When we have finished loading the model, we map the mesh to the bones. We propagate the mesh name of a bone to all its children without mesh names. This step is important for when we concatenate the meshes.
2.2.2. Concatenating Meshes
When we concatenate the meshes, we must update the mesh reference and the vertex indices in each bone class. The pseudo-code for the private method UpdateBoneIndices of the Model Class is:
Retrieve a pointer to the mesh assigned to the current bone.
Add the Mesh Starting Vertex Index to the Bone Vertices index list
Recursively process the bone children
When we load multiple meshes, each subsequent mesh has a special variable initiated which is the sum of the previous meshes vertices number (see 1.2.3). This variable is used to update the bone vertices index list to keep the link between the bone and the concatenated mesh.
2.2.3. Displaying the result
We are now left with the last part of our implementation. When we initialise an instance of Object3D with our loaded Model, we replicate the Model Bone hierarchy into a corresponding ObjectBone hierarchy. This is the task of the private Object3D method ReplicateSkeletton. This method takes a Model Bone pointer as a parameter and returns an ObjectBone:
Create an ObjectBone instance
Get the Model Bone name
Get a pointer to the Model Bone
Initialise the Transform matrix with the Model Bone Local transform matrix
For each Model Bone children
Recursively replicate the Model Bone children
Add to the ObjectBone children list the result of the replication
Whoa! What is that transform matrix? This matrix variable within the Object Bone class is used to hold a local transform matrix before any matrix calculation. We will come back to that matrix in the 3rd chapter on animations. Suffice to say it is just a copy of the local transform matrix.
Once the skeleton is replicated, we clear the skinned mesh in Object3D then we call our Update method. This method is modified to calculate all the matrices before skinning the mesh. This calculation is done by the function CalcAttitude with two parameters: the current ObjectBone and its immediate parent:
Calculate the current ObjectBone combined and final matrices.
For each children ObjectBone recursively call this function.
It's pretty straight forward code.
Eventually we call the SkinMesh method to recursively process each ObjectBone to transform each bone vertex by the Final Matrix and the bone weight list.
The character is ready to display. Note that we put the Update method in the idle function: this means that our skinned mesh is calculated back at each call of our Idle function.
3. Animating the model
All that is left is to parse and display the animation sets of our model. The example code in Sample3.zip builds on the previous one to support animation information.
3.1. Design
3.1.1. Descriptions
Animating a skinned model is as simple as animating a cartoon character. The lead cartoonist draws key animation frames. Each of these key frames represents an important character pose at a precise time. If we were to look at key animation frames of the mouse Jerry (from Tom & Jerry), we might see 3 key frames:
- Instant 0: Jerry hides a hammer behind its back.
- Instant + 5 frames: Jerry brandishes the hammer over Tom's foot.
- Instant + 15 frames: Jerry hammers Tom's foot.
The other cartoonists will use these key frames to draw all the intermediate frames (meaning they will draw frames 1 to 4 and 6 to 14).
The animation in a 3D model is only composed of key frames with a timing identification. The Key frame is a picture at a precise moment of the skeleton position. So a key frame can be represented by a set of local transform matrix describing all the bones orientation in character space. The local transform matrix can also be decomposed into:
- a scaling vector,
- a translation vector,
- a quaternion rotation. A quaternion is a mathematical representation of a rotation around an axis as a 4 dimensional "vector".
Thus a local bone transformation can be either represented by a matrix or by a set of vectors and quaternions.
The programmer must calculate all the intermediate key frames by interpolating the key local bone transformations in relation to the time elapsed between two keyframes. The interpolation method is linear for matrices and vectors:
Interpolation = A + (B - A) * FrameID / DeltaKey
Where A and B are two key frames separated by DeltaKey frames, and FrameID is the frame number between both key frames.
Quaternions use spherical linear interpolation (aka SLERP):
Interpolation = A*[sin((1-Elapsed) * Angle)/sin(Angle)] + B * [sin (Elapsed * Angle) / sin(Angle)]
Where A and B are two key quaternion frames, Angle is the total angle between both quaternions and Elapsed = FrameID / DeltaKey.
In DirectX .X file, the animations are grouped into Animation Sets blocks. Within each Animation Set there is an Animation block for each animated bone. Each animation block is composed of one or many Animation Key blocks depending on the representation of the local bone transformations. The table below gives the correspondence between Key types and local bone transformation representations:
| Key Type |
Representation |
| 0 |
Quaternion rotation |
| 1 |
Scaling vector |
| 2 |
Translation vector |
| 4 |
Matrix transformation |
That's all we should know about skinned model animations.
Now let's define our list of desired functionalities:
- Extract all the animation sets.
- Map the animations to the model bones.
- Calculate the animation matrices.
- Display the animated model.
- Switch between animation sets.
3.1.2. Code design
The design to store animation sets is straightforward:
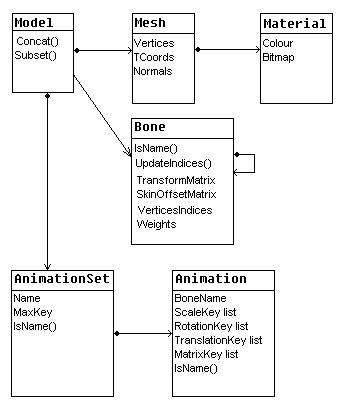
The MaxKey member variable in the animation set class stores the last key frame timing index. Each animation set stores a list of animation description. An animation description corresponds to a bone. Inside an animation description, there is a list of each type of transformation representation possible. A transformation structure follows the same template as the Rotate Key below:
typedef struct {
                                                                            Uint32 Time;
                                                                            Frm::Quaternion Rotation
                                                                            } RotateKey;
The responsibility to calculate the new local transformation matrix is given to our Object3D class:

Whoa! That looks complex. If we compare with the design in chapter 2, we see that Object3D takes an additional pointer to an animation set: the Object3D stores the current animation set played. It also has a new method MapAnimation. This method is called when the user switches animations to change the current animation set pointer and update the ObjectBone class.
The ObjectBone class gets a pointer to the animation class corresponding to its bone name reference. The Object3D method MapAnimation maps the animation to the ObjectBone. ObjectBone also gets a new method CalcAnimation that calculates the local transformation matrix from the current animation timing. So far, so good.
3.2. Implementation
3.2.1. Parsing the file
We add to the main parsing loop a new method to process animations sets. The pseudo-code:
Create an instance of an AnimationSet object
Get the Animation Set name
If there is no name, we assign a name.
While we have not reached the end of the block
Read the block name (ProcessBlock)
If the block name is recognised, we process it.
Else avoid the block (AvoidTemplate)
Once the animation set is processed, we add it to the model's list of sets.
Now let's process animation blocks:
Create an instance of an Animation object
While we have not reached the end of the block
Read the block name (ProcessBlock)
If the block name is recognised, we process it.
If it is an open brace, we read in the Bone name
Else avoid the block (AvoidTemplate)
When the animation is processed, we add it to the AnimationSet animation list
There are animation key blocks inside each animation. We process the animation key block:
Read in the type of transformation
Read in the number of transformations stored in the animationkey
Switch according to the type of transformation
For each transformation listed
Create a transformation key
Read in the Timing
Read in the transformation data
Push the transformation key to the Animation corresponding transformation key.
Now we are ready.
3.2.2. Displaying a single animation set
Displaying the animated model is another matter. We setup as before in sample 2. The difference resides in that we call two new methods of Object3D for animation:
- MapAnimationSet: there are two versions of that function. One uses a string as a parameter, the other an index number. This function will retrieve the animation set either by name or by index and map all the enclosed Animation instances to the ObjectBone hierarchy.
- SetAnimationStep: sets up the step increase for the animation. At each timer call (or user keypress like in the sample), the animation set will advance the main animation set time counter by this step.
The drawing steps are almost the same:
Clear the skinned mesh in Object3D
Calculation the animation set local transform matrices
Update the skinned mesh.
The new step is the calculation of each bone local transform matrices. This step calls a recursive private method CalcAnimation, which:
Calls the animation method of the ObjectBone passed in parameter
For each children ObjectBone
Calls CalcAnimation(children ObjectBone)
The animation method of the ObjectBone does the following: If no animation instance is linked to that bone, bail out.
If the transformations are expressed as matrices=
Advance the internal matrix animation index according to the main Time count
If we are at the last matrix index use the last matrix as a transform matrix
Else interpolate the transform matrix between this matrix index and the next using the Time count parameter.
Else
Set the transform matrix to identity
If there are rotations
Advance the internal rotation animation index according to the main Time count
If we are at the last rotation index multiply use the last quaternion
Else interpolate the rotation quaternion between this rotation index and the next using the Time count parameter.
Convert quaternion to a rotation matrix
Multiply the transform matrix by the rotation matrix obtained
If there are scalings
Advance the internal scaling animation index according to the main Time count
If we are at the last scaling index multiply use the last vector
Else interpolate the scaling vector between this scaling index and the next using the Time count parameter.
Convert the scaling vector to a scaling matrix
Multiply the transform matrix by the scaling matrix obtained
If there are translations
Advance the internal translation animation index according to the main Time count
If we are at the last translation index multiply use the last translation vector
Else interpolate the translation vector between this translation index and the next using the Time count parameter.
Convert the translation vector to a translation matrix
Multiply the transform matrix by the translation matrix obtained
As you can see, we either use an interpolated matrix or a combined transformation matrix. Be aware that matrix multiplication is not commutative: the multiplication of rotation, scaling and translation matrices must always be done in that order.
Now that we have our new local transform matrices, we can calculate our final matrices as usual and obtain our animated skinned mesh.