|
|
Q 在NT/2000/XP中,我想用VC編寫應用程序訪問硬件設備,如獲取磁盤參數、讀寫絕對扇區數據、測試光驅實際速度等,該從哪里入手呢?
A 在NT/2000/XP中,應用程序可以通過API函數DeviceIoControl來實現對設備的訪問—獲取信息,發送命令,交換數據等。利用該接口函數向指定的設備驅動發送正確的控制碼及數據,然后分析它的響應,就可以達到我們的目的。
DeviceIoControl的函數原型為
BOOL DeviceIoControl(
HANDLE hDevice,              // 設備句柄
DWORD dwIoControlCode,       // 控制碼
LPVOID lpInBuffer,           // 輸入數據緩沖區指針
DWORD nInBufferSize,         // 輸入數據緩沖區長度
LPVOID lpOutBuffer,          // 輸出數據緩沖區指針
DWORD nOutBufferSize,        // 輸出數據緩沖區長度
LPDWORD lpBytesReturned,     // 輸出數據實際長度單元長度
LPOVERLAPPED lpOverlapped    // 重疊操作結構指針
);
設備句柄用來標識你所訪問的設備。
發送不同的控制碼,可以調用設備驅動程序的不同類型的功能。在頭文件winioctl.h中,預定義的標準設備控制碼,都以IOCTL或FSCTL開頭。例如,IOCTL_DISK_GET_DRIVE_GEOMETRY是對物理驅動器取結構參數(介質類型、柱面數、每柱面磁道數、每磁道扇區數等)的控制碼,FSCTL_LOCK_VOLUME是對邏輯驅動器的卷加鎖的控制碼。
輸入輸出數據緩沖區是否需要,是何種結構,以及占多少字節空間,完全由不同設備的不同操作類型決定。在頭文件winioctl.h中,已經為標準設備預定義了一些輸入輸出數據結構。重疊操作結構指針設置為NULL,DeviceIoControl將進行阻塞調用;否則,應在編程時按異步操作設計。
Q 設備句柄是從哪里獲得的?
A 設備句柄可以用API函數CreateFile獲得。它的原型為
HANDLE CreateFile(
LPCTSTR lpFileName,                         // 文件名/設備路徑
DWORD dwDesiredAccess,                      // 訪問方式
DWORD dwShareMode,                          // 共享方式
LPSECURITY_ATTRIBUTES lpSecurityAttributes, // 安全描述符指針
DWORD dwCreationDisposition,                // 創建方式
DWORD dwFlagsAndAttributes,                 // 文件屬性及標志
HANDLE hTemplateFile                        // 模板文件的句柄
);
CreateFile這個函數用處很多,這里我們用它“打開”設備驅動程序,得到設備的句柄。操作完成后用CloseHandle關閉設備句柄。
與普通文件名有所不同,設備驅動的“文件名”(常稱為“設備路徑”)形式固定為“\\.\DeviceName”(注意在C程序中該字符串寫法為“\\\\.\\DeviceName”),DeviceName必須與設備驅動程序內定義的設備名稱一致。
一般地,調用CreateFile獲得設備句柄時,訪問方式參數設置為0或GENERIC_READ|GENERIC_WRITE,共享方式參數設置為FILE_SHARE_READ|FILE_SHARE_WRITE,創建方式參數設置為OPEN_EXISTING,其它參數設置為0或NULL。
Q 可是,我怎么知道設備名稱是什么呢?
A 一些存儲設備的名稱是微軟定義好的,不可能有什么變化。大體列出如下
| 軟盤驅動器
| A:, B:
|
| 硬盤邏輯分區
| C:, D:, E:, ...
|
| 物理驅動器
| PHYSICALDRIVEx
|
| CD-ROM, DVD/ROM
| CDROMx
|
| 磁帶機
| TAPEx |
其中,物理驅動器不包括軟驅和光驅。邏輯驅動器可以是IDE/SCSI/PCMCIA/USB接口的硬盤分區(卷)、光驅、MO、CF卡等,甚至是虛擬盤。x=0,1,2 ……
其它的設備名稱需通過驅動接口的GUID調用設備管理函數族取得,這里暫不討論。
Q 請舉一個簡單的例子說明如何通過DeviceIoControl訪問設備驅動程序。
A 這里有一個從MSDN上摘抄來的demo程序,演示在NT/2000/XP中如何通過DeviceIoControl獲取硬盤的基本參數。
/* The code of interest is in the subroutine GetDriveGeometry. The
                code in main shows how to interpret the results of the IOCTL call. */
                #include <windows.h>
                #include <winioctl.h>
                BOOL GetDriveGeometry(DISK_GEOMETRY *pdg)
                {
                HANDLE hDevice;               // handle to the drive to be examined
                BOOL bResult;                 // results flag
                DWORD junk;                   // discard results
                hDevice = CreateFile("\\\\.\\PhysicalDrive0",  // drive to open
                0,                // no access to the drive
                FILE_SHARE_READ | // share mode
                FILE_SHARE_WRITE,
                NULL,             // default security attributes
                OPEN_EXISTING,    // disposition
                0,                // file attributes
                NULL);            // do not copy file attributes
                if (hDevice == INVALID_HANDLE_VALUE) // cannot open the drive
                {
                return (FALSE);
                }
                bResult = DeviceIoControl(hDevice,     // device to be queried
                IOCTL_DISK_GET_DRIVE_GEOMETRY,     // operation to perform
                NULL, 0,               // no input buffer
                pdg, sizeof(*pdg),     // output buffer
                &junk,                 // # bytes returned
                (LPOVERLAPPED) NULL);  // synchronous I/O
                CloseHandle(hDevice);
                return (bResult);
                }
                int main(int argc, char *argv[])
                {
                DISK_GEOMETRY pdg;            // disk drive geometry structure
                BOOL bResult;                 // generic results flag
                ULONGLONG DiskSize;           // size of the drive, in bytes
                bResult = GetDriveGeometry (&pdg);
                if (bResult)
                {
                printf("Cylinders = %I64d\n", pdg.Cylinders);
                printf("Tracks per cylinder = %ld\n", (ULONG) pdg.TracksPerCylinder);
                printf("Sectors per track = %ld\n", (ULONG) pdg.SectorsPerTrack);
                printf("Bytes per sector = %ld\n", (ULONG) pdg.BytesPerSector);
                DiskSize = pdg.Cylinders.QuadPart * (ULONG)pdg.TracksPerCylinder *
                (ULONG)pdg.SectorsPerTrack * (ULONG)pdg.BytesPerSector;
                printf("Disk size = %I64d (Bytes) = %I64d (Mb)\n", DiskSize,
                DiskSize / (1024 * 1024));
                }
                else
                {
                printf("GetDriveGeometry failed. Error %ld.\n", GetLastError());
                }
                return ((int)bResult);
                }
C++位操作包括兩種:傳統的C語言方式的位操作和C++中利用bitset容器的位操作
一、傳統的C方式位操作:
1.基本操作:
使用一個unsigned int變量來作為位容器。
2.操作符:
| 按位或操作符:result=exp1|exp2;當exp1和exp2中對應位中至少有一個為1時,result中對應位為1,否則為0。
& 按位與操作符::result=exp1&exp2;當exp1和exp2中對應位全為1時,result中對應位為1,否則為0。
^ 按位異或或操作符:result=exp1^exp2;當exp1和exp2中對應位不相同時,result中對應位為1,否則為0。
~ 反轉操作符:將位容器中的所有位都反轉,1變為0,0變為1。
<< 按位左移操作符:exp<<n,將容器中所有的位向左移n位,空出的位用0填充。
>> 按位右移操作符:exp>>n,將容器中所有的位向右移n位,空出的位用0填充。
|=,&=,^= 分別對應|&^三種操作符的復合操作符。
3.常用操作
這里我們假設有一個result的unsigned int變量用來儲存32個學生的成績(通過和不通過分別用0和1),這樣result就有33位(result從右至左,從0開始計算位數,在這個例子中0位被浪費)。
(a) 將第27位設置為及格(設作1)其他位不變:
result|=(1<<27) //任意的位值與1作按位或操作其值為1,而與0作按位與操作其值不變
(b) 將第27位設置成不及格(設為0)。
result&=~(1<<27) //任意的位值與0作按位與操作其值為0,而與1作按位與操作其值不變
(c) 反轉第27位的值。
result^=(1<<27) //任意的位值與1作按位異或操作其值為1,而與0作按位異與操作其值不變
二、C++中的bitset容器
1.頭文件:
#include <bitset>
2.聲明一個容器:
(a)聲明一個指定位數的空容器(所有位設為0): bitset<int> bits;
(b)聲明一個指定位數并將指定的幾個位初始化為相應值的容器: bitset<n> bits(int);
bitdet<int> bits(string&)
總結:bitset模板類中類型參數傳遞容器的位數,而構造函數參數通過一個int或一個string&值來從右至左初始化容器中的相應值。
3.bitset的基本用法:
4.bitset與傳統C位操作及字符串的轉換
可以通過to_string()成員將容器轉輸出為一個string字符串,另外還可以用to_long()成員將容器輸出到傳統的用于C風格的位容器中。如:
unsigned long bits = bits.to_long();
sting str(bits.to_string());
5.bitset支持所有的位操作符。
Installing Ubuntu 8.04 under Microsoft Virtual PC 2007
April 24, 2008 — arcanecode
I’m pleased to say that Ubuntu 8.04 is probably the easiest install I’ve had to do with VPC yet! One quick reminder before we begin, when working inside the VPC your mouse will get “trapped” or captured by the virtual computer. You won’t be able to move outside of it. To get it released, just press the RIGHT side ALT key. Left side won’t work, has to be the RIGHT side of your keyboard.
To start with, create a new Virtual PC. For a tutorial, see either my step by step tutorial or the video tutorial if you need more instructions. Since I had the space, I was using 768 meg of ram, and left the disk space at the default of 16 gig. If you can, try and use at least 512 meg of ram for good performance. Use the CD menu option to capture the desktop ISO you downloaded from Ubuntu, or if you have a real CD put it in the drive and capture that. When it launches, you’ll see this screen. (By the way, you can click on any of the screens to see the full size graphic, these have been resized slightly to fit in with most common browser sizes).
![[image - Select Language]](http://arcanecode.files.wordpress.com/2008/04/u804-01-thumb.jpg?w=404&h=346)
Pick your language, I just took the default of English.
![[image - Safe graphics mode]](http://arcanecode.files.wordpress.com/2008/04/u804-02-thumb.jpg?w=404&h=346)
Now press F4 to select an alternate starting mode. When it pops up, change to Safe graphics mode, as you see above, and press Enter. Now pick “Try Ubuntu…” (should already be selected) and press enter. Do NOT pick the Install Ubuntu option, I kept getting VPC errors when trying to install directly.
Additionally, don’t be alarmed if the screen goes black for a while, then you see some garbled graphics. This is perfectly normal, it is just passing through and will be OK when Ubuntu gets done doing it’s thing. It took me about 7 minutes to get from the previous screen to the next one.
![[image - live environment]](http://arcanecode.files.wordpress.com/2008/04/u804-03-thumb.jpg?w=404&h=303)
After it boots you should be in the live session trial environment. Double click the Install icon to begin the install process.
![[image - Installer welcome screen]](http://arcanecode.files.wordpress.com/2008/04/u804-04-thumb.jpg?w=404&h=278)
Screen 1 is just a welcome screen, although you can change your language here if you need to. Press Forward to continue.
![[image - Installer Set Time Zone]](http://arcanecode.files.wordpress.com/2008/04/u804-05-thumb.jpg?w=404&h=276)
Next it wants to know where you are, at least time zone wise. I’m in the central time zone, but set yours appropriately and click Forward.
![[image - Installer Pick your Keyboard]](http://arcanecode.files.wordpress.com/2008/04/u804-06-thumb.jpg?w=404&h=276)
Next you can specify your keyboard. Since I’m using a typical USA style keyboard, I just clicked Forward.
![[image - Installer Prepare Disk Space]](http://arcanecode.files.wordpress.com/2008/04/u804-07-thumb.jpg?w=404&h=275)
Next it asks how you want your disk space partitioned. Since we’re in a virtual environment, it made the most sense to just take the defaults and click Forward.
Be aware, after clicking forward my mouse went into the “I’m busy” mode, and there was a delay while the disks were prepared. Mine went about five minutes. Don’t be alarmed, just wait a few minutes and you’ll then proceed to the next screen.
![[image - Installer Who Are You]](http://arcanecode.files.wordpress.com/2008/04/u804-08-thumb.jpg?w=404&h=276)
On this screen, first supply your name; this will be used in documents and the like. The next text box is the important one - it is for your Ubuntu user name. By default it uses your first name, now is your chance to change it. I rather like mine so will accept it. Next you’ll need to key in a good password and confirm, and finally name the computer. When you are happy, click Forward.
Now is where you may get confused. In the screen above, you are on step 5 of 7. When you click forward, you are suddenly on step 7 of 7. I’m not sure what happened to step 6, I even ran the installer yet one more time just to make sure it was gone. Perhaps it was kidnapped by space aliens?
![[image - Installer is Ready]](http://arcanecode.files.wordpress.com/2008/04/u804-10-thumb.jpg?w=404&h=275)
Apparently even without the missing step 6, the installer has everything it needs. Just click Install to begin the install process. Kick back and wait. Don’t be alarmed if the screen goes black during the process, it’s just the screen saver kicking in. Just click in the VPC and wiggle your mouse and your display will return. I had it kick in several times during the 45 (or so) minutes it took to get everything installed.
![[image - Install complete time to reboot]](http://arcanecode.files.wordpress.com/2008/04/u804-11-thumb.jpg?w=404&h=303)
Eventually Ubuntu will complete it’s install, then give you the above message. On the Virtual PC menu click CD, then release the cd. Then click on the big Restart now button inside VPC.
This was the only real snag I hit in the whole install process, I waited a while and it never did restart on its own. I gave it about five minutes, then in the Virtual PC menu I clicked Action, Reset. I figured since it’s already installed, I wouldn’t lose anything, and I was right.
The boot process does take a few minutes; you’ll see some text then a black screen for about 90 seconds. Then it comes up to the big Ubuntu logo and the orange bar as it loads. You’ll see some garbled graphics for a few seconds, then the login screen finally appeared. I gave it my user id and password, and minutes later I was in Ubuntu.
One last piece of business, fixing the networking. First make sure the network card is mapped to a real network card in your computer. For more instructions on this, see my video, Virtual PC Advanced Settings. After that, click on the network icon in the upper right side of the toolbar, as you see below.
![[image - Fix Networking]](http://arcanecode.files.wordpress.com/2008/04/u804-12-thumb.jpg?w=404&h=67)
Then just pick Wired Network. Once connected you’ll be free to visit your favorite websites!
![[image - Ubuntu open for business]](http://arcanecode.files.wordpress.com/2008/04/u804-13-thumb.jpg?w=404&h=303)
I haven’t had much time to check out other features, or get the sound working so if anyone has a quick fix for that by all means leave a comment below.
C Run-Time Libraries
This topic discusses the various .lib files that comprise the C run-time libraries as well as their associated compiler options and preprocessor directives.
 C Run-Time Libraries (CRT)
The following libraries contain the C run-time library functions.
| C run-time library (without iostream or standard C++ library) |
Associated DLL |
Characteristics |
Option |
Preprocessor directives |
|
libcmt.lib
|
None, static link.
|
Multithreaded, static link
|
/MT
|
_MT
|
|
msvcrt.lib
|
msvcr80.dll
|
Multithreaded, dynamic link (import library for MSVCR80.DLL). Be aware that if you use the Standard C++ Library, your program will need MSVCP80.DLL to run.
|
/MD
|
_MT, _DLL
|
|
libcmtd.lib
|
None, static link
|
Multithreaded, static link (debug)
|
/MTd
|
_DEBUG, _MT
|
|
msvcrtd.lib
|
msvcr80d.dll
|
Multithreaded, dynamic link (import library for MSVCR80D.DLL) (debug).
|
/MDd
|
_DEBUG, _MT, _DLL
|
|
msvcmrt.lib
|
msvcm80.dll
|
C Runtime import library. Used for mixed managed/native code.
|
/clr
|
|
|
msvcurt.lib
|
msvcm80.dll
|
C Runtime import library compiled as 100% pure MSIL code. All code complies with the ECMA URT spec for MSIL.
|
/clr:pure
|
|
.gif) Note Note |
|
The single-threaded CRT (libc.lib, libcd.lib) (formerly the /ML or /MLd options) is no longer available. Instead, use the multithreaded CRT. See Multithreaded Libraries Performance.
|
If you link your program from the command line without a compiler option that specifies a C run-time library, the linker will use LIBCMT.LIB. This is different from previous versions of Visual C++ which used LIBC.LIB, the single-threaded library, instead.
Using the statically linked CRT implies that any state information saved by the C runtime library will be local to that instance of the CRT. For example, if you use strtok, _strtok_l, wcstok, _wcstok_l, _mbstok, _mbstok_l when using a statically linked CRT, the position of the strtok parser is unrelated to the strtok state used in code in the same process (but in a different DLL or EXE) that is linked to another instance of the static CRT. In contrast, the dynamically linked CRT shares state for all code within a process that is dynamically linked to the CRT. This concern does not apply if you use the new more secure versions of these functions; for example, strtok_s does not have this problem.
Because a DLL built by linking to a static CRT will have its own CRT state, it is not recommended to link statically to the CRT in a DLL unless the consequences of this are specifically desired and understood. For example, if you call _set_se_translator in an executable that loads the DLL linked to its own static CRT, any hardware exceptions generated by the code in the DLL will not be caught by the translator, but hardware exceptions generated by code in the main executable will be caught.
If you are using the /clr compiler switch, your code will be linked with an import library, msvcmrt.lib. The import library references a new library, msvcm80.dll, which provides a proxy between your managed code and the native CRT. You cannot use the statically linked CRT ( /MT or /MTd options) with /clr. Use the dynamically-linked libraries (/MD or /MDd) instead.
If you are using the /clr:pure compiler switch, your code will be linked with the import library msvcurt.lib, which also references msvcm80.dll. As with /clr, you cannot link with the statically linked library.
For more information on using the CRT with /clr, see Mixed (Native and Managed) Assemblies; for /clr:pure, see Pure and Verifiable Code.
To build a debug version of your application, the _DEBUG flag must be defined and the application must be linked with a debug version of one of these libraries. For more information about using the debug versions of the library files, see CRT Debugging Techniques.
This version of Visual C++ is not conformant with the C99 standard.
Standard C++ Library
| Standard C++ Library |
Characteristics |
Option |
Preprocessor directives |
|
LIBCPMT.LIB
|
Multithreaded, static link
|
/MT
|
_MT
|
|
MSVCPRT.LIB
|
Multithreaded, dynamic link (import library for MSVCP80.dll)
|
/MD
|
_MT, _DLL
|
|
LIBCPMTD.LIB
|
Multithreaded, static link
|
/MTd
|
_DEBUG, _MT
|
|
MSVCPRTD.LIB
|
Multithreaded, dynamic link (import library for MSVCP80D.DLL)
|
/MDd
|
_DEBUG, _MT, _DLL
|
Note Starting in Visual C++ 2005, LIBCP.LIB and LIBCPD.LIB (via the old /ML and /MLd options) have been removed. Use LIBCPMT.LIB and LIBCPMTD.LIB instead via the /MT and /MTd options.
When you build a release version of your project, one of the basic C run-time libraries (LIBCMT.LIB, MSVCMRT.LIB, MSVCRT.LIB) is linked by default, depending on the compiler option you choose (multithreaded, DLL, /clr). If you include one of the Standard C++ Library Header Files in your code, a Standard C++ Library will be linked in automatically by Visual C++ at compile time. For example:
What is the difference between msvcrt.dll and msvcr80.dll?
The msvcrt.dll is now a "known DLL," meaning that it is a system component owned and built by Windows. It is intended for future use only by system-level components.
What problems exist if an application uses both msvcrt.dll and msvcr80.dll?
If you have a .lib or .obj file that needs to link to msvcrt.lib, then you should not have to recompile it to work with the new msvcrt.lib in Visual C++ 2005. The .lib or .obj file may rely on the sizes, field offsets, or member function names of various CRT classes or variables, and those should all still exist in a compatible way. When you relink against msvcrt.lib, your final EXE and DLL image will now have a dependency on msvcr80.dll instead of msvcrt.dll.
If you have more than one DLL or EXE, then you may have more than one CRT, whether or not you are using different versions of Visual C++. For example, statically linking the CRT into multiple DLLs can present the same problem. Developers encountering this problem with static CRTs have been instructed to compile with /MD to use the CRT DLL. Now that the CRT DLL has been renamed to msvcr80.dll, applications may have some components linked to msvcrt.dll and others to msvcr80.dll. If your DLLs pass CRT resources across the msvcrt.dll and msvcr80.dll boundary, you will encounter issues with mismatched CRTs and need to recompile your project with Visual C++ 2005.
If your program is using more than one version of the CRT, some care is needed when passing certain CRT objects (such as file handles, locales and environment variables) across DLL boundaries. For more information on the issues involved and how to resolve them, see Potential Errors Passing CRT Objects Across DLL Boundaries.
原文鏈接: http://www.cnblogs.com/smartstone/archive/2005/12/22/302457.html
如果在 ATL 組件程序中調用了 CRT 的運行時刻庫函數,比如開平方 sqrt() ,那么編譯的時候可能會報錯“error LNK2001: unresolved external symbol _main”。怎么辦?刪除預定義宏“_ATL_MIN_CRT”!操作方法也見圖一、圖二。(vc.net 2003 中的這個項目屬性叫“在 ATL 中最小使用 CRT”) 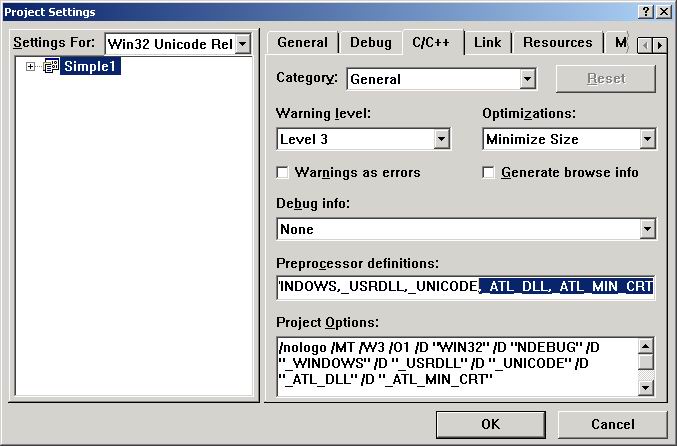  學習VC++時經常會遇到鏈接錯誤LNK2001,該錯誤非常討厭,因為對于編程者來說,最好改的錯誤莫過于編譯錯誤,而一般說來發生連接錯誤時,編譯都已通過。產生連接錯誤的原因非常多,尤其LNK2001錯誤,常常使人不明其所以然。如果不深入地學習和理解VC++,要想改正連接錯誤LNK2001非常困難。 初學者在學習VC++的過程中,遇到的LNK2001錯誤的錯誤消息主要為: unresolved external symbol “symbol”(不確定的外部“符號”)。 如果連接程序不能在所有的庫和目標文件內找到所引用的函數、變量或標簽,將產生此錯誤消息。一般來說,發生錯誤的原因有兩個:一是所引用的函數、變量不存在、拼寫不正確或者使用錯誤;其次可能使用了不同版本的連接庫。 以下是可能產生LNK2001錯誤的原因: 一.由于編碼錯誤導致的LNK2001 1.不相匹配的程序代碼或模塊定義(.DEF)文件能導致LNK2001。例如, 如果在C++源文件內聲明了一變量“var1”,卻試圖在另一文件內以變量“VAR1”訪問該變量,將發生該錯誤。 2.如果使用的內聯函數是在.CPP文件內定義的,而不是在頭文件內定義將導致LNK2001錯誤。 3.調用函數時如果所用的參數類型同函數聲明時的類型不符將會產生LNK2001。 4.試圖從基類的構造函數或析構函數中調用虛擬函數時將會導致LNK2001。 5.要注意函數和變量的可公用性,只有全局變量、函數是可公用的。靜態函數和靜態變量具有相同的使用范圍限制。當試圖從文件外部訪問任何沒有在該文件內聲明的靜態變量時將導致編譯錯誤或LNK2001。 函數內聲明的變量(局部變量) 只能在該函數的范圍內使用。 C++ 的全局常量只有靜態連接性能。這不同于C,如果試圖在C++的多個文件內使用全局變量也會產生LNK2001錯誤。一種解決的方法是需要時在頭文件中加入該常量的初始化代碼,并在.CPP文件中包含該頭文件;另一種方法是使用時給該變量賦以常數。 二.由于編譯和鏈接的設置而造成的LNK2001 1.如果編譯時使用的是/NOD(/NODEFAULTLIB)選項,程序所需要的運行庫和MFC庫在連接時由編譯器寫入目標文件模塊, 但除非在文件中明確包含這些庫名,否則這些庫不會被鏈接進工程文件。在這種情況下使用/NOD將導致錯誤LNK2001。 2.如果沒有為wWinMainCRTStartup設定程序入口,在使用Unicode和MFC時將得到“unresolved external on _WinMain@16”的LNK2001錯誤信息。 3.使用/MD選項編譯時,既然所有的運行庫都被保留在動態鏈接庫之內,源文件中對“func”的引用,在目標文件里即對“__imp__func” 的引用。如果試圖使用靜態庫LIBC.LIB或LIBCMT.LIB進行連接,將在__imp__func上發生LNK2001;如果不使用/MD選項編 譯,在使用MSVCxx.LIB連接時也會發生LNK2001。 4.使用/ML選項編譯時,如用LIBCMT.LIB鏈接會在_errno上發生LNK2001。 5.當編譯調試版的應用程序時,如果采用發行版模態庫進行連接也會產生LNK2001;同樣,使用調試版模態庫連接發行版應用程序時也會產生相同的問題。 6.不同版本的庫和編譯器的混合使用也能產生問題,因為新版的庫里可能包含早先的版本沒有的符號和說明。 編程時打開了函數內聯(/Ob1或/Ob2),但是在描述該函數的相應頭文件里卻關閉了函數內聯(沒有inline關鍵字),這時將得到該錯誤信息。為避免該問題的發生,應該在相應的頭文件中用inline關鍵字標志內聯函數。 8.不正確的/SUBSYSTEM或/ENTRY設置也能導致LNK2001。
圖像增強是指將圖像的部分信息利用某種方式(在頻域或者空域)將以增強,從而有利于某種服務的操作。一般將空域的圖像增強分為線性灰度增強和非線性灰度增強。
線性灰度增強:
設源圖像的灰度范圍在[a-b]的范圍內,我們打算將這個范圍內的像素灰度增強到范圍[c-d],設函數f(x,y)表示坐標為(x,y)點處的原始灰度值,g(x,y)表示增強后的圖像的灰度值:
那么:
g(x,y)=(d-c)*(f(x,y)-a)/(b-a)+c
下面是GDI+實現的線性灰度增強的代碼:
void GrayEnhance(Bitmap *bmp,char minR,char maxR,char minG,char maxG, char minB, char maxB)
{
if(minR>=maxR)
{
return;
}
if(minG>=maxG)
{
return;
}
if(minB>maxB)
{
return;
}
BitmapData bmpData;
bmp->LockBits(&rec,ImageLockModeRead|ImageLockModeWrite ,PixelFormat32bppARGB,&bmpData);
char *pStar=(char*)bmpData.Scan0;
UINT width=bmp->GetWidth();
UINT height=bmp->GetHeight();
char mR=pStart[0],maR=pStart[0],mG=pStart[1],maG=pStart[1],mB=pStart[2],maB=pStart[2];
for(int i=0;i<height;i++)
{
for(int j=0;j<width;j++)
{
if(pStart[0]<mR)
{
mR=pStart[0];
}
else if(pStart[0]>maR)
{
maR=pStart[0];
}
if(pStart[1]<mG)
{
mG=pStart[1];
}
else if(pStart[1]>maG)
{
maG=pStart[1];
}
if(pStart[2]<mB)
{
mB=pStart[2];
}
else if(pStart[2]>maB)
{
maB=pStart[2];
}
pStart+=3;
}
p+=bmpData.Stride-3*width;
}
pStar=(char*)bmpData.Scan0;
for(int i=0;i<height;i++)
{
for(int j=0;j<width;j++)
{
pStart[0]=(char)((maxR-minR)*(pStart[0]-mR)/(maR-mR)+minR);
pStart[1]=(char)((maxG-minG)*(pStart[0]-mG)/(maG-mG)+minG);
pStart[2]=(char)((maxB-minB)*(pStart[0]-mB)/(maB-mB)+minB);
pStart+=3;
}
p+=bmpData.Stride-3*width;
}
bmp->UnlockBits(&bmpData);
}
在GDI里面,你要想開始自己的繪圖工作,必須先獲取一個device context handle,然后把這個handle作為繪圖復方法的一個參數,才能完成任務。同時,device context handle是同一定的繪圖屬性綁定在一起的,諸如畫筆、話刷等等,你必須在畫線之前創建自己的畫筆,然后使用selectObject方法把這個畫筆同已經獲取的device context handle綁定,才能使用LineTo等方法開始畫線。不然,你畫出來的線使用的是默認的屬性:寬度(1),顏色(黑色)。 但是,在GDI+里面,畫線方法DrawLine把畫筆Pen直接作為一個參數,這樣,一定的畫筆就不需要同device context handle 直接綁定了。 下面是GDI和GDI+兩者畫線代碼的演示: GDI:
HDC          hdc;
PAINTSTRUCT  ps;
HPEN         hPen;
HPEN         hPenOld;
hdc = BeginPaint(hWnd, &ps);
hPen = CreatePen(PS_SOLID, 3, RGB(255, 0, 0));
hPenOld = (HPEN)SelectObject(hdc, hPen);
MoveToEx(hdc, 20, 10, NULL);
LineTo(hdc, 200, 100);
SelectObject(hdc, hPenOld);
DeleteObject(hPen);
EndPaint(hWnd, &ps);
GDI+:
HDC          hdc;
PAINTSTRUCT  ps;
Pen*         myPen;
Graphics*    myGraphics;
hdc = BeginPaint(hWnd, &ps);
myPen = new Pen(Color(255, 255, 0, 0), 3);
myGraphics = new Graphics(hdc);
myGraphics->DrawLine(myPen, 20, 10, 200, 100);
delete myGraphics;
delete myPen;
EndPaint(hWnd, &ps);
顯示位圖,你應該使用GDI+里面的Bitmap類或者Image類,這兩個類都提供了方法從硬盤上的一個文件打開文件,創建相應的內存中的位圖對象的工作。然后你可以使用Graphics類的DrawImage方法來繪制該位圖。
下面的代碼初始化GDI+,顯示一個打開文件對話框并且創建Bitmap對象,顯示位圖:
GdiplusStartupInput input;
ULONG_PTR gdiPlusToken;
if(GdiplusStartup(&gdiPlusToken,&input,NULL)!=Ok)
{
return -1;
}
char fileName[200];
OPENFILENAME openStruct;
memset(&openStruct,0,sizeof(OPENFILENAME));
openStruct.lStructSize=sizeof(OPENFILENAME);
openStruct.Flags=OFN_EXPLORER;
openStruct.lpstrFilter="Jpeg files(*.jpg)\0*.jpg\0\0";
openStruct.lpstrFile=fileName;
openStruct.nMaxFile=200;
if(GetOpenFileName(&openStruct))
{
imageFileName=fileName;
}
HDC hdc=GetDC(hPicWnd);
if(hdc==NULL)
{
MessageBox(NULL,"","",MB_OK);
}
Graphics *g=new Graphics(hdc);
WCHAR tmpFileName[100];
size_t numOfChars;
if(/*mbstowcs_s(&numOfChars,tmpFileName,100,fileName,199)*/MultiByteToWideChar(CP_ACP,MB_COMPOSITE,imageFileName.c_str(),200,tmpFileName,100)/*==-1*/)
{
MessageBox(NULL,"Error occured in string convertion!","Error!",MB_OK);
return wParam;
}
HWND hPicWnd;
RECT rc;
GetWindowRect(hPicWnd,&rc);
RectF drawRect(rc.left,rc.top,rc.right-rc.left,rc.bottom-rc.top);
Bitmap *bmp=new Bitmap(tmpFileName);
bmpMain=bmp;
g->DrawImage(bmp,drawRect);
delete g;
ReleaseDC(hwnd,hdc);
GdiplusShutdown(gdiPlusToken);
在我理解看來,Graphics是一個device context和你的drawing conetent之間的一個中介。它存儲了device context的相關屬性,以及drawing content的屬性。這樣,它就能用自己的方法把drawing content“映射”到device content 之上。 GDI中的繪圖工作是直接在device context之上進行的。在GDI—+中,你因該在device context之上再建立一個graphics,然后調用graphics的相關方法完成繪圖等工作。 Graphics類有四個構造函數:
(1)Graphics(

    Image* image
);
(2)Graphics(

    HDC hdc
);

(3)Graphics(

    HDC hdc,
    HANDLE hdevice
);

(4)Graphics(

    HWND hwnd,
    BOOL icm
);


構造函數1從image對象創建一個Graphics類。這種方式允許你在打開某張,或者生成某張,位圖之后,應用Grapgics的方法對改位圖進行操作。
構造函數2從一個傳統的HDC獲取一個Graphics對象,把傳統的在HDC完成的操作接手過來。
構造函數3允許你創建一個綁定于某個特定設備的Graphics類實例。
構造函數4允許你直接從特定的窗口hwnd直接獲取一個Graphics類實例。
GDI+提供了GdiplusStartup和 GdiplusShutdown 函數來進行初始化和完成清理工作。你必須在調用其他的GDI+函數之前,調用GdiplusStartup函數,在完成GDI+工作后調用GdiplusShutdown 。 具體的可以看下面的MSDN上的例子:
#include <windows.h>
#include <gdiplus.h>
#include <stdio.h>
using namespace Gdiplus;
INT main()
{
GdiplusStartupInput gdiplusStartupInput;
ULONG_PTR gdiplusToken;
GdiplusStartup(&gdiplusToken, &gdiplusStartupInput, NULL);
Image* image = new Image(L"FakePhoto.jpg");
printf("The width of the image is %u.\n", image->GetWidth());
printf("The height of the image is %u.\n", image->GetHeight());
delete image;
GdiplusShutdown(gdiplusToken);
return 0;
}
具體的使用方法,可以參考MSDN的說明。
|