Google 開源了很多優秀的 C++ 程序庫�����,本文介紹如何將其中幾個整合到一起。
本文涉及的 Google 庫有:
- gflags - 命令行參數解析�����?����?梢酝耆妹钚衼砼渲脩贸绦?��,省去配置文件�����。
- gtest - C++ 單元測試框架
- gmock - C++ 單元測試中用到的 mock
- glog - 日志庫
- protobuf - 高效的網絡協議格式
還有第三方的 libunwind 和 zlib。
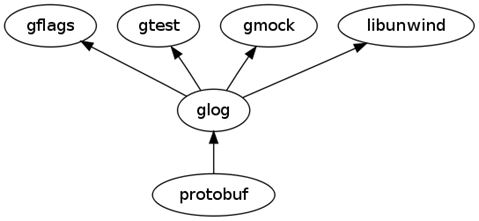
這些庫每個都是獨立的,可以單獨安裝使用��。不過它們之間有內在的依賴關系�����,如果配合使用的話效果更加��。下面這張圖表示了依賴關系:

本文以 64-bit Debian squeeze 為例�����,安裝路徑為默認的 /usr/local。按這個圖的后續遍歷開始依次安裝這些庫�����。這些庫的安裝都沒什么困難�����,無非 ./configure && make && sudo make install 而已。下面開始這篇流水賬日志。
gflags 1.3
在傳統的 C 語言程序里,命令行參數解析是用 getopt(3) 函數�����,所有的參數放到一塊兒解析���。這種方式有一個明顯的缺點��,即命令行參數必須集中在一個地方定義�����,而不能分散到程序的各處。設想一個網絡程序用到了三個庫 (1) 數據庫 (2) 網絡 (3) 日志��,這幾樣東西通常都需要在運行時配置���,比如連到哪個數據庫服務器���,在哪個端口偵聽連接��,日志文件寫到哪個目錄等等��。通常我們會用配置文件,主程序讀取配置文件,然后分別初始化各個庫?��;蛘邚拿钚校ɑ颦h境變量)指定多個配置文件,如數據庫配置文件、網絡配置文件���、日志配置文件等等,主程序把配置文件的路徑作為參數來初始化各個庫。
gflags 能讓程序庫各自定義命令行參數,然后集中到一起解析�����。即分散定義���,集中解析��。這樣應用程序本身就不用管各個庫的配置了,反正都在命令行里指定��,各個庫自己就能從命令行讀到想要的配置信息��。
gflags 的安裝很簡單�����,它不依賴于其他庫。
$ wget http://google-gflags.googlecode.com/files/gflags-1.3.tar.gz
$ tar zxf gflags-1.3.tar.gz
$ cd gflags-1.3/
$ ./configure
$ make –j4
$ make check
$ sudo make install
gtest 1.4.0 (可選), gmock 1.4.0 (可選)
gtest 和 gmock 是 Google 的開源 C++ 單元測試框架�����,glog 會用到它們�����。這兩個庫的安裝與 gflags 類似�����,不再贅述��。
先裝 http://googletest.googlecode.com/files/gtest-1.4.0.tar.gz
再裝 http://googlemock.googlecode.com/files/gmock-1.4.0.tar.gz
注意在安裝 gmock 的時候,make check 可能會失敗�����,因為 LD_LIBRARY_PATH 沒有設置好��,這個小問題相信讀者能解決。
glog 0.3.0
glog 是一個日志庫��,并且帶運行期檢查的宏���,例如 CHECK_EQ 等等�����。這些宏遍布 Google 的開源 C++ 代碼���。
glog 能自動檢測已經安裝好的 gflags, gtest, gmock�����。
glog 會用 libunwind 做 stack unwinding (函數調用棧展開),Debian 下安裝這個庫很簡單:
$ sudo apt-get install libunwind7-dev
如果是 Ubuntu�����,可以去下載合適的 .deb 文件自己安裝���。
但是��,由于 glog configure 的 bug���,這個庫沒有被檢測到�����。要解決這個問題,指標的辦法是修改 configure:
--- configure.old 2010-04-17 13:51:27.000000000 +0800
+++ configure 2010-04-17 13:57:22.000000000 +0800
@@ -24120,7 +24120,7 @@
# Unfortunately, we need to check the header file in addition to the
# lib file to check if libunwind is available since libunwind-0.98
# doesn't install all necessary header files.
-if test x"$ac_cv_have_libunwind_h" = x"1"; then
+if test x"$ac_cv_header_libunwind_h" = x"yes"; then
{ echo "$as_me:$LINENO: checking for backtrace in -lunwind" >&5
echo $ECHO_N "checking for backtrace in -lunwind... $ECHO_C" >&6; }
if test "${ac_cv_lib_unwind_backtrace+set}" = set; then
治本的辦法是在上游修改 configure.ac�����。我已把這個問題向 glog 的作者報告�����,http://code.google.com/p/google-glog/issues/detail?id=42 。
$ wget http://google-glog.googlecode.com/files/glog-0.3.0.tar.gz
$ tar zxf glog-0.3.0.tar.gz
$ cd glog-0.3.0/
# 修改 configure
$ ./configure
$ make –j4
# 為了通過 ./src/demangle_unittest.sh 測試���,需要建一些符號鏈接
$ cd .libs
$ ln -s /usr/local/lib/libgflags.so.0
$ ln -s /usr/local/lib/libgtest.so.0
$ ln -s /usr/local/lib/libgmock.so.0
$ cd ..
$ make check
$ sudo make install
protobuf 2.3.0
protobuf 的安裝與前面的庫無關。它可以用 zlib 來壓縮數據�����,先安裝 zlib dev
$ sudo apt-get install zlib1g-dev
為了能讓 protoc 直接運行���,需要在編譯的時候指定 run path:
$ ./configure
$ LD_RUN_PATH=/usr/local/lib make
$ make check
$ sudo make install
為了檢驗成果���,我們編譯一個用到了以上這些庫的程序 evproto���。
evproto
evproto 簡單地用 libevent2 實現了 Google Protocol Buffers RPC��。
evproto 采用 CMake 構建�����,先安裝它:
$ sudo apt-get install cmake
然后下載源代碼
$ mkdir evproto && cd evproto
$ svn checkout http://evproto.googlecode.com/svn/trunk trunk
下載并修補 libevent-2.0.4-alpha
$ wget http://www.monkey.org/~provos/libevent-2.0.4-alpha.tar.gz
$ tar zxf libevent-2.0.4-alpha.tar.gz
$ cd libevent-2.0.4-alpha
再編譯 libevent 之前,要打兩個補丁,這兩個補丁的作用是讓 evrpc 和 protobuf rpc 對接起來�����,見:
http://archives.seul.org/libevent/users/Mar-2010/msg00059.html
補丁已經在 evproto 源碼里提供,可直接打到 libevent-2.0.4-alpha 上
$ patch -p1 < ~/evproto/trunk/libevent-2.0.4-alpha-msg-new-with-arg.patch
$ patch -p1 < ~/evproto/trunk/libevent-2.0.4-alpha-get-request-reply.patch
$ ./configure && make && sudo make install
然后試著編譯 evproto
$ cd ~/evproto/trunk
$ ./build.sh
如果編譯成功,說明前面這些庫已經全都裝好了��。
注:這兩個 patch 已經收入 libevent 的官方源碼庫��,將來應該不用再手動 patch 了。
http://levent.git.sourceforge.net/git/gitweb.cgi?p=levent/levent;a=commitdiff;h=755fbf16c3ce94bfa09e1bf5da27ccdfc1e7e725
http://levent.git.sourceforge.net/git/gitweb.cgi?p=levent/levent;a=commitdiff;h=07edf784fab4e25c31eef3fdcccec3975e2741db
本文沒有涉及 google-perftools��,這個庫是能獨立安裝使用的���。