青青草原综合久久大伊人导航_色综合久久天天综合_日日噜噜夜夜狠狠久久丁香五月_热久久这里只有精品
<rt id="ugwmu"><acronym id="ugwmu"></acronym></rt>
<strike id="ugwmu"><acronym id="ugwmu"></acronym></strike>
<button id="ugwmu"></button>
visualfc
C++博客
::
首頁
::
新隨筆
::
聯系
::
聚合
::
管理
::
42 隨筆 :: 0 文章 :: 119 評論 :: 0 Trackbacks
<
2009年9月
>
日
一
二
三
四
五
六
30
31
1
2
3
4
5
6
7
8
9
10
11
12
13
14
15
16
17
18
19
20
21
22
23
24
25
26
27
28
29
30
1
2
3
4
5
6
7
8
9
10
常用鏈接
我的隨筆
我的評論
我參與的隨筆
留言簿
(11)
給我留言
查看公開留言
查看私人留言
隨筆分類
C++(12)
(rss)
FOX(1)
(rss)
go(10)
(rss)
LUA(5)
(rss)
Qt(13)
(rss)
WTL(16)
(rss)
隨筆檔案
2014年4月 (1)
2014年3月 (2)
2013年1月 (1)
2012年6月 (1)
2011年9月 (1)
2011年7月 (1)
2011年1月 (3)
2010年11月 (1)
2010年10月 (1)
2010年6月 (1)
2010年4月 (1)
2010年2月 (1)
2010年1月 (1)
2009年11月 (1)
2009年9月 (1)
2009年6月 (2)
2009年5月 (4)
2009年4月 (1)
2009年3月 (2)
2009年2月 (2)
2009年1月 (4)
2008年12月 (2)
2008年11月 (2)
2008年10月 (2)
2008年9月 (1)
2008年8月 (2)
友情鏈接
大連銘泰船務有限公司
大連銘泰船務有限公司是一家在大連長興島注冊的船務公司,公司主要業務:船舶修理;船舶備件供應;船舶物料供應。公司有一只專業的航修隊伍,從而保證高效,優質的完成修理任務。公司同時與多家柴油機,凈油機,空壓機廠家有密切的合作,能提供多種型號的進口,國產柴油機,凈油機,空壓機的備件
搜索
最新評論
1.?re: Go 語言開發工具 LiteIDE x22 發布
不知道如何端點調試啊
--greg
2.?re: Go語言開發工具 LiteIDE x21.1發布
支持HTML css 嗎?
--flayman
3.?re: Go語言開發工具 LiteIDE x21.1發布
因為要編譯打包和上傳四個操作系統版本,所以二進制版本的發布周期比較長。
相對而言,github上的源碼版本相對比較新,BUG也會及時修復。
--visualfc
4.?re: Go語言開發工具 LiteIDE x21.1發布
更新速度真快!
--戰魂小筑
5.?re: Go語言開發工具LiteIDE x15.2發布,兩周年紀念
難道博主也是船舶行業的?
怎么給了個“大連銘泰船務”的鏈接……
--eryar
閱讀排行榜
1.?CppSupport for Qt Creator 1.3.x(15126)
2.?學習LUA,使用IUP進行GUI程序設計(11337)
3.?VS2010英文正式版官方下載(9052)
4.?WTL8.1已提供下載,正式支持VS2008。(7478)
5.?FOX TOOLKIT 學習 - 文本顯示(4441)
評論排行榜
1.?VFC的WTL應用程序向導簡介(10)
2.?測試GUI自動排版,發圖紀念。(10)
3.?FOX TOOLKIT 學習 - 文本顯示(9)
4.?VCExpress下配置WTL開發環境(更新)(9)
5.?WTL AppWizard 2.0 RC1(9)
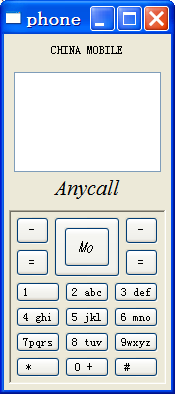
測試GUI自動排版,發圖紀念。
為了測試一下GUI自動排版,照著自己的手機做了一個GUI程序界面。特此發圖以留紀念。
posted on 2009-09-17 22:29
visualfc
閱讀(2413)
評論(10)
編輯
收藏
引用
評論
#
re: 測試GUI自動排版,發圖紀念。
2009-09-17 23:45
diverger
博主說的自動排版是指類型于QT或者wxWidgets的layout的功能嗎?
回復
更多評論
#
re: 測試GUI自動排版,發圖紀念。[未登錄]
2009-09-18 08:17
visualfc
是的,使用了相似的layout功能來完成。
回復
更多評論
#
re: 測試GUI自動排版,發圖紀念。
2009-09-18 10:02
codespy
博主能否介紹下布局的原理呢?
回復
更多評論
#
re: 測試GUI自動排版,發圖紀念。[未登錄]
2009-09-18 12:18
visualfc
如果詳細講,恐怕不只一篇文章能講得完,在這里僅簡單介紹一下實現原理。
圖中的布局僅使用boxlayout來完成,如果配合space可以完成更多控制。
這個布局控制與QT和WX有所不同,其子窗口由父窗口管理,layout僅具備算法功能,因此理論上可以對窗口任意切換layout。
//代碼原理如下
class xwnd
{
xwnd* first;xwnd* last;xwnd* prev;xwnd*next;
xlayout* layout;
//調用排版功能
void layout()
{
if (_layout)
_layout->layout(this);
for (xwindow* child = _first; child; child = child->_next)
{
child->layout();
}
}
};
class xwindow : xwnd;
class xframe : xwindow;
class xspace : xwindow;不生成實際的窗口,只是一個占位。
//示例如下:
xframe* frame = new xframe(_T("TEST")); //框架
frame->set_layout(xboxlayout(true));//設置HORZ_BOX
new xedit(frame,LAYOUT_FILL,xsize(100,100)); //左面的EDIT窗口
xwindow* right = new xwindow(frame); //右面的窗口做為容器
right->setlayout(xboxlayout(false)); //設置VERT_BOX
new xspace(right,LAYOUT_FILL_Y); //促使OK和CANCEL按鈕置于最下
new xbutton(right,_T("OK"));
new xbutton(right,_T("Cancel"));
frame->create(); //最后生成框架窗口并顯示
回復
更多評論
#
re: 測試GUI自動排版,發圖紀念。
2009-09-20 21:47
codespy
主要的布局有兩種,一種是一維的(水平盒子,垂直盒子),另一種是二維的(網格布局)。此圖上的鍵盤布局是二維的,難道是用一維布局組合的嗎?
對于“這個布局控制與QT和WX有所不同,其子窗口由父窗口管理,。。。”,
這個與Qt相同。
回復
更多評論
#
re: 測試GUI自動排版,發圖紀念。
2009-09-20 21:49
codespy
補充一下,有兩張圖片看不到(顯示的是兩個紅叉)!
回復
更多評論
#
re: 測試GUI自動排版,發圖紀念。[未登錄]
2009-09-21 08:01
visualfc
@codespy
我的表達可能不太準確,“這個布局控制與QT和WX有所不同,其子窗口由父窗口管理,。。。” 這段話指的是在WX和QT中使用的是 Lyaout->addWidget(child)的形式,而在此布局中則由 new child(parent)的方式來指定。
為了試驗布局是否準確,此例中的鍵盤布局使用的也是hbox和vbox的組合。即將鍵盤grid看成是一個vbox和四個hbox組合。
回復
更多評論
#
re: 測試GUI自動排版,發圖紀念。[未登錄]
2009-09-21 08:07
visualfc
兩張圖片看不到是因為原來文件名為phone..png,結果編輯時不認,又重傳的phone.png。現已修正。
回復
更多評論
#
re: 測試GUI自動排版,發圖紀念。
2009-09-22 13:08
codespy
@visualfc
在Qt中布局對象沒有子部件的所有權(ownership),子部件的所有權仍然歸父部件。也就是說,銷毀布局并不會銷毀布局所管理的子部件。
對于實現二維布局算法,俺沒有找到好的參考資料(估計各家的實現都不一樣), 現在還沒什么思路。看到博主的圖片后很興奮!不過,有的布局用一維布局組合的話會使用戶的代碼顯得混亂,甚至組合不出來(比如類似德國納粹標志)。
回復
更多評論
#
re: 測試GUI自動排版,發圖紀念。[未登錄]
2009-09-22 13:52
visualfc
@codespy
是這樣的,本質上一樣,只是不同的實現方式而已。
可能的話加我gmail。visualfc at gmail.com
回復
更多評論
刷新評論列表
只有注冊用戶
登錄
后才能發表評論。
【推薦】100%開源!大型工業跨平臺軟件C++源碼提供,建模,組態!
網站導航:
博客園
IT新聞
BlogJava
博問
Chat2DB
管理
Powered by:
C++博客
Copyright © visualfc
青青草原综合久久大伊人导航_色综合久久天天综合_日日噜噜夜夜狠狠久久丁香五月_热久久这里只有精品
<ins id="pjuwb"></ins>
<blockquote id="pjuwb"><pre id="pjuwb"></pre></blockquote>
<noscript id="pjuwb"></noscript>
<sup id="pjuwb"><pre id="pjuwb"></pre></sup>
<dd id="pjuwb"></dd>
<abbr id="pjuwb"></abbr>
欧美视频福利
|
亚洲私拍自拍
|
久久综合九色综合欧美就去吻
|
亚洲午夜在线视频
|
国产精品三上
|
久久综合久色欧美综合狠狠
|
亚洲欧洲精品一区
|
欧美成人免费在线观看
|
中文日韩欧美
|
午夜精品99久久免费
|
伊人久久大香线蕉av超碰演员
|
欧美va天堂va视频va在线
|
欧美成人综合在线
|
午夜视频在线观看一区
|
久久久久久网址
|
亚洲精选久久
|
午夜一区二区三区不卡视频
|
亚洲欧洲综合另类
|
亚洲无吗在线
|
亚洲三级免费
|
亚洲制服av
|
亚洲欧洲偷拍精品
|
午夜久久美女
|
日韩亚洲欧美综合
|
欧美在线国产精品
|
99在线观看免费视频精品观看
|
中文国产亚洲喷潮
|
亚洲福利视频在线
|
亚洲欧美日韩国产一区二区
|
亚洲日韩欧美一区二区在线
|
欧美影院视频
|
亚洲图片在线
|
久久婷婷亚洲
|
久久精品亚洲精品国产欧美kt∨
|
欧美成人综合在线
|
老司机成人网
|
国产麻豆精品久久一二三
|
亚洲二区在线
|
黄色亚洲大片免费在线观看
|
99在线热播精品免费
|
亚洲人www
|
久久久久免费视频
|
欧美一区二区在线免费播放
|
欧美日韩国产高清视频
|
欧美大片一区二区
|
国产一区二区三区在线观看网站
|
一区二区三区 在线观看视
|
亚洲欧洲精品天堂一级
|
亚洲精品美女在线观看播放
|
一区二区三区在线不卡
|
午夜免费久久久久
|
欧美一级二区
|
国产精品美女xx
|
一区二区91
|
亚洲网站啪啪
|
欧美视频一区二区
|
99国产精品
|
亚洲私人影吧
|
欧美亚州在线观看
|
一本色道久久综合
|
亚洲男人天堂2024
|
国产精品综合不卡av
|
欧美视频中文在线看
|
亚洲一品av免费观看
|
亚洲日本欧美
|
欧美国产视频一区二区
|
亚洲激情网站
|
99精品国产在热久久婷婷
|
欧美国产日产韩国视频
|
亚洲精品在线视频观看
|
在线亚洲一区
|
国产精品高清免费在线观看
|
亚洲一区黄色
|
欧美诱惑福利视频
|
国产综合色在线
|
久久综合99re88久久爱
|
欧美成人亚洲成人
|
日韩系列欧美系列
|
欧美视频官网
|
欧美一区二视频
|
欧美1区2区
|
一区二区三区精品
|
国产精品裸体一区二区三区
|
欧美在线首页
|
欧美激情精品
|
先锋a资源在线看亚洲
|
国产一区二区三区日韩欧美
|
久久视频在线看
|
亚洲乱码精品一二三四区日韩在线
|
亚洲自拍偷拍一区
|
国产在线观看精品一区二区三区
|
免费成人在线观看视频
|
亚洲最新在线
|
久久久五月婷婷
|
日韩一级网站
|
国产午夜精品理论片a级探花
|
久久中文字幕导航
|
亚洲性感激情
|
欧美成人免费小视频
|
亚洲欧美国产精品va在线观看
|
国产欧美一区二区色老头
|
亚洲精品在线电影
|
久久久久免费观看
|
制服诱惑一区二区
|
一区二区三区自拍
|
欧美色精品在线视频
|
久久中文欧美
|
午夜在线a亚洲v天堂网2018
|
亚洲精品欧美极品
|
麻豆freexxxx性91精品
|
亚洲欧美久久久久一区二区三区
|
尤物在线精品
|
国产精品一区二区久激情瑜伽
|
欧美阿v一级看视频
|
亚洲欧美日韩网
|
一区二区黄色
|
亚洲精品久久在线
|
欧美xxxx在线观看
|
欧美主播一区二区三区
|
夜夜嗨av一区二区三区网站四季av
|
韩国精品主播一区二区在线观看
|
国产精品美女www爽爽爽视频
|
欧美激情欧美狂野欧美精品
|
亚洲美女av在线播放
|
欧美成人免费在线视频
|
欧美在线免费视频
|
亚洲综合日本
|
正在播放亚洲一区
|
99视频精品全部免费在线
|
亚洲午夜在线观看
|
最近看过的日韩成人
|
激情亚洲网站
|
国外视频精品毛片
|
国产三级欧美三级日产三级99
|
欧美视频久久
|
欧美视频一区二区三区四区
|
欧美日韩精品免费观看视频
|
欧美日韩成人精品
|
欧美日韩视频一区二区
|
欧美激情精品久久久久
|
欧美精品国产精品
|
欧美精品自拍偷拍动漫精品
|
欧美精品在欧美一区二区少妇
|
久久综合五月
|
欧美精品尤物在线
|
欧美性色aⅴ视频一区日韩精品
|
欧美日本精品一区二区三区
|
欧美日韩一区在线观看
|
国产精品久久久久久久电影
|
国产精品久久影院
|
国产日产欧美一区
|
狠狠色狠狠色综合人人
|
亚洲国产精品一区在线观看不卡
|
国产精品成人免费精品自在线观看
|
亚洲女人天堂成人av在线
|
亚洲综合日本
|
久久久99久久精品女同性
|
久久久综合激的五月天
|
美女精品视频一区
|
亚洲国产欧美不卡在线观看
|
亚洲免费观看高清完整版在线观看熊
|
国产色产综合色产在线视频
|
国产亚洲精品久久久久久
|
黄色一区二区三区四区
|
亚洲日本国产
|
午夜精品久久久久久久白皮肤
|
久久不射中文字幕
|
欧美激情在线狂野欧美精品
|
亚洲美女区一区
|
午夜在线观看免费一区
|
免费看成人av
|
国产精品久久久久9999
|
精品91视频
|
亚洲午夜精品一区二区三区他趣
|
久久精品99国产精品酒店日本
|
欧美成人精品福利
|
一区二区国产在线观看
|
久久亚洲精选
|
国产精品视频99
|
91久久在线观看
|
久久av资源网站
|
亚洲欧洲综合
|
欧美一区二区三区电影在线观看
|
牛牛影视久久网
|
国产婷婷色一区二区三区在线
|
最近看过的日韩成人
|
欧美在线视频导航
|
亚洲精品乱码
|
久久精品午夜
|
国产女主播在线一区二区
|
亚洲精品韩国
|
久久天堂av综合合色
|
9i看片成人免费高清
|
久久综合给合
|
国产欧美精品一区aⅴ影院
|
一本久道综合久久精品
|
欧美 日韩 国产在线
|
亚洲欧美综合v
|
欧美午夜理伦三级在线观看
|
亚洲破处大片
|