|
|
2012年9月18日
原文地址:在Ubuntu中安裝Python科學計算環境 作者:HyryStudio
在Ubuntu下安裝Python模塊通常可以使用apt-get和pip命令。apt-get命令是Ubuntu自帶的包管理命令,而pip則是Python安裝擴展模塊的工具,通常pip會下載擴展模塊的源代碼并編譯安裝。
Ubuntu 12.04中缺省安裝了Python2.7.3,首先通過下面的命令安裝pip,pip是Python的一個安裝和管理擴展庫的工具。
sudo apt-get install python-pip
安裝Python開發環境,方便今后編譯其他擴展庫,占用空間92.8M:
sudo apt-get install python-dev
IPython
為了安裝最新版的IPython 0.13beta,需要下載IPython源代碼,并執行安裝命令。在IPython 0.13beta中提供了改進版本的IPython notebook。下面的命令首先安裝版本管理軟件git,然后通過git命令從IPython的開發代碼庫中下載最新版本的IPython源代碼,并執行安裝命令:
cd
sudo apt-get install git
git clone https://github.com/ipython/ipython.git
cd ipython
sudo python setup.py install
如果安裝目前的最新穩定版本,可以輸入:
sudo apt-get install ipython
安裝完畢之后,請輸入ipython命令測試是否能正常啟動。
為了讓IPython notebook工作,還還需要安裝tornado和pyzmq:
sudo pip install tornado
sudo apt-get install libzmq-dev
sudo pip install pyzmq
sudo pip install pygments
下面測試IPython:
cd
mkdir notebook
cd notebook
ipython notebook
為了在IPython中離線使用LaTeX數學公式,需要安裝mathjax,首先輸入下面的命令啟動ipython notebook:
在IPython notebook界面中輸入:
from IPython.external.mathjax import install_mathjax
install_mathjax()
NumPy,SciPy和matplotlib
通過apt-get命令可以快速安裝這三個庫:
sudo apt-get install python-numpy
sudo apt-get install python-scipy
sudo apt-get install python-matplotlib
如果需要通過pip編譯安裝,可以先用apt-get命令安裝所有編譯所需的庫:
sudo apt-get build-dep python-numpy
sudo apt-get build-dep python-scipy
然后通過pip命令安裝:
sudo pip install numpy
sudo pip install scipy
通過build-dep會安裝很多庫,包括Python 3.2。
PyQt4和Spyder
下面的命令安裝PyQt4,Qt界面設計器,PyQt4的開發工具以及文檔:
sudo apt-get install python-qt4
sudo apt-get install qt4-designer
sudo apt-get install pyqt4-dev-tools
sudo apt-get install python-qt4-doc
安裝完畢之后,文檔位于:
/usr/share/doc/python-qt4-doc
安裝好PyQt4之后通過下面的命令安裝Spyder:
sudo apt-get install spyder
由于Spyder經常更新,通過下面的命令可以安裝最新版:
sudo pip install spyder --upgrade
cython和SWIG
Cython和SWIG是編寫Python擴展模塊的工具:
sudo pip install cython
sudo apt-get install swig
輸入 cython --version 和 swig -version 查看版本。
ETS
ETS是enthought公司開發的一套科學計算軟件包,其中的Mayavi通過VTK實現數據的三維可視化。
首先通過下面的命令安裝編譯ETS所需的庫:
sudo apt-get install python-dev libxtst-dev scons python-vtk  pyqt4-dev-tools python2.7-wxgtk2.8 python-configobj
sudo apt-get install libgl1-mesa-dev libglu1-mesa-dev
創建ets目錄,并在此目錄下下載ets.py,運行ets.py可以復制最新版的ETS源程序,并安裝:
mkdir ets
cd ets
wget https://github.com/enthought/ets/raw/master/ets.py
python ets.py clone
sudo python ets.py develop
#sudo python ets.py install    或者運行install安裝
如果一切正常,那么輸入 mayavi2 命令則會啟動mayavi。
OpenCV
為了編譯OpenCV需要下載cmake編譯工具,和一些依賴庫:
sudo apt-get install build-essential
sudo apt-get install cmake
sudo apt-get install cmake-gui
sudo apt-get install libavcodec-dev libavformat-dev libswscale-dev
sudo apt-get install libjpeg-dev libpng-dev libtiff-dev libjasper-dev
然后從 http://sourceforge.net/projects/opencvlibrary/ 下載最新版的OpenCV源代碼,并解壓。然后創建編譯用的目錄release,并啟動cmake-gui:
在界面中選擇OpenCV源代碼的目錄,和編譯輸出目錄release,然后按Configure按鈕,并根據需要設置各個編譯選項,最后點Generate按鈕,退出cmake-gui界面。進入編譯路徑,執行下面的命令:
cd release
make
sudo make install
安裝完畢之后,啟動IPython,并輸入 import cv2 測試OpenCV是否能正常載入。
2012年9月17日
 
1 from sgmllib import SGMLParser from sgmllib import SGMLParser
2import sys,urllib2,urllib,cookielib
3class spider(SGMLParser):
4 def __init__(self,email,password):
5 SGMLParser.__init__(self)
6 self.h3=False
7 self.h3_is_ready=False
8 self.div=False
9 self.h3_and_div=False
10 self.a=False
11 self.depth=0
12 self.names=""
13 self.dic={}
14
15 self.email=email
16 self.password=password
17 self.domain='renren.com'
18 try:
19 cookie=cookielib.CookieJar()
20 cookieProc=urllib2.HTTPCookieProcessor(cookie)
21 except:
22 raise
23 else:
24 opener=urllib2.build_opener(cookieProc)
25 urllib2.install_opener(opener)
26
27 def login(self):
28 url='http://www.renren.com/PLogin.do'
29 postdata={
30 'email':self.email,
31 'password':self.password,
32 'domain':self.domain
33 }
34 req=urllib2.Request(
35 url,
36 urllib.urlencode(postdata)
37 )
38
39 self.file=urllib2.urlopen(req).read()
40 #print self.file
41 def start_h3(self,attrs):
42 self.h3 = True
43 def end_h3(self):
44 self.h3=False
45 self.h3_is_ready=True
46
47 def start_a(self,attrs):
48 if self.h3 or self.div:
49 self.a=True
50 def end_a(self):
51 self.a=False
52
53 def start_div(self,attrs):
54 if self.h3_is_ready == False:
55 return
56 if self.div==True:
57 self.depth += 1
58
59 for k,v in attrs:
60 if k == 'class' and v == 'content':
61 self.div=True;
62 self.h3_and_div=True #h3 and div is connected
63 def end_div(self):
64 if self.depth == 0:
65 self.div=False
66 self.h3_and_div=False
67 self.h3_is_ready=False
68 self.names=""
69 if self.div == True:
70 self.depth-=1
71 def handle_data(self,text):
72 #record the name
73 if self.h3 and self.a:
74 self.names+=text
75 #record says
76 if self.h3 and (self.a==False):
77 if not text:pass
78 else: self.dic.setdefault(self.names,[]).append(text)
79 return
80 if self.h3_and_div:
81 self.dic.setdefault(self.names,[]).append(text)
82
83 def show(self):
84 type = sys.getfilesystemencoding()
85 for key in self.dic:
86 print ( (''.join(key)).replace(' ','')).decode('utf-8').encode(type), \
87 ( (''.join(self.dic[key])).replace(' ','')).decode('utf-8').encode(type)
88
89
90
91
92renrenspider=spider('your email','your password')
93renrenspider.login()
94renrenspider.feed(renrenspider.file)
95renrenspider.show()
96
2012年8月19日
Google Earth坐標-美國航空母艦坐標
這里羅列了已經發現的所有美國現役和退役的航空母艦。其中包括:
“小鷹”號 CV63 35°17'29.66"N,139°39'43.67"E
“肯尼迪”號 CVN67 30°23'50.91"N, 81°24'14.86"W
“尼米茲”號 CVN68 32°42'47.88"N,117°11'22.49"W
“艾森豪威爾”號 CVN69 36°57'27.13"N, 76°19'46.35"W
“林肯” 號 CVN72 47°58'53.54"N,122°13'42.94"W
“華盛頓”號 CVN73 36°57'32.90"N, 76°19'45.10"W
“杜魯門”號 CVN75 36°48'53.25"N,76°17'49.29"W
“無畏”號 CV-11 40°45'53.88"N,74° 0'4.22"W
“萊克星頓”號 CV-2 27°48'54.13"N,97°23'19.65"W
“星座”號 47°33'11.30"N,122°39'17.24"W
“獨立”號 47°33'7.53"N,122°39'30.13"W
“游騎兵”號 47°33'10.63"N,122°39'9.53"W
“佛瑞斯特”號和“薩拉托加”號 41°31'39.59"N,71°18'58.70"W
“美利堅”號 39°53'6.36"N,75°10'45.55"W
本列表收錄了美國海軍己退役或現役中的航空母艦,包括船級屬于CV、CVA、CVB、CVL或CVN的全部艦只。編號在CVA-58之后的都屬于超級航空母艦(排水量超過75,000噸),CVN-65和CVN-68以后的都屬于核動力航空母艦。
排水量較小的護航航空母艦(Escort Aircraft Carriers,CVE),則另行收錄于美國海軍護航航空母艦列表中。
2012年8月10日
高光譜成像是新一代光電檢測技術,興起于2O世紀8O年代,目前仍在迅猛發展巾。高光譜成像是相對多光譜成像而言,通過高光譜成像方法獲得的高光譜圖像與通過多光譜成像獲取的多光譜圖像相比具有更豐富的圖像和光譜信息。如果根據傳感器的光譜分辨率對光譜成像技術進行分類,光譜成像技術一般可分成3類。
(1) 多光譜成像——光譜分辨率在 delta_lambda/lambda=0.1數量級,這樣的傳感器在可見光和近紅外區域一般只有幾個波段。
(2) 高光譜成像—— 光譜分辨率在 delta_lambda/lambda=0.01數量級,這樣的傳感器在可見光和近紅外區域有幾卜到數百個波段,光譜分辨率可達nm級。
(3) 超光譜成像—— 光譜分辨率在delta_lambda/lambda =O.001數量級,這樣的傳感器在可見光和近紅外區域可達數千個波段。
眾所周知,光譜分析是自然科學中一種重要的研究手段,光譜技術能檢測到被測物體的物理結構、化學成分等指標。光譜評價是基于點測量,而圖像測量是基于空間特性變化,兩者各有其優缺點。因此,可以說光譜成像技術是光譜分析技術和圖像分析技術發展的必然結果,是二者完美結合的產物。光譜成像技術不僅具有光譜分辨能力,還具有圖像分辨能力,利用光譜成像技術不僅可以對待檢測物體進行定性和定量分析,而且還能進對其進行定位分析。
高光譜成像系統的主要工作部件是成像光譜儀,它是一種新型傳感器,2O世紀8O年代初正式開始研制,研制這類儀器的目的是為獲取大量窄波段連續光譜圖像數據,使每個像元具有幾乎連續的光譜數據。它是一系列光波波長處的光學圖像,通常包含數十到數百個波段,光譜分辨率一般為1~l0nm。由于高光譜成像所獲得的高光譜圖像能對圖像中的每個像素提供一條幾乎連續的光譜曲線,其在待測物上獲得空間信息的同時又能獲得比多光譜更為豐富光譜數據信息,這些數據信息可用來生成復雜模型,來進行判別、分類、識別圖像中的材料。
通過高光譜成像獲取待測物的高光譜圖像包含了待測物的豐富的空間、光譜和輻射三重信息。這些信息不僅表現了
地物空間分布的影像特征,同時也可能以其中某一像元或像元組為目標獲取它們的輻射強度以及光譜特征。影像、輻射與光譜是高光譜圖像中的3個重要特征,這3個特征的有機結合就是高光譜圖像。
高光譜圖像數據為數據立方體(cube)。通常圖像像素的橫坐標和縱坐標分別用z和Y來表示,光譜的波長信息以(Z即軸)表示。該數據立方體由沿著光譜軸的以一定光譜分辨率間隔的連續二維圖像組成。
2012年7月30日
Q:Link Error 2019 無法解析的外部符號 _cvCreateImage
A:應將解決方案平臺改為win64。
工具欄上方的解決方案平臺—》點擊下拉菜單—》配置管理器—》活動解決方案平臺—》新建—》鍵入獲選著新平臺—》x64
問題就解決啦!哈哈!
Q:Error C1189 Building MFC application with /MD[d] (CRT dll version) requires MFC shared dll version. Please #define _AFXDLL or do not use /MD[d]
A:Go to the project properties (Project menu, Properties). Set 'Use of MFC' to "Use MFC in a Shared DLL". You have to make this change for both the debug and release configurations
2012年7月25日
2012年7月24日
- Introduction
- The Idea
- The Gaussian Case
- Experiments with Black-and-White Images
- Experiments with Color Images
- References
Introduction
Filtering is perhaps the most fundamental operation of image processing and computer vision. In the broadest sense of the term "filtering", the value of the filtered image at a given location is a function of the values of the input image in a small neighborhood of the same location. For example, Gaussian low-pass filtering computes a weighted average of pixel values in the neighborhood, in which the weights decrease with distance from the neighborhood center. Although formal and quantitative explanations of this weight fall-off can be given, the intuition is that images typically vary slowly over space, so near pixels are likely to have similar values, and it is therefore appropriate to average them together. The noise values that corrupt these nearby pixels are mutually less correlated than the signal values, so noise is averaged away while signal is preserved.
The assumption of slow spatial variations fails at edges, which are consequently blurred by linear low-pass filtering. How can we prevent averaging across edges, while still averaging within smooth regions? Many efforts have been devoted to reducing this undesired effect. Bilateral filtering is a simple, non-iterative scheme for edge-preserving smoothing.
Back to Index
The Idea
The basic idea underlying bilateral filtering is to do in the range of an image what traditional filters do in its domain. Two pixels can be close to one another, that is, occupy nearby spatial location, or they can be similar to one another, that is, have nearby values, possibly in a perceptually meaningful fashion.
Consider a shift-invariant low-pass domain filter applied to an image:
The bold font for f and h emphasizes the fact that both input and output images may be multi-band. In order to preserve the DC component, it must be
Range filtering is similarly defined:
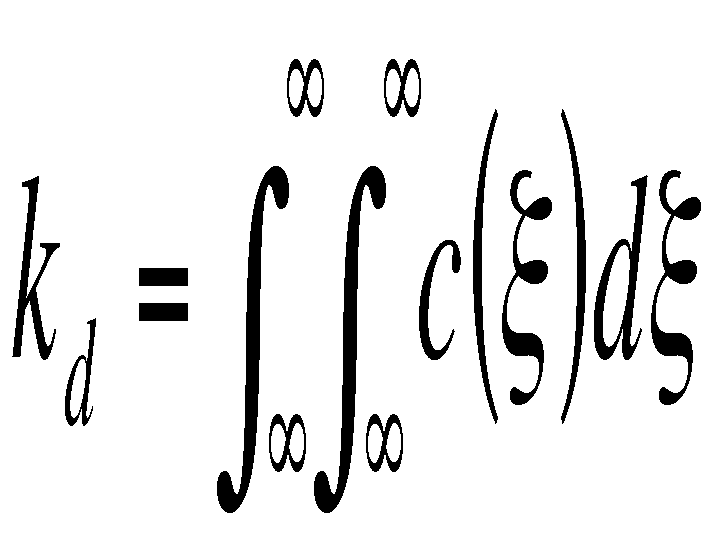
In this case, the kernel measures the photometric similarity between pixels. The normalization constant in this case is
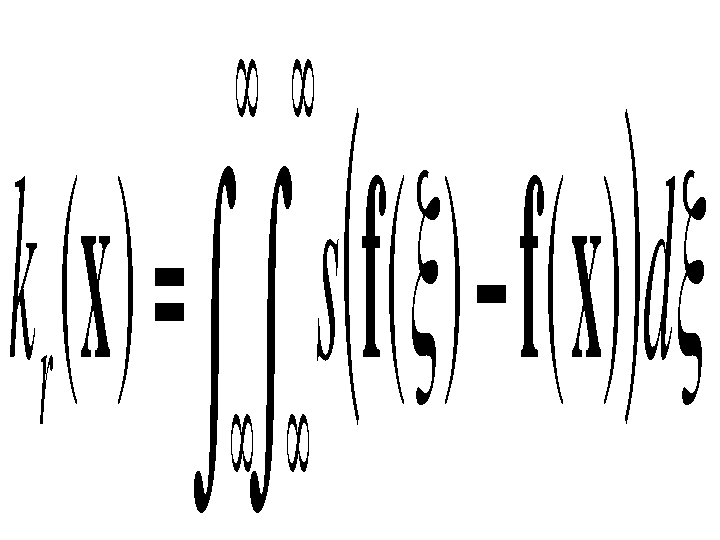
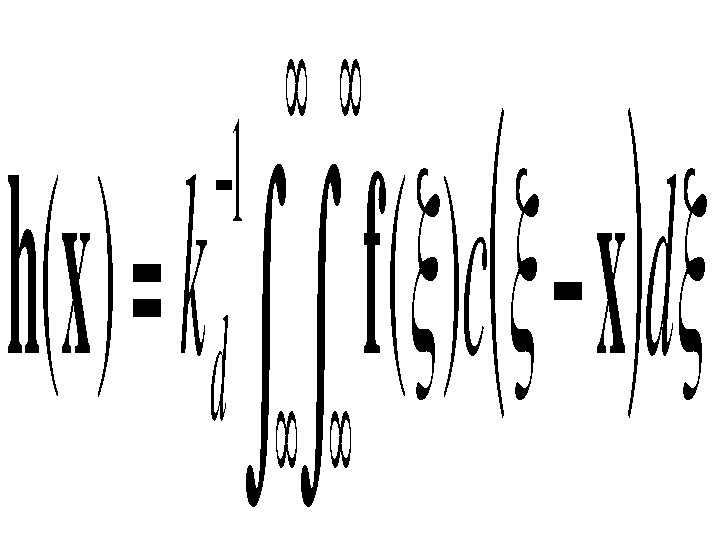
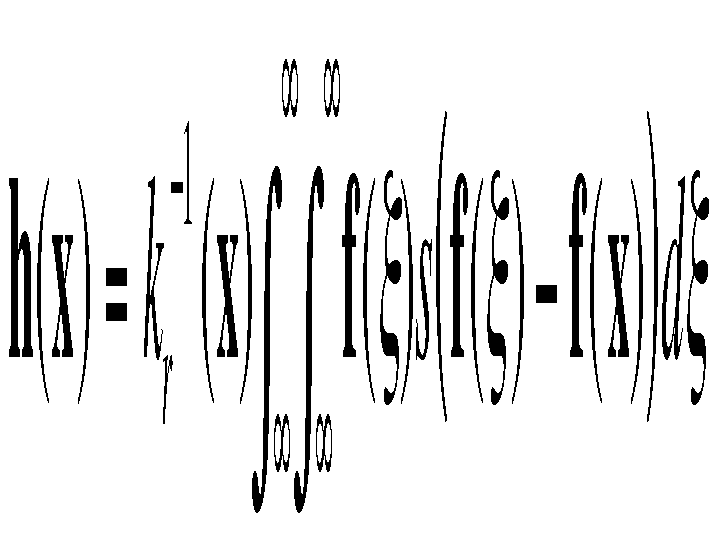
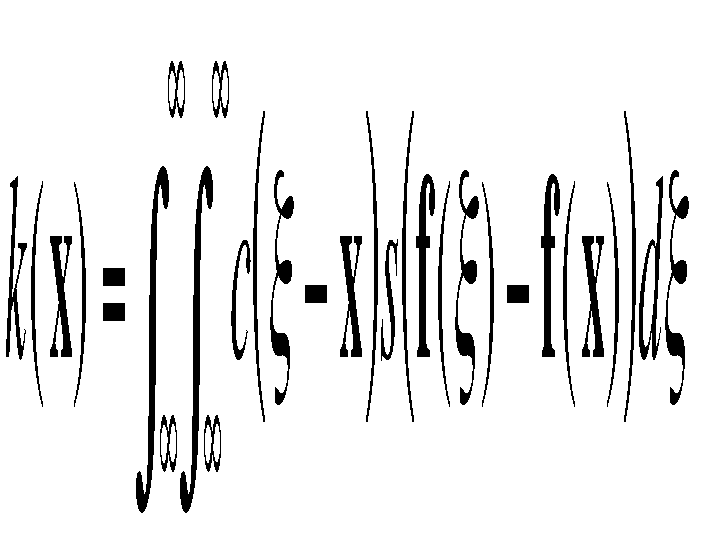
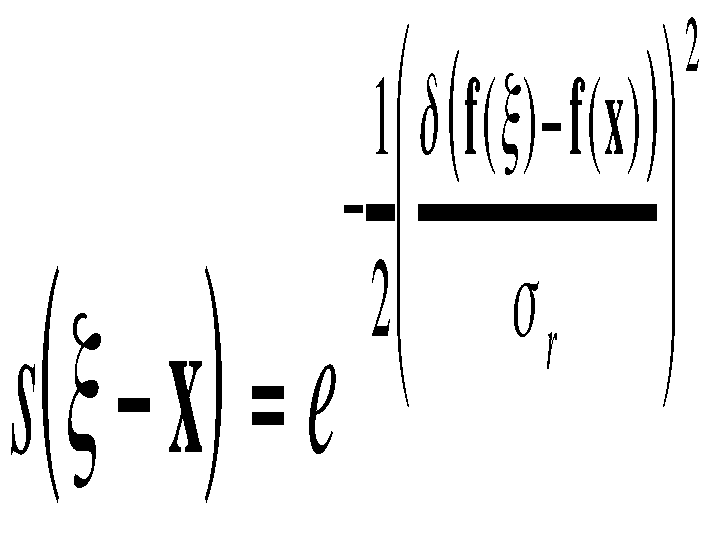
The spatial distribution of image intensities plays no role in range filtering taken by itself. Combining intensities from the entire image, however, makes little sense, since the distribution of image values far away from x ought not to affect the final value at x. In addition, one can show that range filtering without domain filtering merely changes the color map of an image, and is therefore of little use. The appropriate solution is to combine domain and range filtering, thereby enforcing both geometric and photometric locality. Combined filtering can be described as follows:
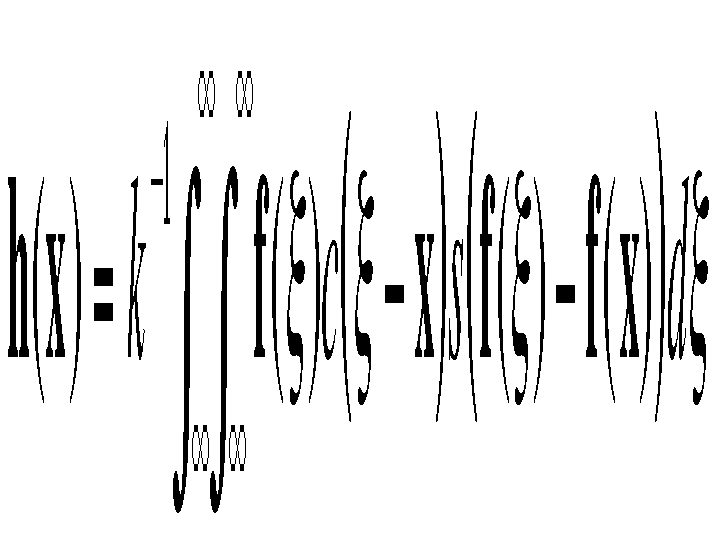
with the normalization
Combined domain and range filtering will be denoted as bilateral filtering. It replaces the pixel value at x with an average of similar and nearby pixel values. In smooth regions, pixel values in a small neighborhood are similar to each other, and the bilateral filter acts essentially as a standard domain filter, averaging away the small, weakly correlated differences between pixel values caused by noise. Consider now a sharp boundary between a dark and a bright region, as in figure 1(a).
When the bilateral filter is centered, say, on a pixel on the bright side of the boundary, the similarity function s assumes values close to one for pixels on the same side, and values close to zero for pixels on the dark side. The similarity function is shown in figure 1(b) for a 23x23 filter support centered two pixels to the right of the step in figure 1(a). The normalization term k(x) ensures that the weights for all the pixels add up to one. As a result, the filter replaces the bright pixel at the center by an average of the bright pixels in its vicinity, and essentially ignores the dark pixels. Conversely, when the filter is centered on a dark pixel, the bright pixels are ignored instead. Thus, as shown in figure 1(c), good filtering behavior is achieved at the boundaries, thanks to the domain component of the filter, and crisp edges are preserved at the same time, thanks to the range component.
Back to Index
The Gaussian Case
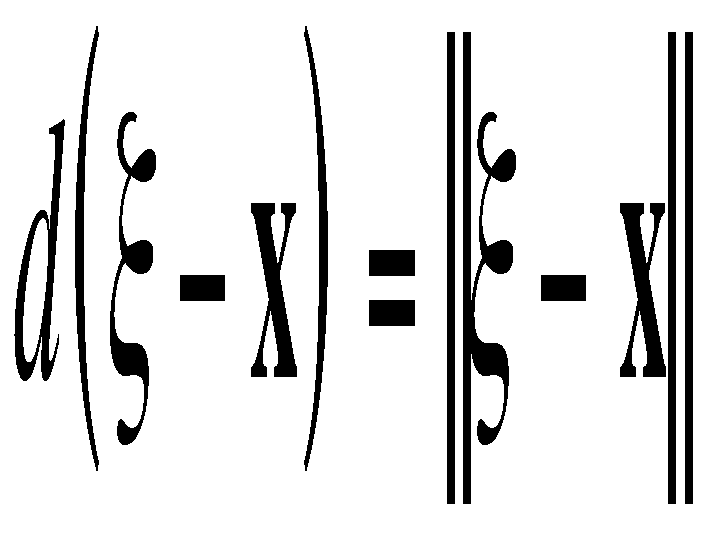
A simple and important case of bilateral filtering is shift-invariant Gaussian filtering, in which both the closeness function c and the similarity function s are Gaussian functions of the Euclidean distance between their arguments. More specifically, c is radially symmetric:
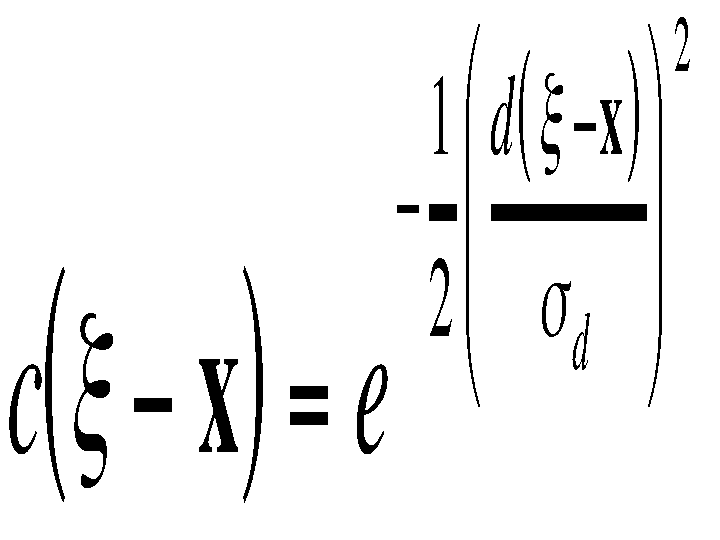
where
is the Euclidean distance. The similarity function s is perfectly analogous to c :
where
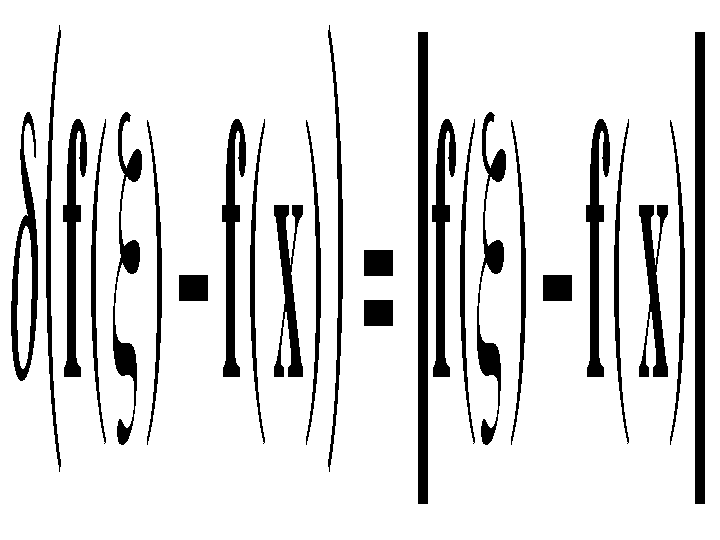
is a suitable measure of distance in intensity space. In the scalar case, this may be simply the absolute difference of the pixel difference or, since noise increases with image intensity, an intensity-dependent version of it. Just as this form of domain filtering is shift-invariant, the Gaussian range filter introduced above is insensitive to overall additive changes of image intensity. Of course, the range filter is shift-invariant as well.
Back to Index
Experiments with Black-and-White Images
Figure 2 (a) and (b) show the potential of bilateral filtering for the removal of texture. The picture "simplification" illustrated by figure 2 (b) can be useful for data reduction without loss of overall shape features in applications such as image transmission, picture editing and manipulation, image description for retrieval.
|

|
|
|
|
(a) |
|
(b) |
|
|
Figure 2 |
|
Bilateral filtering with parameters sd =3 pixels and sr =50 intensity values is applied to the image in figure 3 (a) to yield the image in figure 3 (b). Notice that most of the fine texture has been filtered away, and yet all contours are as crisp as in the original image. Figure 3 (c) shows a detail of figure 3 (a), and figure 3 (d) shows the corresponding filtered version. The two onions have assumed a graphics-like appearance, and the fine texture has gone. However, the overall shading is preserved, because it is well within the band of the domain filter and is almost unaffected by the range filter. Also, the boundaries of the onions are preserved.
Back to Index
Experiments with Color Images
For black-and-white images, intensities between any two gray levels are still gray levels. As a consequence, when smoothing black-and-white images with a standard low-pass filter, intermediate levels of gray are produced across edges, thereby producing blurred images. With color images, an additional complication arises from the fact that between any two colors there are other, often rather different colors. For instance, between blue and red there are various shades of pink and purple. Thus, disturbing color bands may be produced when smoothing across color edges. The smoothed image does not just look blurred, it also exhibits odd-looking, colored auras around objects.
Figure 4 (a) shows a detail from a picture with a red jacket against a blue sky. Even in this unblurred picture, a thin pink-purple line is visible, and is caused by a combination of lens blurring and pixel averaging. In fact, pixels along the boundary, when projected back into the scene, intersect both red jacket and blue sky, and the resulting color is the pink average of red and blue. When smoothing, this effect is emphasized, as the broad, blurred pink-purple area in figure 4 (b) shows.
To address this difficulty, edge-preserving smoothing could be applied to the red, green, and blue components of the image separately. However, the intensity profiles across the edge in the three color bands are in general different. Smoothing the three color bands separately results in an even more pronounced pink and purple band than in the original, as shown in figure 4 (c). The pink-purple band, however, is not widened as in the standard-blurred version of figure 4 (b).
A much better result can be obtained with bilateral filtering. In fact, a bilateral filter allows combining the three color bands appropriately, and measuring photometric distances between pixels in the combined space. Moreover, this combined distance can be made to correspond closely to perceived dissimilarity by using Euclidean distance in the CIE-Lab color space. This color space is based on a large body of psychophysical data concerning color-matching experiments performed by human observers. In this space, small Euclidean distances are designed to correlate strongly with the perception of color discrepancy as experienced by an "average" color-normal human observer. Thus, in a sense, bilateral filtering performed in the CIE-Lab color space is the most natural type of filtering for color images: only perceptually similar colors are averaged together, and only perceptually important edges are preserved. Figure 4 (d) shows the image resulting from bilateral smoothing of the image in figure 4 (a). The pink band has shrunk considerably, and no extraneous colors appear.
Figure 5 (c) shows the result of five iterations of bilateral filtering of the image in figure 5 (a). While a single iteration produces a much cleaner image (figure 5 (b)) than the original, and is probably sufficient for most image processing needs, multiple iterations have the effect of flattening the colors in an image considerably, but without blurring edges. The resulting image has a much smaller color map, and the effects of bilateral filtering are easier to see when displayed on a printed page. Notice the cartoon-like appearance of figure 5 (c). All shadows and edges are preserved, but most of the shading is gone, and no "new" colors are introduced by filtering.
Back to Index
References
[1] C. Tomasi and R. Manduchi, "Bilateral Filtering for Gray and Color Images", Proceedings of the 1998 IEEE International Conference on Computer Vision, Bombay, India.
[2] T. Boult, R.A. Melter, F. Skorina, and I. Stojmenovic,"G-neighbors", Proceedings of the SPIE Conference on Vision Geometry II, pages 96-109, 1993.
[3] R.T. Chin and C.L. Yeh, "Quantitative evaluation of some edge-preserving noise-smoothing techniques", Computer Vision, Graphics, and Image Processing, 23:67-91, 1983.
[4] L.S. Davis and A. Rosenfeld, "Noise cleaning by iterated local averaging", IEEE Transactions on Systems, Man, and Cybernetics, 8:705-710, 1978.
[5] R.E. Graham, "Snow-removal - a noise-stripping process for picture signals", IRE Transactions on Information Theory, 8:129-144, 1961.
[6] N. Himayat and S.A. Kassam, "Approximate performance analysis of edge preserving filters", IEEE Transactions on Signal Processing, 41(9):2764-77, 1993.
[7] T.S. Huang, G.J. Yang, and G.Y. Tang, "A fast two-dimensional median filtering algorithm", IEEE Transactions on Acoustics, Speech, and Signal Processing, 27(1):13-18, 1979.
[8] J.S. Lee, "Digital image enhancement and noise filtering by use of local statistics", IEEE Transactions on Pattern Analysis and Machine Intelligence, 2(2):165-168, 1980.
[9] M. Nagao and T. Matsuyama, "Edge preserving smoothing", Computer Graphics and Image Processing, 9:394-407, 1979.
[10] P.M. Narendra, "A separable median filter for image noise smoothing", IEEE Transactions on Pattern Analysis and Machine Intelligence, 3(1):20-29, 1981.
[11] K.J. Overton and T.E. Weymouth, "A noise reducing preprocessing algorithm",Proceedings of the IEEE Computer Science Conference on Pattern Recognition and Image Processing, pages 498-507, Chicago, IL, 1979.
[12] P. Perona and J. Malik, "Scale-space and edge detection using anisotropic diffusion", IEEE Transactions on Pattern Analysis and Machine Intelligence, 12(7):629-639, 1990.
[13] G. Ramponi, "A rational edge-preserving smoother", Proceedings of the International Conference on Image Processing, volume 1, pages 151-154, Washington, DC, 1995.
[14] G. Sapiro and D.L. Ringach, "Anisotropic diffusion of color images", Proceedings of the SPIE, volume 2657, pages 471-382, 1996.
[15] D.C.C. Wang, A.H. Vagnucci, and C.C. Li, "A gradient inverse weighted smoothing scheme and the evaluation of its performance", Computer Vision, Graphics, and Image Processing, 15:167-181, 1981.
[16] G. Wyszecki and W. S. Styles, Color Science: Concepts and Methods, Quantitative Data and Formulae, John Wiley and Sons, New York, NY, 1982.
[17] L. Yin, R. Yang, M. Gabbouj, and Y. Neuvo, "Weighted median filters: a tutorial",IEEE Transactions on Circuits and Systems II: Analog and Digital Signal Processing, 43(3):155-192, 1996.
我們在寫程序時,常常會遇到類型轉換的問題。現總結一些常見的類型轉換。
1,const char*(C風格字符串)與string之間轉換:
(1) const char*可以直接對string類型賦值,例如:
const char* pchar = "qwerasdf";
stringstr = pchar;
(2) string通過c_str()函數轉換為C風格字符串,例如:
string str = "qwerasdf";
const char* pchar = str.c_str();
2,const char*類型可以直接給CString類型賦值,例如:
const char* pchar = "qwerasdf";
CString str = pchar;
3,string類型變量轉為為Cstring類型變量
CString類型變量可以直接給string類型變量賦值,但是string類型不能對CString類型直接賦值。通過前兩類
轉換我們可以得到,string類型變量轉換為const char*類型,然后再直接賦值就可以了。例如:
CString cstr;
sring str = “asdasd”;
cstr = str.c_str();
同理,CStrng類型變量先轉換為string類型在調用c_str()函數就可以完成向const char*類型的轉換。例如:
CString cStr = "adsad";
string str = cStr;
const char* pchar = str.c_str();
4,double,int轉string
double temp;
stringstream strStream;
strStream<<temp;
string ss = strStream.str()
string 轉double,int
string.atoi , string.atof
從上面我們可以上面看出,通過類型之間的相互轉化,會使本來要通過復雜的函數來完成的類型轉換變得簡單易懂。
|