#

晚上在跟同事聊到字符串匹配的時候,同事提到了矩陣,覺著是個很牛的東西,它的結果如果出現連續的斜線的話,則說明有匹配了,這可以用于做快速搜索,而且也可以搜索最大公共字符串。據說有個很牛的算法專門用來做“最大公共字符串”的,但我還沒去找,先將這個矩陣輸出試試。
本程序提供兩種輸出方式,以參數-w和-wo進行區分,分別用于顯示人眼識別的信息,以及可供后續程序進行處理的純凈信息。本程序同時提供通用的幫助查看方式,參數為-h或/?等。
通過矩陣,我們就很容易得出最大匹配結果。至于如何分析,暫時還沒有做考慮,有空會進行分析。
// max_match.cpp : 定義控制臺應用程序的入口點。
//

#include <stdlib.h>
#include <stdio.h>
#include <string.h>
#define BOOL int
#define TRUE 1
#define FALSE 0
typedef char element_t;
#define ele_space ' '
#define ele_break '\n'
#define ele_placeholder '*'
#define ele_end '\0'

element_t *malloc_space(element_t* str1, element_t* str2, BOOL with_illuminate);
element_t *max_match_matrix(element_t* str1, element_t* str2, BOOL with_illuminate, element_t *matrix);
/*display the help informations*/
void man_this(void);
/*
purpose:
    Generate a matrix for max match with str1 & str2.
    e.g:
        str1 = "abcdefghijk";
        str2 =    "define";
    The str2 with the same substring "def" in str1.
    Show the relationship between the two string by matrix.
    You can use the pipe for dealing with the result.
invoke:
    max_match {options} str1 str2
options:
    @-w(default): Display the result infomations for view.
    @    --with_illuminate: The same function as option -w;
    @-wo: Don't display the result infomations for view.
    @    --without_illuminate: The same function as option -wo;
    @-h: Display the help info for users.
    @    --help: The same function as option -h;
    @    /h: The same function as option -h;
    @    /help: The same function as option -h;
    @    /?: The same function as option -h;
    @    -?: The same function as option -h;
*/
int main(int argc, char* argv[])
{
    char *str1, *str2;
    BOOL with_illuminate = TRUE;
    if(argc == 3)
    {
        str1 = argv[1];
        str2 = argv[2];
    }
    else if(argc == 4)
    {
        if(strcmp(argv[1], "-w") == 0 || strcmp(argv[1], "--with_illuminate") == 0)
            with_illuminate = TRUE;
        else if(strcmp(argv[1], "-wo") == 0 || strcmp(argv[1], "--without_illuminate") == 0)
            with_illuminate = FALSE;
        else
        {
            printf("ERROR: error paramaters in!\n");
            return -2;
        }

        str1 = argv[2];
        str2 = argv[3];
    }
    else if(argc == 2)
    {
        if(strcmp(argv[1], "-h") == 0
            || strcmp(argv[1], "/h") == 0
            || strcmp(argv[1], "--help") == 0
            || strcmp(argv[1], "/help") == 0
            || strcmp(argv[1], "/?") == 0
            || strcmp(argv[1], "-?") == 0)
        {
            man_this();
            return 0;
        }
    }
    else
    {
        printf("ERROR: No enough paramaters!\n");
        return -1;
    }

    if(with_illuminate)
    {
        printf("str1:\t|%s\n", str1);
        printf("str2:\t|%s\n", str2);
        printf("\nresult:\n");
    }

    element_t *matrix = malloc_space(str1, str2, with_illuminate);
    printf("%s", max_match_matrix(str1, str2, with_illuminate, matrix));
    free(matrix);
    return 0;
}

element_t *max_match_matrix(element_t* str1, element_t* str2, BOOL with_illuminate, element_t *matrix)
{
    int curr = with_illuminate ? 0 : -1;
    if(with_illuminate)
    {
        matrix[curr] = ele_space;
        int i = -1;
        while(str1[++i] != ele_end)
        {
            matrix[++curr] = str1[i];
        }
        matrix[++curr] = ele_break;
    }
    int j = -1;
    while(str2[++j] != ele_end)
    {
        if(with_illuminate)    matrix[++curr] = str2[j];
        int z = -1;
        while(str1[++z] != ele_end)
        {
            if(str1[z] == str2[j])
                matrix[++curr] = ele_placeholder;
            else
                matrix[++curr] = ele_space;
        }
        matrix[++curr] = ele_break;
    }

    matrix[++curr] = ele_end;
    return matrix;
}

element_t *malloc_space(element_t* str1, element_t* str2, BOOL with_illuminate)
{
    int len1 = strlen(str1);
    int len2 = strlen(str2);
    int len = 0;
    if(with_illuminate)
        len = (len1 + 2) * (len2 + 1) + 1;
    else
        len = (len1 + 1) * len2 + 1;

    element_t* result;
    if((result = (element_t*)malloc((size_t)(len * sizeof(element_t)))) == NULL)
    {
        printf("ERROR: No enough space!");
        return NULL;
    }
    return result;
}

void man_this(void)
{
    printf("%s", "purpose:\n");
    printf("%s", "    Generate a matrix for max match with str1 & str2.\n");
    printf("%s", "    e.g:\n");
    printf("%s", "        str1 = \"abcdefghijk\";\n");
    printf("%s", "        str2 =    \"define\";\n");
    printf("%s", "    The str2 with the same substring \"def\" in str1.\n");
    printf("%s", "    Show the relationship between the two string by matrix.\n");
    printf("%s", "    You can use the pipe for dealing with the result.\n");
    printf("%s", "invoke:\n");
    printf("%s", "    max_match {options} str1 str2\n");
    printf("%s", "options:\n");
    printf("%s", "    @-w(default): Display the result infomations for view.\n");
    printf("%s", "    @    --with_illuminate: The same function as option -w;\n");
    printf("%s", "    @-wo: Don't display the result infomations for view.\n");
    printf("%s", "    @    --without_illuminate: The same function as option -wo;\n");
    printf("%s", "    @-h: Display the help info for users.\n");
    printf("%s", "    @    --help: The same function as option -h;\n");
    printf("%s", "    @    /h: The same function as option -h;\n");
    printf("%s", "    @    /help: The same function as option -h;\n");
    printf("%s", "    @    /?: The same function as option -h;\n");
    printf("%s", "    @    -?: The same function as option -h;\n");
}
Copy from “Computer Systems A Programmer’s Perspective(CS:APP)” P12
The 1960s was an era of huge, complex operating systems, such as IBM’s OS/360 and Honeywell’sMultics systems.
While OS/360 was one of the most successful software projects in history, Multics dragged on for years and never
achieved wide-scale use. Bell Laboratories was an original partner in the Multics project, but dropped out in 1969
because of concern over the complexity of the project and the lack of progress. In reaction to their unpleasant
Multics experience, a group of Bell Labs researchers — Ken Thompson, Dennis Ritchie, Doug McIlroy, and Joe
Ossanna — began work in 1969 on a simpler operating system for a DEC PDP-7 computer, written entirely in
machine language. Many of the ideas in the new system, such as the hierarchical file system and the notion of a
shell as a user-level process, were borrowed from Multics, but implemented in a smaller, simpler package. In 1970,
Brian Kernighan dubbed the new system “Unix” as a pun on the complexity of “Multics.” The kernel was rewritten
in C in 1973, and Unix was announced to the outside world in 1974 [61].
Because Bell Labs made the source code available to schools with generous terms, Unix developed a large following
at universities. The most influential work was done at the University of California at Berkeley in the late 1970s and
early 1980s, with Berkeley researchers adding virtual memory and the Internet protocols in a series of releases called
Unix 4.xBSD (Berkeley Software Distribution). Concurrently, Bell Labs was releasing their own versions, which
become known as System V Unix. Versions from other vendors, such as the Sun Microsystems Solaris system, were
derived from these original BSD and System V versions.
Trouble arose in the mid 1980s as Unix vendors tried to differentiate themselves by adding new and often incompatible
features. To combat this trend, IEEE (Institute for Electrical and Electronics Engineers) sponsored an effort
to standardize Unix, later dubbed “Posix” by Richard Stallman. The result was a family of standards, known as
the Posix standards, that cover such issues as the C language interface for Unix system calls, shell programs and
utilities, threads, and network programming. As more systems comply more fully with the Posix standards, the
differences between Unix version are gradually disappearing. End Aside.
將Fedora10升級至Fedora11(試驗性的)
只能從Fedora10升級到Fedora11。更早的版本則需要先升級至Fedora10。RPM格式已經為Fedora11做了改變,因此首先必須升級舊的rpmlib。否則進程將出現rpmlib(FileDigests)依賴問題。對新格式的支持已經是Fedora10升級的一部分了。
yum update rpm
Fedora 10 -> Fedora 11 (tentative)
閱讀全文
- New
initrd built when installing a new kernel while running Fedora 10 might fail. To solve that boot with an old kernel (to get the new userspace) and (re)install the new kernel. - Systems with PAE support (indicated by
pae in /proc/cpuinfo) should use kernel-PAE.i686. The new kernel must be changed/installed manually: Set DEFAULTKERNEL=kernel-PAE in /etc/sysconfig/kernel and yum install kernel-PAE. Refer to Dave Jones' blog post for details. - The yum update step should NOT be run inside a gnome desktop session/gnome-terminal.
- REDIRECT Archive:Template:Bz could result in a unusable install when gnome-terminal segfaults during the upgrade. Update should be run in a vty, runlevel 3, or a screen session.
- fedora-release-11-1.noarch changes the yum mirrorlist URL so that it uses a "metalink", but the version of yum currently in F10 doesn't understand this syntax, leading to yum downloads failing with this error message:
YumRepo Error: All mirror URLs are not using ftp, http[s] or file.
 Eg. </metalink>/
This is RHBZ #498720. Workaround is to manually edit the URL in /etc/yum.repos.d/fedora.repo as described at https://www.redhat.com/archives/fedora-list/2009-June/msg00783.html
- Some packages in Fedora 10 are regarded as newer than those supplied by Fedora 11 and its updates repository. These include ntpd, ntpdate (RHBZ #506040, RHBZ #504980), unique, unique-devel, eclipse-changelog, eclipse-svnkit and svnkit. You may wish to remove these before performing the upgrade, then reinstall them afterwards. Doing so may require
--nodeps.
- Some i386 packages in Fedora 10 are replaced with i586, i686 or x86_64 packages in Fedora 11. These include gpm.i386, glibc-2.9-3.i386. You may wish to remove these before performing the upgrade, then reinstall them afterwards. Doing so may require
--nodeps.
- mplayer-1.0-0.104.20090204svn.fc10 from the RPM Fusion repository has a dependency on libfaad.so.0 that the depsolve doesn't find, but rpm_check_debug does. You may wish to remove mplayer before performing the upgrade, then reinstall them afterwards. Doing so may require
--nodeps.
C:\Documents and Settings\a>help subst
Associates a path with a drive letter.
SUBST [drive1: [drive2:]path]
SUBST drive1: /D
drive1: Specifies a virtual drive to which you want to assign a path.
[drive2:]path Specifies a physical drive and path you want to assign to
a virtual drive.
/D Deletes a substituted (virtual) drive.
Type SUBST with no parameters to display a list of current virtual drives.
可以將一個文件夾虛擬成一個驅動器。
記錄一下。
這個問題源自對'\0',0,以及NULL的探究!
先看看標題所提到的內容:
根據https://research.microsoft.com/en-us/um/redmond/projects/invisible/include/__defs.h.htm文檔中的定義:
#if !defined(NULL) && defined(__NEEDS_NULL)
#ifdef __cplusplus
#define NULL 0
#else
#define NULL ((void *)0)
#endif
#endif
在C和C++中,分別是由(void*)0和0來表示的。
而'\0'是ASCII中的值,ASCII中它的值就是0。
所以它們三者是相同的。
參考資料:
https://research.microsoft.com/en-us/um/redmond/projects/invisible/include/__defs.h.htm
在探究的過程中找到下面的一個帖子。很是不錯,COPY如下。
轉載自:http://blog.chinaunix.net/u/18517/showart_309917.html
帖子里討論了C語言中的空指針、空指針常量、NULL、0等概念及相互關系及區別。這里摘錄whyglinux兄的總結。做個標簽,呵呵^_^
- 什么是空指針常量(null pointer constant)?
[6.3.2.3-3] An integer constant
expression with the value 0, or such an expression cast to type void *, is
called a null pointer constant.
這里告訴我們:0、0L、'\0'、3 - 3、0 * 17
(它們都是“integer constant expression”)以及 (void*)0 (tyc:
我覺得(void*)0應該算是一個空指針吧,更恰當一點)等都是空指針常量(注意 (char*) 0 不叫空指針常量,只是一個空指針值)。至于系統選取哪種形式作為空指針常量使用,則是實現相關的。一般的 C 系統選擇 (void*)0 或者 0
的居多(也有個別的選擇 0L);至于 C++ 系統,由于存在嚴格的類型轉化的要求,void* 不能象 C 中那樣自由轉換為其它指針類型,所以通常選 0
作為空指針常量(tyc: C++標準推薦),而不選擇 (void*)0。
- 什么是空指針(null pointer)?
[6.3.2.3-3] If a null pointer constant is
converted to a pointer type, the resulting pointer, called a null pointer, is
guaranteed to compare unequal to a pointer to any object or
function.
因此,如果 p 是一個指針變量,則 p = 0;、p = 0L;、p = '\0';、p = 3 - 3;、p = 0 *
17; 中的任何一種賦值操作之后(對于 C 來說還可以是 p = (void*)0;), p 都成為一個空指針,由系統保證空指針不指向任何實際的對象或者函數。反過來說,任何對象或者函數的地址都不可能是空指針。(tyc: 比如這里的(void*)0就是一個空指針。把它理解為null pointer還是null pointer
constant會有微秒的不同,當然也不是緊要了)
- 什么是 NULL?
[6.3.2.3-Footnote] The macro NULL is defined in
<stddef.h> (and other headers) as a null pointer constant
即 NULL 是一個標準規定的宏定義,用來表示空指針常量。因此,除了上面的各種賦值方式之外,還可以用 p =
NULL; 來使 p 成為一個空指針。(tyc:很多系統中的實現:#define NULL
(void*)0,與這里的“a null pointer constant”并不是完全一致的)
- 空指針(null
pointer)指向了內存的什么地方(空指針的內部實現)?
標準并沒有對空指針指向內存中的什么地方這一個問題作出規定,也就是說用哪個具體的地址值(0x0
地址還是某一特定地址)表示空指針取決于系統的實現。我們常見的空指針一般指向 0 地址,即空指針的內部用全 0 來表示(zero null
pointer,零空指針);也有一些系統用一些特殊的地址值或者特殊的方式表示空指針(nonzero null pointer,非零空指針),具體請參見C
FAQ。
幸運的是,在實際編程中不需要了解在我們的系統上空指針到底是一個 zero null pointer 還是
nonzero null pointer,我們只需要了解一個指針是否是空指針就可以了——編譯器會自動實現其中的轉換,為我們屏蔽其中的實現細節。注意:不要把空指針的內部表示等同于整數
0 的對象表示——如上所述,有時它們是不同的。
- 如何判斷一個指針是否是一個空指針?
這可以通過與空指針常量或者其它的空指針的比較來實現(注意與空指針的內部表示無關)。例如,假設
p 是一個指針變量,q 是一個同類型的空指針,要檢查 p
是否是一個空指針,可以采用下列任意形式之一——它們在實現的功能上都是等價的,所不同的只是風格的差別。
指針變量 p
是空指針的判斷:
if ( p == 0 )
if ( p == '\0' )
if (
p == 3 - 3 )
if ( p == NULL ) /* 使用 NULL
必須包含相應的標準庫的頭文件 */
if ( NULL == p )
if ( !p )
if ( p == q
)
...
指針變量 p 不是空指針的判斷:
if ( p != 0 )
if ( p != '\0' )
if ( p
!= 3 - 3 )
if ( p != NULL ) /* 使用 NULL 必須包含相應的標準庫的頭文件 */
if ( NULL != p
)
if ( p )
if ( p != q )
...
- 可以用 memset 函數來得到一個空指針嗎?
這個問題等同于:如果 p 是一個指針變量,那么
memset(
&p, 0, sizeof(p) ); 和 p =
0;
是等價的嗎?
答案是否定的,雖然在大多數系統上是等價的,但是因為有的系統存在著“非零空指針” (nonzero null
pointer),所以這時兩者不等價。由于這個原因,要注意當想將指針設置為空指針的時候不應該使用
memset,而應該用空指針常量或空指針對指針變量賦值或者初始化的方法。
- 可以定義自己的 NULL 的實現嗎?兼答"NULL 的值可以是 1、2、3 等值嗎?"類似問題
[7.1.3-2] If the
program declares or defines an identifier in a context in which it is reserved
(other than as allowed by 7.1.4), or defines a reserved identifier as a macro
name, the behavior is undefined.
NULL 是標準庫中的一個符合上述條件的 reserved identifier
(保留標識符)。所以,如果包含了相應的標準頭文件而引入了 NULL 的話,則再在程序中重新定義 NULL
為不同的內容是非法的,其行為是未定義的。也就是說,如果是符合標準的程序,其 NULL 的值只能是 0,不可能是除 0 之外的其它值,比如 1、2、3
等。
- malloc 函數在分配內存失敗時返回 0 還是 NULL?
malloc 函數是標準 C
規定的庫函數。在標準中明確規定了在其內存分配失敗時返回的是一個 “null pointer”(空指針):
[7.20.3-1] If the
space cannot be allocated, a null pointer is returned.
對于空指針值,一般的文檔(比如
man)中傾向于用 NULL 表示,而沒有直接說成 0。但是我們應該清楚:對于指針類型來說,返回 NULL 和 返回 0 是完全等價的,因為 NULL 和 0
都表示 “null pointer”(空指針)。(tyc:一般系統中手冊中都返回NULL,那我們就用NULL吧)
另外,附C FAQ上關于null pointer的解釋:C FAQ:null pointer
#include <stdio.h>
#include <stdlib.h>

int main(void){
    int MB = 0;
    while(malloc(1 << 20))
        ++MB;
    printf("Allocated %d MB total\n", MB);

    return EXIT_SUCCESS;
}
原理,因為2的20次方就是1MB(2的10次方為1KB,2的30次方為1GB,以此類推)。
如果你請求分配的內存塊小于1MB,你得到的內存是否比這要多一些呢?為什么?
答:
這不是絕對的!
在本例中使用
1<<22(4MB)得到的結果乘4是2000MB
1<<21(2MB)得到的結果乘2是1972MB
1<<20(1MB)得到的結果是1918MB
1<<19(0.5MB)得到的結果除2是1812MB
1<<18(0.25MB)得到的結果除4是2003MB
1<<17(0.125MB)得到的結果除8是2034MB
顯然出現了一個意外的結果。
#include <stdio.h>
#include <stdlib.h>

char * favorite_fruit1(void);
char * favorite_fruit2(void);
void favorite_fruit3(char **);
int main(void) {
    char * fruit1 = favorite_fruit1();
    printf("%s\n", fruit1);

    char * fruit2 = favorite_fruit2();
    printf("%s\n", fruit2);

    char * fruit3 = NULL;
    favorite_fruit3(&fruit3);
    printf("%s\n", fruit3);

    printf("------END of CODE------");
    return EXIT_SUCCESS;
}
char * favorite_fruit1(void){
    char deciduous[] = "apple";
    return deciduous;
}
char * favorite_fruit2(void){
    static char deciduous[] = "apple";
    return deciduous;
}
void favorite_fruit3(char ** fruit){
    static char deciduous[] = "apple";
    *fruit = deciduous;
}
favorite_fruit1很明顯會出現問題,原因是因為char deciduous[]是局部變量,在函數調用返回后,就釋放了。
favorite_fruit2因為使用了static,而static限定了變量被保存在數據段(data segment)中,它的聲明周期同程序一樣長。所以不會出錯。
favorite_fruit3是另一種有效的寫法,其原理同2。
本部分內容詳見《C專家編程》P119
查看可執行文件中的段
1.編譯“hello world”程序,在可執行文件中執行ls -l,得到文件的總體大小。運行size得到文件里各個段的大小。
2.增加一個全局的int[1000]數組聲明,重新進行編譯,再用上面的命令得到總體及各個段的大小,注意前后的區別。
3.現在,在數組的聲明中增加初始值(記住,C語言并不強迫對數組進行初始化時為每個元素提供初始值)。這將使數組從BSS段轉換到數據段。重復上面的測量,注意各個段前后大小的區別。
4.現在,在函數內聲明一個巨大的數組。然后再聲明一個巨大的局部數組,但這次加上初始值。重復上面的測量。定義于函數內部的局部數組存儲在可執行文件中嗎?有沒有初始化有什么不同嗎?
5.如果在調試狀態下編譯,文件和段的大小有沒有變化?是為了最大程度的優化嗎?
分析上面“編程挑戰”的結果,使自己確信:
- 數據段保存在目標文件中。
- BSS段不保存在目標文件中(除了記錄BSS段在運行時所需要的大小)。
- 文本段是最容易受優化措施影響的段。
- a.out文件的大小受調試狀態下編譯的影響,但段不受影響。
helloworld.c的文件最終如下:
#include <stdio.h>
int global_array[1000] = {100, 101, 102};
void SayGoodBye(void);
int main(void)
{
printf("hello Linux world");
int main_array[1000] = {10, 20, 30, 40};
SayGoodBye();
return 0;
}
void SayGoodBye(void)
{
int goodbye_array[1000] = {1024, 2048, 4096};
printf("good bye user!");
}
以下命令按照文中步驟依次修改上文代碼(過程不贅述),運行size后的數據如下所示:
[volnet@GoCool c]$ echo "size helloworld1"; size helloworld1; echo "size helloworld2"; size helloworld2; echo "size helloworld3"; size helloworld3; echo "size helloworld4"; size helloworld4;
size helloworld1
text data bss dec hex filename
1015 252 8 1275 4fb helloworld1
size helloworld2
text data bss dec hex filename
1015 252 4032 5299 14b3 helloworld2
size helloworld3
text data bss dec hex filename
1015 4280 8 5303 14b7 helloworld3
size helloworld4
text data bss dec hex filename
1270 4280 8 5558 15b6 helloworld4
注:
BSS的全稱是:Block Started by Symbol(由符號開始的塊),它是舊式IBM704匯編程序的一個偽指令,UNIX借用了這個名字,至今依然沿用。
因為硬盤被自己給擠爆了,所以終于肯花錢買個移動硬盤了。把大部分地數據COPY到移動硬盤后,發現自己地硬盤還是有蠻多空間的。一直就想裝個
Linux,但苦于沒有空間也就沒有嘗試,機子上的確有個虛擬機的Linux,是Fedora10的LiveCD,但因為是LiveCD,而且是虛擬機上
跑的,加上機器配置本來就是老古董,所以覺得還是很不爽。既然有空間了,就裝個實體的吧。
裝Linux和裝Windows肯定是不一樣的,而且大
部分人都會有這樣地想法:機器上通常會先有了Windows,然后想拓展個Linux,雖然是Linux粉,但Windows也是必備的,因為大家都需要
淘寶,都需要網上銀行,可能還需要安裝MSN等,總之Windows要被Linux取代,一時半會還沒那么容易。這些是我個人的拙見啦。因為有很多地憤青
和狂熱青年會不分青紅皂白的把Windows一棒打死,這就完全沒必要了,雖然微軟是收費的,但你繼續用著盜版,連想被黑屏都要苦苦等待一百年,微軟只是
擺個姿態,你繼續用你的好了。(Linux粉詆毀Windows的不在少數,相關討論數不勝數,反正大家看自己的需要了,這里不做口水戰)
既然說了要Windows+Linux雙系統,當然這里我的前提是我已經安裝了Windows。其實這個解決的方案在互聯網上已經有很多實戰地范例,我這篇無非是更符合我自己地情況,當然有可能也能幫助到你。
步驟大致如下:
1、為Linux安排分區
2、下載Linux,并準備好。
3、安裝Linux
其實上面的步驟等于沒說,因為看似美好,但危機重重,我是在正常安裝了,但到您那可能就不是這么回事。
場景:
我有光驅,但我沒有光盤,這很讓人遺憾,我有U盤,也有移動硬盤,但移動硬盤放了我太多重要的數據,我不敢輕易冒險,我地光盤只有1G,但綽綽有余了。
網上的做法我基本也嘗試過了,但很不幸,并不能成功。
方案1(未成功,但您可以再試,因為有些步驟我可能真錯了)
1、下載GRUB for DOS,這個軟件在GNU的網站上就有,下載應該不是問題,找不到就搜一個吧。
2、我這里是用了Windows地boot.ini來帶動GRUB,然后再啟動GRUB來做的。GRUB的安裝是正確的。步驟如下:
2.1 解壓GRUB for DOS到C盤任意目錄,這里用了(Windows下)c:\boot\grub
2.2 復制其中地grldr到C盤根目錄下。
2.3 修改boot.ini文件,在最下面添加一行c:\grldr="啟動GRUB"
其實這里步驟2.2和2.3可以合并為一步,就是修改boot.ini文件到c:\boot\grub\grldr="啟動GRUB",這樣可能C盤根目錄下會好看許多。
現
在重新啟動你的計算機,你會發現在啟動地時候會出現多行可選的,其中最下面就是“啟動GRUB”,點擊進入后會有個綠色的界面。其中的內容是在
menu.lst文件中指定的,其實你可以增加你自己地命令到里面去,格式嘛,基本里面隨便找一個大致一致的斷修改一下就可以了。
當然,這個方法我沒有實戰成功,原因在下面。
3、
按照網上的說法,我應該要在啟動到GRUB后進入command
line(或者事先在menu.lst中編輯好后)再輸入啟動命令。當然之前要做一些準備工作。比如把Linux
ISO(CD的話是第一張光盤)中images文件夾下的vmlinuz和initrd.img文件copy到某個驅動器下。但現在我可能遇到了下面的問
題(說“可能”,是因為最后我也沒有去做一下可能正確的嘗試):
首先兩行命令大致如下:
grub>kernel /hd(0,5)/vmlinuz
grub>initrd /hd(0,5)/initrd.img
這
句話是網上的某個帖子說的,當然這里可能有錯誤,關鍵的地方是在hd(0,5),這是代表盤符,正確的寫法可能是(hd0,5)也就是大概是
grub> kernel
/(hd0,5)/vmlinuz,當然這個只是網友的一個例子,在那篇帖子中還說了如何推算驅動器盤符的名字,比如IDE硬盤就用hd開始,SATA硬
盤就用sd,但其實這是錯誤的(網上也另有帖子說不區分IDE和SATA。(http://blog.guoshuang.com/?p=5742)hd
應該就是hard
disk的縮寫,那sd是SCSI Dervice的縮寫,而不是SATA,第一輪我一直使用hd,并且嘗試了各種排列組合,但當數字增加到了二十幾的時候,我毅然決定放棄了。呵
呵。
當然后面在我正確安裝(如何正確,見后文)之后,圖形界面告訴我我的硬盤情況以及它們的正確命名。
我在Windows下有C,D,E,F分區,其中C為主分區,DEF為一個邏輯擴展分區,在F之后,還有兩個linux分區,這是我在Windows中為Linux分配的(使用PQ/Partition Magic 將它們進行調整)
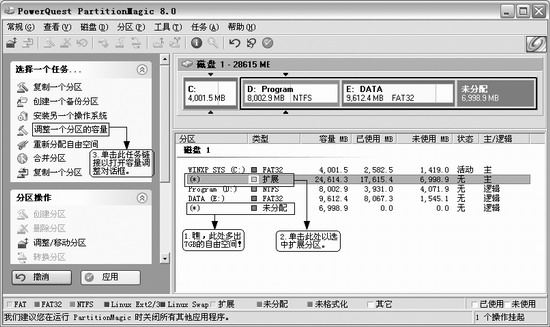
該圖片來自http://os.yesky.com/lin/184/2514684.shtml,內含詳細步驟(其中我是用“安裝另一個操作系統”來給Linux分配分區的)。
我還有插著一個U盤,然后最后的命名對應如下:
sda1對應C
sda5對應D
sda6對應E
sda7對應F
sda4對應Linux分區
sdb1對應U盤
我的失敗可能還來自于我地CDEF分區均為NTFS,據說GRUB是不支持NTFS的,但我在GRUB的文件夾下看到了grub-0.97-patch3-ntfs文件,從名字上好像就是ntfs的補丁。當然您可以先試試。反正我是換了其他方案。
方案2(成功)
我
狠心把F盤的空間給格了,將其轉換為FAT32,其實我相信不用轉的,因為我在Linux的安裝過程中看到了CDE盤,也就是
sda1,sda5,sda6等,那么也就是說它們是可以被識別的。其實這不是關鍵,關鍵是我用了一個軟件(其實它也就是跟我們做了手動的工作差不多。但
可能一些細節被我給弄錯了,總之現在這個方案還很方便。)
下載一個unetbootin軟件,安裝for
windows版的,它可以不需要你提供ISO文件,直接在線制作(也就是幫你下載下來,然后制作),我是消受不起這種高科技的,因為CD嘛,動輒
700MB,哪那么容易。ISO有了,指定完就可以了。U盤準備好,格了,FAT32格式,我之前一次在U盤里放了所謂地U盤啟動制作地兩個DOS文件,
結果還是出錯了。恩,先格式化了就可以了。其實它的做法COPY了太多的數據了,應該跟我們手動制作的時候一樣,只COPY幾個用于啟動安裝地img就可
以了。當然也無所謂了,起來了再說。(原因:因為在啟動后,它始終是U盤,但是Linux的安裝,只限四種方式:CD/DVD,Hard
disk,NFS(也就是網絡文件系統,通常就是一個本地局域網的服務器),URL(這種方式一樣需要強大的網絡帶寬支持),并沒有指定U盤,所以我們無
法簡單地用U盤來取代CD,只能依靠BIOS中用U盤來啟動initrd.img而已)
現在可以啟動地U盤制作好了,重啟后調整BIOS為USB啟動,然后會進入一個漂亮的畫面,選擇第一項(Default)就可以進入了,會要求選擇語言和鍵盤,就和Linux啟動的時候類似,選擇中文和US就可以了。
因
為我地多個ISO文件都是放在F盤的根目錄下的,剛才有CD/DVD,Hard disk,NFS,URL的時候,選擇硬盤(hard
disk),然后可能會讓你選擇引導驅動的盤,原本我都是選擇sdb1也就是U盤,其實直接選擇sda7就可以了,這里你的硬盤分區情況可能跟我不同,但
其實很容易,你挨個給它試過去,如果不可以它會提示你出錯了,你換換就可以了。
隨后會出現圖形界面,因為我事先為硬盤分出了Linux分區,這里選擇一下“刪除Linux分區,然后重建”(意思大概這樣)。
關鍵地一步是在下面會有個復選框,意思大概是檢測分區(也就是自定義安裝),讓你能夠看到默認地安裝過程。我的判斷是默認要求C盤是FAT32(網上的說法),但這里我們是F盤才是FAT32,所以我進去后小做修改(具體過程我忘了,大致就是將其中的一項改成了sda7,就順利過關了),否則可能遭遇“缺少ISO 9660圖像”安裝程序試圖掛載映像#1,但在硬盤上無法找到該映像。請將此映像復制到硬盤中,并點擊重試。點擊退出來終止安裝。
然后就會經過一個漫長的安裝過程。直到見到歡迎頁面,就沒啥難度了。
其實問題還有很多呢,我也還有好多問題沒解決。
剛才看一個哥們寫的安裝過程以及所遭遇的問題,看來是通病,Windows為什么成功,已經看得出來了,當然Linux粉完全可以說是定位不同,咱層次低,門檻感覺就高了,或許習慣后,也會覺得so easy,不過我還是很頂Windows的,確實很棒!
編程之美P117 -
求二進制中1的個數(P119)
除以一個2,如果有余,則有一個1,如果沒有余數,則有一個0;
位運算,循環右移,當前值&0x01,要么為0,要么為1,求和,即可得1的個數;
位運算,二進制-1,將會使最靠右的一個1消失,使其右邊那個0(如果存在的話)變1,然后與原數做&運算,結果如果非0,則說明還有1存在;
(低效)switch運算,直接給出答案0~255(可求8位二進制);
(神效)將結果放入int[256]中,直接查表即可,時間復雜度O(1)
階乘,給定一個整數N,那么N的階乘N!末尾有多少個0呢?例如:N=10,N!=3628800,N!的末尾有兩個。(P126)
N!中0的個數就是10的個數,因為10 = 2×5,由于2可能出現的個數肯定比5要多很多倍,所以只要計算含有5的個數即可。所以方法1就是%5(對5取余數);
原理同方法1,但是計算方式不同,一個數假設是250由幾個5相乘呢?
等價于
因為54 >250,也就是最后一個加號以后的數在計算機的整數除法中均為0,因此只有前三個有效。
等價于
它們分別可以解釋為:
1…5…10…15…25…30……250
:每間隔5,一共有多少個數,其結果也就是整除5的結果
:每間隔25,一共有多少個數,其結果也就是整除25的結果,因為之前這些數已經參與了含有5的計算,因此,現在整除25也就是整除5×5,則表示它有兩個5相乘。
依此類推,即可得出5的個數。
求N!的二進制表示中最低位1的位置。
同上一題一樣的方式解,把5換成2即可。題目的意思也就是類似,二進制的末尾0表示含有2的個數(類似上題含有5的個數)所以最后一個1的位置必然等于0的個數+1;更高效一點的就是上一題需用/5的做法,而這一題用>>=的做法就可以實現/2的效果了,而移位比除法要高效得多;
N!含有質因數2的個數,還等于N減去N的二進制表示中1的數目。(具體分析見P128)
1的數目
給定一個十進制正整數N,寫下從1開始,到N的所有整數,然后數一下其中出現的所有1的個數。
遍歷每個數,求每個數含有1的個數,但效率低,時間復雜度為O(N*log2N)
P115
數組int array[]中,最大的N個數。
排序?但是數字一大肯定不可以。
快速排序法,時間復雜度O(N*log2K),因為是求K個數,而快速排序一次可以將數分成兩組,最佳狀態是一次就將其分成兩組{K}X{N-K},其中X為參考數值。
二分搜索法
用容量為K的最小堆來做,使堆頂的元素是K個數中最小,然后其他數進行比較,如果比堆頂的大就替換最小的數,并重新排序堆,……,最后堆中的數據就是所要地數據了。
(快,但是受限)將每個數出現的次數記錄一下,假設有3、8、10,每個數出現的次數分別是2、7、3,那么假設K取5,則分別是{10、10、10、8、8}。
最大公約數
輾轉相除法
求差判定法,用減法代替方法1中的取模運算,但增加了迭代次數
根據f(x,y) = f(p*x1,y)=f(x1,y),用移位的方式除2(>>=)
?
Math::gcdNum_t Math::Gcd1(Math::gcdNum_t x, Math::gcdNum_t y)
{
????//y, x%y順序不能錯;
????return y ? Gcd1(y, x % y) : x;
}
? Math::gcdNum_t Math::Gcd2(Math::gcdNum_t x, Math::gcdNum_t y)
{
????//與Gcd1相同的方式,但由于x%y計算速度較x-y要慢,但效果相同,所以換用x - y
????// 但用減法和除法不同的是,比如和,%20=10,-20=70,也就是-4×=10
????// 也就是說迭代次數較Gcd1而言通常是增加了。
????return y ? Gcd1(y, x - y) : x;
}
? Math::gcdNum_t Math::Gcd3(Math::gcdNum_t x, Math::gcdNum_t y)
{
????if(x < y)
????????return Gcd3(y, x);
????if(y == 0)
????????return x;
????else
????{
????????if(IsEven(x))
????????{
????????????if(IsEven(y))
????????????????return (Gcd3(x >> 1, y >> 1) << 1);
????????????else
????????????????return Gcd3(x >> 1, y);
????????}
????????else
????????{
????????????if(IsEven(y))
????????????????return Gcd3(x, y >> 1);
????????????else
????????????????return Gcd3(y, x - y);
????????}
????}
}
? bool Math::IsEven(Math::gcdNum_t x)
{
????return !(bool)x & 0x0001;
} |