#
今天在VS2008下編譯VS自帶Sample中的一個例子,TstCon,因為之前的機器裝的是XP系統,該程序曾成功編譯過,不過今天在Windows Server 2008 R2下打開失敗,在朋友的Windows 7 Ultimate下打開也失敗,試用以管理員身份運行,失敗,試用修改兼容性選項為Windows XP SP3/SP2方式,均失敗。
其實這個時候可能是一些Vista以上版本的OS所提供的新功能引起的限制。就當前的這個例子而言,是因為編譯的時候,啟用用戶帳戶控制(UAC)默認為“是”所致,將解決方案內所有工程選中,右鍵屬性,修改“配置屬性”->“鏈接器”->“清單文件”->“啟用用戶帳戶控制(UAC)”為“否”,重新生成解決方案,即可。

準確地說還是經驗不足,這么簡單的事居然想了好幾分鐘,當然也要怪VS在沒有重新生成前的詭異現象。
今晚在類中加入兩個數組用來做計數,因為之前代碼有所改動,VS編譯(增量)的結果居然出現了無數次的程序崩潰,害我一度懷疑是不是我的數組寫的有問題。囧。最后無奈之下,點了重新生成,居然順利通過了,很生氣,憤怒中。
但是另外卻發現了一個問題,也就是當size_t用作循環的時候。因為以前都是用int做循環的,現在換成unsigned int(也就是size_t)后,一下子沒反應過來,就順手這么寫了:
for( size_t i = MAX - 1; i >= 0; --i)
{
//……
}
乍一看似乎沒啥問題,因為我循環內的代碼是刪除資源的,因此程序也頻頻崩潰。
step over的結果才讓人驚訝,因為當size_t i = 0的時候,--i的結果是無窮大,而無窮大則肯定滿足i>=0的條件,所以當我們期待程序停住的時候,程序是不會停住的。
修正的方式:
1、使用正向遍歷。
2、增加判斷條件(i>=0 && i < MAX),但這里也可能存在問題,因為size_t可能被定義為unsigned int,但是MAX可能是個更大的數,比如unsigned long long,當然這樣的比較不是很有意義,或者會實現一些轉換,但是如果這種情況發生的話,程序可能還是會通過一個隨機的i進入到一個未知的空間中,從而造成崩潰。而且增加判斷條件也使得程序的運行成本提高。
本來想好好寫寫C++ Traits的,剛剛接到interview的通知,先貼代碼,改天再議。
/*
 * cpp_traits.cpp
 *
 *  Created on: 2010-4-26
 *      Author: volnet@tom.com
 */
#include <iostream>
// kinds of types for overloading.
struct undefined_type {};
struct int32_type {};
struct int64_type {};

// typedef some has_trivial_* for difference types.
template <class T>
struct type_traits {
    typedef undefined_type has_trivial_type;
};

// define the partial specialization functions.
template <>
struct type_traits<int> {
    typedef int32_type has_trivial_type;
};
template <>
struct type_traits<long> {
    typedef int64_type has_trivial_type;
};

// the dispatcher method for all kinds of types.
template <class T>
void type_detect(T& p){
    typedef typename type_traits<T>::has_trivial_type trivial_type;
    type_detect(p, trivial_type());
}

// define the functions for dispatching.
template <class T>
void type_detect(T& p, undefined_type) {
    std::cout << p;
    std::cout << " // It's a undefined type, we have NOT found the dispatcher function." << std::endl;
}
template <class T>
void type_detect(T& p, int32_type) {
    std::cout << p;
    std::cout << " // It's a int32" << std::endl;
}
template <class T>
void type_detect(T& p, int64_type) {
    std::cout << p;
    std::cout << " // It's a int64" << std::endl;
}

int main(void) {
    int int32num = 2010;
    type_detect(int32num);

    long int64num = 2010L;
    type_detect(int64num);

    std::string str = "2010";
    type_detect(str);

    std::cout << "-------end of program." << std::endl;
    return EXIT_SUCCESS;
}
本文來自C/C++用戶日志,17(10),1999年10月 原文鏈接
大部分人都聽說過auto_ptr指針,但是并非所有人都每天使用它。不使用它是不明智的(可恥的),因為auto_ptr的設計初衷是為了解決C++設計和編碼的普遍問題,將它用好可以寫出更健壯的代碼。本文指出如何正確使用auto_ptr以使程序變得安全,以及如何避開危險,而不是一般使用auto_ptr的惡習所致的創建間歇性和難以診斷的問題。
為什么它是一個“自動”指針
auto_ptr只是許許多多智能指針中的一種。許多商業庫提供許多更強大的智能指針,可以完成更多的事情。從可以管理引用計數到提供更先進的代理服務等。應該把auto_ptr認為是智能指針中的福特Escort[注釋]:一個基于簡單且通用目的的智能指針,既沒有小發明也沒有豐富的特殊目的更不需要高性能,但是能將許多普通的事情做好,并且能夠適合日常使用的智能指針。
auto_ptr做這樣一件事:擁有一個動態分配內存對象,并且在它不再需要的時候履行自動清理的職責。這里有個沒有使用auto_ptr指針的不安全的例子:
    // Example 1(a): Original code
    //
    void f()
    {
      T* pt( new T );

      /*...more code...*/

      delete pt;
    }
我們每天都像這樣寫代碼,如果f()只是一個三行程序,也沒做什么多余的事情,這樣做當然可以很好工作。但是如果f()沒有執行delete語句,比如程序提前返回(return)了,或者在執行的時候拋出異常了,然后就導致已經分配的對象沒有被刪除,因此我們就有了一個經典的內存泄漏。
一個使Example(1)安全的辦法是用一個“智能”的指針擁有這個指針,當銷毀的時候,刪除那個被指的自動分配的對象。因為這個智能指針被簡單地用為自動對象(這就是,當它離開它的作用域的時候自動銷毀對象),所以它被稱作“自動”指針。
    // Example 1(b): Safe code, with auto_ptr
    //
    void f()
    {
      auto_ptr<T> pt( new T );

      /*...more code...*/

    } // cool: pt's destructor is called as it goes out
      // of scope, and the object is deleted automatically
現在這段代碼將不會再T對象上發生泄漏了,不必在意這個方法是正常退出還是異常退出,因為pt的析構函數將總是在堆棧彈出的時候被調用。清理工作將自動進行。
最后,使用auto_ptr和使用內建指針一樣地容易,如果要“收回”資源并且再次手動管理的話,我們可以調用release():
    // Example 2: Using an auto_ptr
    //
    void g()
    {
      T* pt1 = new T;
      // right now, we own the allocated object

      // pass ownership to an auto_ptr
      auto_ptr<T> pt2( pt1 );

      // use the auto_ptr the same way
      // we'd use a simple pointer
      *pt2 = 12;       // same as "*pt1 = 12;"
      pt2->SomeFunc(); // same as "pt1->SomeFunc();"

      // use get() to see the pointer value
      assert( pt1 == pt2.get() );

      // use release() to take back ownership
      T* pt3 = pt2.release();

      // delete the object ourselves, since now
      // no auto_ptr owns it any more
      delete pt3;

    } // pt2 doesn't own any pointer, and so won't
      // try to delete it... OK, no double delete
最后,我們可以使用auto_ptr的reset()方法將auto_ptr重置向另一個對象。如果auto_ptr已經獲得一個對象,這個過程就像是它先刪除已經擁有的對象,因此調用reset(),就像是先銷毀了auto_ptr,然后重建了一個新的并擁有該新對象:
    // Example 3: Using reset()
    //
    void h()
    {
      auto_ptr<T> pt( new T(1) );

      pt.reset( new T(2) );
        // deletes the first T that was
        // allocated with "new T(1)"

    } // finally, pt goes out of scope and
      // the second T is also deleted
包裝指針數據成員
同樣,auto_ptr也可以被用于安全地包裝指針數據成員。考慮下面使用Pimpl idiom(或者,編譯器防火墻)的例子:[1]
    // Example 4(a): A typical Pimpl
    //

    // file c.h
    //
    class C
    {
    public:
      C();
      ~C();
      /*...*/
    private:
      class CImpl; // forward declaration
      CImpl* pimpl_;
    };

    // file c.cpp
    //
    class C::CImpl { /*...*/ };

    C::C() : pimpl_( new CImpl ) { }
    C::~C() { delete pimpl_; }
簡單地說,就是C的私有細節被實現為一個單獨的對象,藏匿于一個指針之中。該思路要求C的構造函數負責為隱藏在類內部的輔助“Pimpl”對象分配內存,并且C的析構函數負責銷毀它。使用auto_ptr,我們會發現這非常容易:
    // Example 4(b): A safer Pimpl, using auto_ptr
    //

    // file c.h
    //
    class C
    {
    public:
      C();
      /*...*/
    private:
      class CImpl; // forward declaration
      auto_ptr<CImpl> pimpl_;
    };

    // file c.cpp
    //
    class C::CImpl { /*...*/ };

    C::C() : pimpl_( new CImpl ) { }
現在,析構函數不需要擔心刪除pimpl_指針了,因為auto_ptr將自動處理它。事實上,如果沒有其它需要顯式寫析構函數的原因,我們完全不需要自定義析構函數。顯然,這比手動管理指針要容易得多,并且將對象所有權包含進對象是一個不錯的習慣,這正是auto_ptr所擅長的。我們將在最后再次回顧這個例子。
所有權,源,以及調用者(Sinks)
它本身很漂亮,并且做得非常好:從函數傳入或傳出auto_ptrs,是非常有用的,比如函數的參數或者返回值。
讓我們看看為什么,首先我們考慮當拷貝auto_ptr的時候會發生什么:一個auto_ptr獲得一個擁有指針的對象,并且在同一時間只允許有一個auto_ptr可以擁有這個對象。當你拷貝一個auto_ptr的時候,你自動將源auto_ptr的所有權,傳遞給目標auto_ptr;如果目標auto_ptr已經擁有了一個對象,這個對象將先被釋放。在拷貝完之后,只有目標auto_ptr擁有指針,并且負責在合適的時間銷毀它,而源將被設置為空(null),并且不能再被當作原有指針的代表來使用。
例如:
    // Example 5: Transferring ownership from
    //            one auto_ptr to another
    //
    void f()
    {
      auto_ptr<T> pt1( new T );
      auto_ptr<T> pt2;

      pt1->DoSomething(); // OK

      pt2 = pt1;  // now pt2 owns the pointer,
                  // and pt1 does not

      pt2->DoSomething(); // OK

    } // as we go out of scope, pt2's destructor
      // deletes the pointer, but pt1's does nothing
但是要避免陷阱再次使用已經失去所有權的auto_ptr:
    // Example 6: Never try to do work through
    //            a non-owning auto_ptr
    //
    void f()
    {
      auto_ptr<T> pt1( new T );
      auto_ptr<T> pt2;

      pt2 = pt1;  // now pt2 owns the pointer, and
                  // pt1 does not

      pt1->DoSomething();
                  // error! following a null pointer
    }
謹記于心,我們現在看看auto_ptr如何在源和調用者之間工作。“源”這里是指一個函數,或者其它創建一個新資源的操作,并且通常將移交出資源的所有權。一個“調用者”函數反轉這個關系,也就是獲得已經存在對象的所有權(并且通常還負責釋放它)。而不是有一個源和調用者,返回并且利用一個禿頭指針(譯者注:而不是使用一個局部變量來傳遞這個指針),雖然,通過一個禿頭指針來獲得一個資源通常很好:
    // Example 7: Sources and sinks
    //

    // A creator function that builds a new
    // resource and then hands off ownership.
    //
    auto_ptr<T> Source()
    {
      return auto_ptr<T>( new T );
    }

    // A disposal function that takes ownership
    // of an existing resource and frees it.
    //
    void Sink( auto_ptr<T> pt )
    {
    }

    // Sample code to exercise the above:
    auto_ptr<T> pt( Source() ); // takes ownership
注意下面的微妙的變化:
-
Source()分配了一個新對象并且以一個完整安全的方式將它返回給調用者,并讓調用者成為指針的擁有著。即使調用者忽略了返回值(顯然,如果調用者忽略了返回值,你應該從來沒有寫過代碼來刪除這個對象,對吧?),分配的對象也將被自動安全地刪除。
在本文的最后,我將演示返回一個auto_ptr是一個好習慣。讓返回值包裹進一些東西比如auto_ptr通常是使得函數變得強健的有效方式。
-
Sink()通過傳值的方式獲得對象所有權。當執行完Sink()的時候,當離開作用域的時候,刪除操作將被執行(只要Sink()沒有將所有權轉移)。上面所寫的Sink()函數實際上并沒有對參數做任何事情,因此調用“Sink(pt);”就等于寫了“pt.reset(0);”,但是大部分的Sink函數都將在釋放它之前做一些工作。
不可以做的事情,以及為什么不能做
謹記:千萬不要以我之前沒有提到的方式使用auto_ptrs。我已經看見過很多程序員試著用其他方式寫auto_ptrs就像他們在使用其它對象一樣。但問題是auto_ptr并不像其他對象。這里有些基本原則,我將把它們提出來以引起你的注意:
For auto_ptr, copies are NOT equivalent. (復制auto_ptr將與原來的不相等)
當你試著在一般的代碼中使用auto_ptrs的時候,它將執行拷貝,并且沒有任何提示,拷貝是不相等的(結果,它確實就是拷貝)。看下面這段代碼,這是我在C++新聞組經常看見的:
    // Example 8: Danger, Will Robinson!
    //
    vector< auto_ptr<T> > v;

    /* ... */

    sort( v.begin(), v.end() );
在標準容器中使用auto_ptrs總是不安全的。一些人可能要告訴你,他們的編譯器或者類庫能夠很好地編譯它們,而另一些人則告訴你在某一個流行的編譯器的文檔中看到這個例子,不要聽他們的。
問題是auto_ptr并不完全符合一個可以放進容器類型的前提,因為拷貝auto_ptrs是不等價的。首先,沒有任何東西說明,vector不能決定增加并制造出“擴展”的內部拷貝。再次,當你調用一個一般函數的時候,它可能會拷貝元素,就像sort()那樣,函數必須有能力假設拷貝是等價的。至少一個流行的排序拷貝“核心”的元素,如果你試著讓它與auto_ptrs一起工作的話,它將拷貝一份“核心”的auto_ptr對象(因此轉移所有權并且將所有權轉移給一個臨時對象),然后對其余的元素也采取相同的方式(從現有成員創建更多的擁有所有權的auto_ptr),當排序完成后,核心元素將被銷毀,并且你將遇到一個問題:這組序列里至少一個auto_ptr(也就是剛才被掉包的那個核心元素)不再擁有對象所有權,而那個真實的指針已經隨著臨時對象的銷毀而被刪除了!
于是標準委員會回退并希望做一些能夠幫助你避免這些行為的事情:標準的auto_ptr被故意設計成當你希望在使用標準容器的時候使用它時打斷你(或者,至少,在大部分的標準庫實現中打斷你)。為了達到這個目的,標準委員會利用這樣一個技巧:讓auto_ptr's的拷貝構造函數和賦值操作符的右值(rhs)指向非常量。因為標準容器的單元素insert()函數,需要一個常量作為參數,因此auto_ptrs在這里就不工作了。(譯者注:右值不能賦值給非常量)
使用const auto_ptr是一個好習慣
將一個auto_ptr設計成const auto_ptrs將不再丟失所有權:拷貝一個const auto_ptr是違法的(譯者注:沒有這樣的構造函數),實際上你可以針對它做的唯一事情就是通過operator*()或者operator->()解引用它或者調用get()來獲得所包含的指針的值。這意味著我們有一個簡單明了的風格來表達一個絕不丟失所有權的auto_ptr:
    // Example 9: The const auto_ptr idiom
    //
    const auto_ptr<T> pt1( new T );
        // making pt1 const guarantees that pt1 can
        // never be copied to another auto_ptr, and
        // so is guaranteed to never lose ownership

    auto_ptr<T> pt2( pt1 ); // illegal
    auto_ptr<T> pt3;
    pt3 = pt1;              // illegal
    pt1.release();          // illegal
    pt1.reset( new T );     // illegal
這就是我要說的cosnt!因此如果現在你要向世界證明你的auto_ptr是不會被改變并且將總是刪除其所有權,加上const就是你要做的。const auto_ptr風格是有用的,你必須將它謹記于心。
auto_ptr以及異常安全
最后,auto_ptr對寫出異常安全的代碼有時候非常必要,思考下面的代碼:
    // Example 10(a): Exception-safe?
    //
    String f()
    {
      String result;
      result = "some value";
      cout << "some output";
      return result;
    }
該函數有兩個可見的作用:它輸出一些內容,并且返回一個String。關于異常安全的詳細說明超出了本文的范圍[2],但是我們想要取得的目標就是強異常安全的保障,歸結為確保函數的原子性——如果有異常,所有的作用一起發生或者都不發生。
雖然在例10(a)中的代碼非常精巧,看起來相當接近于異常安全的代碼,但仍然有一些小的瑕疵,就像下面的客戶代碼所示:
    String theName;
    theName = f();
因為結果通過值返回,因此String的拷貝構造函數將被調用,而拷貝賦值操作符被調用來將結果拷貝到theName中。如果任何一個拷貝失敗了,f()就完成了所有它的工作以及所有它的任務(這很好),但是結果是無法挽回的(哎喲我的媽呀)
我們可以做的更好嗎,是否可以通過避免拷貝來避免這個問題?例如,我們可以 讓函數有一個非常量引用參數并向下面這樣返回值:
    // Example 10(b): Better?
    //
    void f( String& result )
    {
      cout << "some output";
      result = "some value";
    }
這看起來很棒,但實際不是這樣的,返回result的賦值的函數只完成了一個功能,而將其它事情留給了我們。它仍然會出錯。因此這個做法不可取。
解決這個問題的一個方法是返回一個指向動態分配指針的String對象,但是最好的解決方案是讓我們做的更多,返回一個指針包含在auto_ptr:
    // Example 10(c): Correct (finally!)
    //
    auto_ptr<String> f()
    {
      auto_ptr<String> result = new String;
      *result = "some value";
      cout << "some output";
      return result;  // rely on transfer of ownership;
                      // this can't throw
    }
這里是一個技巧,當我們有效隱藏所有的工作來構造第二個功能(返回值)當確保它可以被安全返回給調用者并且在第一個功能(打印消息)完成的時候沒有拋出操作。我們知道一旦cout完成,返回值將成功交到調用者手中,并且無論如何都會正確清理:如果調用者接受返回值,調用者將得到這個拷貝的auto_ptr臨時對象的所有權;如果調用者沒有接受返回值,也就是忽略返回值,分配的String將在臨時auto_ptr被銷毀的時候自動清理。這種安全擴展的代價呢?就像我們經常實現的強異常安全一樣,強安全通常消耗一些效率(通常比較小)——這里指額外的動態內存分配。但是當我們在效率和正確性之間做出選擇的話,我們通常會選擇后者!
讓我們養成在日常工作中使用auto_ptr的習慣。auto_ptr解決了常見的問題,并且能夠使你的代碼變得更安全和健壯,特別是它可以防止內存泄漏以及確保強安全。因為它是標準的,因此它在不同類庫和平臺之間是可移植的,因此無論你在哪里使用它,它都將是對的。
致謝
This article is drawn from material in the new book Exceptional C++: 47 engineering puzzles, programming problems, and exception-safety solutions by Herb Sutter, ? 2000 Addison Wesley Longman Inc., which contains further detailed treatments of points touched on briefly in this article, including exception safety, the Pimpl (compiler-firewall) Idiom, optimization, const-correctness, namespaces, and other C++ design and programming topics.
注釋
-
Pimpl風格可以有效減少項目構建時間,因為它在C私有部分改變的時候,阻止客戶代碼引起廣泛的重新編譯。更多關于Pimpl風格以及如何部署編譯器墻,參考這本Exceptional C++的條款26到30。(Addison-Wesley, 2000)
-
See the article originally published in C++ Report and available on the Effective C++ CD (Scott Meyers, Addison-Wesley, 1999) and Items 8 to 19 in Exceptional C++ (Herb Sutter, Addison-Wesley, 2000).
先看一段簡單的C++代碼:
Type get(int I){
    return Type(i);
}

Type t = get(1);
這里, 我們從C++的基本語義看上去, 應該是Type(i) 調用一次拷貝構造函數, 在堆棧中生成一個臨時對象;然后,用該對象構造返回對象;然后對這個臨時對象調用析構函數;在調用者方, 用返回的臨時對象調用拷貝構造函數以初始化對象t, 返回對象的析構函數在這之后, 函數返回之前調用。
所以, Type t = get(i); 應該有三個拷貝構造函數和兩個析構函數的調用.
可是, 還有一種說法是, 編譯器可能會對這兩個臨時對象進行優化,最終的優化結果會是只有一次的構造函數。因為很明顯地可以看到, 這里我們其實只是要用一個整數構造一個Type對象。
嗯. 似乎很有道理!
那么, 哪一種說法對呢? 沒有調查就沒有發言權,于是本人用VC++6.0做了實驗。 放了些cout<<…..在拷貝構造函數里,觀察打印的結果, 結果卻是跟我的simple, na?ve的預測一致。三個拷貝構造函數, 兩個析構函數。
“你個弱智編譯器!腦袋進水了吧?”(忘了編譯器沒腦袋了)“很明顯在這個例子里我的兩個臨時對象都沒有用的啊!”
于是,上網, 查資料, google一下吧!
下面是我查到的一些結果:
其實, 這種對值傳遞的優化的研究, 并不只局限于返回值。對下面這個例子:
void f(T t) { }
void main(void){
    T t1;
    f(t1);
}
也有這種考慮。
f(T)是按值傳遞的。語義上應該做一個復制, 使得函數內部對T的改變不會影響到原來的t1.
但是,因為在調用f(t1)之后, 我們沒有再使用t1(除了一個隱含的destructor調用),是否可能把復制優化掉, 直接使用t1呢?這樣可以節省掉一個拷貝構造函數和一個析構函數。
可是, 不論是對返回值的優化, 還是對上面這種局部對象的優化,在1995年的C++新標準草案出臺前都是為標準所嚴格限制的 (雖然有些編譯器并沒有遵行這個標準, 還是支持了這種“優化”)
那么, 這又是為什么呢?
這里面涉及到一個普遍的對side-effect的擔憂。
什么又是side-effect呢?
所謂side-effect就是一個函數的調用與否能夠對系統的狀態造成區別。
int add(int i, int j){ return i+j; }就是沒有side-effect的,而
void set(int* p, int I, int v){ p[I]=v; }就是有side-effect的。因為它改變了一個數組元素的值, 而這個數組元素在函數外是可見的。
通常意義上來說, 所有的優化應該在不影響程序的可觀察行為的基礎上進行的。否則,快則快了, 結果卻和所想要的完全不同!
而C++的拷貝構造函數和析構函數又很多都是有side-effect的。如果我們的“優化”去掉了一個有side-effect的拷貝構造函數和一個析構函數, 這個“優化”就有可能改變程序的可觀察行為。(注意, 我這里說的是“可能”,因為“負負得正”, 兩個有side-effect的函數的調用, 在不考慮并行運行的情況下, 也許反而不會影響程序的可觀察行為。不過, 這種塞翁失馬的事兒, 編譯器就很難判斷了)
基于這種憂慮, 1995年以前的標準, 明確禁止對含有side-effect的拷貝構造函數和析構函數的優化。同時, 還有一些對C++擴充的提議, 考慮讓程序員自己對類進行允許優化的聲明。 程序員可以明確地告訴編譯器:不錯, 我這個拷貝構造函數, 析構函數是有side-effect, 但你別管, 盡管優化, 出了事有我呢!
哎, side-effect真是一個讓人又恨又愛的東西!它使編譯器的優化變得困難;加大了程序維護和調試的難度。因此 functional language 把side-effect當作洪水猛獸一樣,干脆禁止。但同時,我們又很難離開side-effect. 不說程序員們更習慣于imperative 的編程方法, 象數據庫操作,IO操作都天然就是side-effect.
不過,個人還是認為C++標準對“優化”的保守態度是有道理的。無論如何,讓“優化”可以潛在地偷偷地改變程序的行為總是讓人想起來就不舒服的。
但是, 矛盾是對立統一的。(想當年俺馬列可得了八十多分呢)。 對這種aggressive的“優化”的呼聲是一浪高過一浪。 以Stan Lippeman為首的一小撮頑固分子對標準的顛覆和和平演變的陰謀從來就沒有停止過。 這不?在1996年的一個風雨交加的夜晚, 一個陰險的C++新標準草案出爐了。在這個草案里, 加入了一個名為RVO (Return Value Optimization) 的放寬對優化的限制, 妄圖走資本主義道路, 給資本家張目的提案。其具體內容就是說:允許編譯器對命名過的局部對象的返回進行優化, 即使拷貝構造函數/析構函數有side-effect也在所不惜。這個提議背后所隱藏的思想就是:為了提高效率, 寧可冒改變程序行為的風險。寧要資本主義的苗, 不要社會主義的草了!
我想, 這樣的一個罪大惡極的提案竟會被提交,應該是因為C++的值拷貝的語義的效率實在太“媽媽的”了。 當你寫一個 Complex operator+(const Complex& c1, const Complex& c2);的時候, 竟需要調用好幾次拷貝構造函數和析構函數!同志們!(沉痛地, 語重心長地)社會主義的生產關系的優越性怎么體現啊?
接下來, 當我想Google C++最新的標準, 看RVO是否被最終采納時, 卻什么也找不到了。 到ANSI的網站上去, 居然要付錢才能DOWNLOAD文檔。 “老子在城里下館子都不付錢, down你幾個爛文檔還要給錢?!”
故事沒有結局, 實在是不爽。 也不知是不是因為標準還沒有敲定, 所以VC++6 就沒有優化, 還是VC根本就沒完全遵守標準。
不過,有一點是肯定的。 當寫程序的時候, 最好不要依賴于RVO (有人, 象Stan Lippeman, 又叫它NRV優化)。 因為, 不論對標準的爭論是否已經有了結果, 實際上各個編譯器的實現仍還是各自為政, 沒有統一。 一個叫SCOtt Meyers的家伙(忘了是賣什么的了)就說, 如果你的程序依賴于RVO, 最好去掉這種依賴。也就是說, 不管RVO到底標準不標準, 你還是不能用。 不僅不能用, 還得時刻警惕著RVO可能帶來的程序行為上的變化。 (也不知這幫家伙瞎忙了半天到底為啥!)
說到這里, 倒想起了C#里一個困惑了我很久的問題。記得讀C#的specification的時候, 非常不解為什么C#不允許給value type 定義析構函數。
這里, 先簡略介紹一下C#里的value type (原始數據類型, struct 類型)。
在C#里的value_type就象是值, 永遠只能copy, 取值。因此, 它永遠是in-place的。如果你把一個value type的數據放在一個對象里,它的生命期就和那個對象相同;如果你聲明一個value type 的變量在函數中, 它的生命期就在lexical scope里。
{
The_ValueType value;
}//value 到這里就死菜了
啊呀呀! 這不正是我們懷念的C++的stack object嗎?
在C++里,Auto_ptr, shared_ptr, 容器們, 不都是利用析構函數來管理資源的嗎?
C#,Java 雖然利用garbage collection技術來收集無用對象, 使我們不用再擔心內存的回收。 但garbage collection并不保證無用對象一定被收集, 并不保證Dispose()函數一定被調用, 更不保證一個對象什么時候被回收。 所以對一些非內存的資源, 象數據庫連接, 網絡連接, 我們還是希望能有一個類似于smart pointer的東西來幫我們管理啊。(try-finally 雖然可以用, 但因為它影響到lexical scope, 有時用起來不那么方便)
于是, 我對C#的取消value type的析構函數充滿了深厚的階級仇恨。
不過, 現在想來, C#的這種設計一定是懲于C++失敗的教訓:
1. value type 沒有拷貝構造函數。C#只做缺省copy, 沒有side-effect
2. value type 不準有析構函數。C#有garbage collection, 析構函數的唯一用途只會是做一些side-effect象關閉數據庫連接。 所以取消了析構函數, 就取消了value type的side-effect.
3. 沒有了side-effect, 系統可以任意地做優化了
對以下程序:
The_Valuetype get(int I){return The_Valuetype(i);}
The_Valuetype t = get(1);
在C#里我們可以快樂地說:只調用了一次構造函數。 再沒有side-effect的沙漠, 再沒有難以優化的荒原, smart pointer望而卻步, 效率之花處處開遍。 I have a dream, ……
轉載自:http://gugu99.itpub.net/post/34143/466008
/*
 * type_infer_in_const_char_array.cpp
 *
 *  Created on: 2010-4-4
 *      Author: volnet
 *      Ref: http://topic.csdn.net/u/20100403/16/aebc3e87-ae49-4a18-ba0b-263348b512e3.html
 *      ShortRef: http://is.gd/be914
 */

#include <stdlib.h>
#include <iostream>
#ifdef _MSC_VER
#include <typeinfo.h>
#else
#include <typeinfo>
#endif

template <typename T>
int compare(const T &v1, const T &v2) {
    std::cout << "invoking compare ..." << std::endl;
    if(v1<v2) return -1;
    if(v2<v1) return 1;
    return 0;
}
int main()
{
    //error:
    // no matching function for call to `compare(const char[3], const char[6])'
    // compare("hi","world");
    compare<const char*>("hi","world");
    //what's the real type about "abcd"?
    // const char * or const char [n] ?
    std::cout << typeid("hi").name() << std::endl;        // char const [3]
    std::cout << typeid("world").name() << std::endl;    // char const [6]
    std::cout << typeid("dlrow").name() << std::endl;    // char const [6]
    // the compiler infer the typename T is char const [6]
    compare("world", "dlrow");
}
首先我們面臨的挑戰是,聲明堆中的數據需要我們用new關鍵字,直到我們顯示調用了delete之后,它們才會被移除,但問題是,我們什么時候應該移除?如果調用語句在上下行中,我們自然知道如何移除。我們知道如果對象聲明在堆中,那么在它離開它的作用域中的時候,可以自動釋放,如果我們能夠用棧對象來管理堆對象,在棧對象自動釋放的時候,釋放堆對象,就不需要顯式調用delete語句了:
于是就有了下面的做法,應該不難理解:
template<class T>
class smart_ptr {
public:
    smart_ptr(T* t = 0) { real_ptr = t; }
    ~smart_ptr() { delete real_ptr; }
    T* operator ->() const { return real_ptr; }
    T& operator *() const { return *real_ptr; }
private:
    T* real_ptr;
};
我們希望我們的智能指針能夠像指針一樣地工作,但下面的工作方式似乎存在問題:
在普通的dumb指針中,以下行為是正確的:
void letUsGo(BaseClass* objPtr);

DerivedClass* derivedObjPtr2 = new DerivedClass();
letUsGo(derivedObjPtr2);
delete derivedObjPtr2;
但是,以下代碼呢?
void letUsSmartGo(const smart_ptr<BaseClass>& objPtr);
smart_ptr<DerivedClass> smartDerivedObjPtr2(new DerivedClass());
// the smart_ptr<DerivedClass> is not inherited from the smart_ptr<BaseClass>
// the compiler can't find the class to cast it, so it must cause the error.
letUsSmartGo(smartDerivedObjPtr2);
下面的過程描述了這個變化所需要的一些支持:
1、error C2664: “letUsSmartGo”: 不能將參數 1 從“smart_ptr<T>”轉換為“const smart_ptr<T> &”
2、smartDerivedObjPtr2的類型:
smart_ptr<DerivedClass> smartDerivedObjPtr2(new DerivedClass());
3、letUsSmartGo的聲明:
void letUsSmartGo(const smart_ptr<BaseClass>&);
4、問題轉化為,如何從smart_ptr<DerivedClass>到const smart_ptr<BaseClass>&的轉變。
5、針對letUsSmartGo的聲明,可以有的實參類型包括:
const smart_ptr<BaseClass>
smart_ptr<BaseClass>
假設存在以下類型 smart_derived_ptr : smart_ptr<BaseClass>,那么smart_derived_ptr也是可以被傳遞的。
6、這里存在這樣一個問題:
new DerivedClass() 被傳遞給smartDerivedObjPtr2之后,smartDerivedObjPtr2就擁有了它的指針。如果從smartDerivedObjPtr2隱式轉換成另一個smart_ptr<X>后,我們需要解決的就是將smartDerivedObjPtr2所擁有的指針傳遞給smart_ptr<X>并將smartDerivedObjPtr2的內部指針清零(這樣就不會在smartDerivedObjPtr2被銷毀的時候,因為調用delete real_ptr,而它的新拷貝在離開作用域的時候,一樣會再次調用delete real_ptr,而此時real_ptr指向的對象已經被釋放,因此這樣的行為是未定義的。)
7、因此,定義如下方法即可:
template<class T>
class smart_ptr {
public:
    smart_ptr(T* t = 0) {
        std::cout << "creating smart_ptr ...smart_ptr(T* t = 0)" << std::endl;
        real_ptr = t;
    }

    template<class U>
    smart_ptr(smart_ptr<U>& rhs) : real_ptr(rhs.real_ptr){
        std::cout << "creating smart_ptr ...smart_ptr(smart_ptr<U>& rhs)" << std::endl;
        rhs.real_ptr = 0;
    }

    ~smart_ptr() {
        std::cout << "destoring smart_ptr ..." << std::endl;
        delete real_ptr;
    }

    T* operator ->() const { return real_ptr; }
    T& operator *() const { return *real_ptr; }

    T* real_ptr;
};
8、但是這里real_ptr按照習慣應該是一個私有成員,而且我們在完成該方法時候,希望能夠實現一種所謂的所有權轉移,也就是將內部的指針傳遞給另一個智能指針,而這應該是一個原子過程。因此,我們實現以下方法:
template<class T>
class smart_ptr {
public:
    smart_ptr(T* t = 0) {
        std::cout << "creating smart_ptr ...smart_ptr(T* t = 0)" << std::endl;
        real_ptr = t;
    }

    template<class U>
    smart_ptr(smart_ptr<U>& rhs) : real_ptr(rhs.release()){
        std::cout << "creating smart_ptr ...smart_ptr(smart_ptr<U>& rhs)" << std::endl;
    }

    ~smart_ptr() {
        std::cout << "destoring smart_ptr ..." << std::endl;
        delete real_ptr;
    }

    T* operator ->() const { return real_ptr; }
    T& operator *() const { return *real_ptr; }

    // helper
    T* release() {
        T* tmp = real_ptr;
        real_ptr = 0;
        return tmp;
    }
private:
    T* real_ptr;
};

1、設置“生成時啟用C/C++代碼分析”為“是”,如果不設置此項,程序速度將出乎你的意料……

2、點擊“分析”->“啟動性能向導”

3、在“性能資源管理器”中右鍵新建的性能報告節點,右鍵“啟動并啟用分析功能”。

雖然此處有“啟用分析功能”,但如果在配置里面沒有進行設置,第一次的測試報告結果將是不準確的。
4、選擇兩個性能報告(ctrl+鼠標),右鍵“比較性能報告”。

用性能報告將有助于提高程序的性能,并且快速定位問題所在,剩下的結果就是你自己需要多觀察,分析性能報告所反映的問題了。
更多
VC++ 6.0詳見這里>> http://neural.cs.nthu.edu.tw/jang/mir/technicalDocument/vc6_profile/index.htm
第三方工具>> http://www.semdesigns.com/Products/Profilers/CppProfiler.html
這不是一篇向導,全面的向導請看
這里(http://goo.gl/XcAf)。
這僅是一篇筆記。這里用
bjam方式進行編譯。
- 下載boost。(http://cdnetworks-kr-1.dl.sourceforge.net/project/boost/boost/1.42.0/boost_1_42_0.tar.bz2)
- 解壓到指定文件夾,我是將它解壓到根目錄下的一個sourcecode文件夾下。
/home/volnet/sourcecode/boost_1_42_0
- 啟動終端(ctrl+f2,輸入“gnome-terminal”)。生成bjam腳本。
./bootstrap.sh --prefix=/home/volnet/sourcecode/boost_install
如果不帶--prefix參數的話(推薦),默認的路徑是/usr/local/include和/usr/local/lib ./bootstrap.sh
使用--help參數可以查看幫助,用-h可以查看簡要幫助。 ./bootstrap.sh --help
生成腳本bjam,已經存在的腳本將被自動備份。volnet@Ubuntu:~/sourcecode/boost_1_42_0$ ./bootstrap.sh --prefix=/home/volnet/sourcecode/boost_install/
Building Boost.Jam with toolset gcc... tools/jam/src/bin.linuxx86/bjam
Detecting Python version... 2.6
Detecting Python root... /usr
Unicode/ICU support for Boost.Regex?... /usr
Backing up existing Boost.Build configuration in project-config.jam.4
Generating Boost.Build configuration in project-config.jam...
Bootstrapping is done. To build, run:
./bjam
To adjust configuration, edit 'project-config.jam'.
Further information:
- Command line help:
./bjam --help
- Getting started guide:
http://www.boost.org/more/getting_started/unix-variants.html
- Boost.Build documentation:
http://www.boost.org/boost-build2/doc/html/index.html
- 然后就是利用生成的bjam腳本編譯源碼了。
volnet@Ubuntu:~/sourcecode/boost_1_42_0$ sudo ./bjam -a -sHAVE_ICU=1 installNote: Building Boost.Regex with Unicode/ICU support enabled Using ICU in /usr/include
- ./是unix-like系統執行文件的前綴,這里就是指要執行bjam文件。
- -a是參數,代表重新編譯(Rebuild)。輸入./bjam -h獲得更多幫助。
- -sHAVE_ICU=1,代表支持Unicode/ICU。點擊這里(http://goo.gl/ySEe)
前提:系統內需要安裝有libicu-dev,可以在終端輸入:
sudo apt-get install libicu-dev
- install,表示安裝
- --clean,表示清理。當前語句中包含-a,則不需要先手動清理,否則需要先運行
./bjam --clean
- 如果你執行上一步,會出現諸如:mpi的問題,多半是本機沒有安裝mpi。根據系統提示,你可以找到有/home/volnet/sourcecode/boost_1_42_0/tools/build/v2/user-config.jam。在文件最后跟上
using mpi ;
即可。然后如果還是有mpi問題,說明本機沒有安裝mpi。sudo apt-get install mpi-default-dev
界此應該順利通過編譯了。并在/usr/local/lib下有了boost的庫了。
下面討論一下鏈接靜態鏈接庫在Eclipse里的問題。
在
Unix variants向導里,官方提供了一個使用正則表達式的程序。
在Eclipse里,新增c++ project,并使用Linux C++編譯器。將代碼拷貝到文件中:
因為要靜態鏈接到正則表達式的庫,所以如下圖所示,設置對應的*.a文件路徑到eclipse,以使鏈接器能夠找到它。
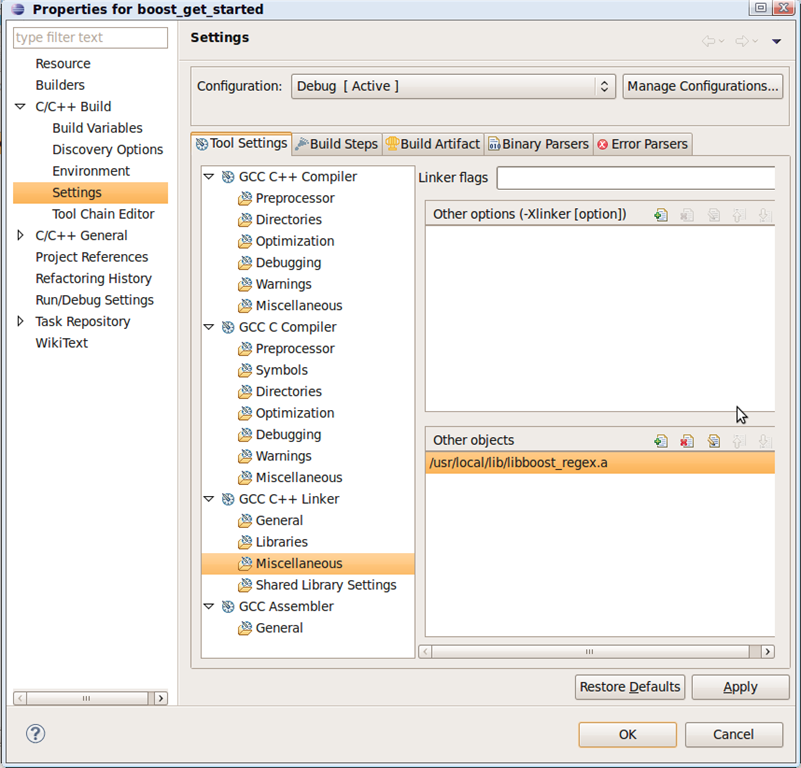
編譯通過!
為了我們的程序能夠正確載入,我們需要讓我們的程序在我們的系統范圍內也能夠找到我們的庫。這時候我們需要在設置一下。詳見
這部分的相關介紹。
測試程序!
volnet@Ubuntu:~/workspace/boost_get_started/Debug$ ./boost_get_started < test
Will Success Spoil Rock Hunter?
這里test是一個文件。
關于單一參數構造函數的問題,主要是因為單一參數被編譯器用作隱式類型轉換,從而導致一些不可預期的事件的發生,請參見代碼詳細注釋:
/*
 * single_argument_ctor.cpp
 *
 *  Created on: 2010-3-29
 *      Author: Volnet
 *      Compiler: GNU C++(version 3.4.5)
 *                MSVC CL(version 15.00.30729.01)
 */

#include <stdlib.h>
#include <iostream>
#include <sstream>

// single-argument class
class SingleArgumentClass {
private:
    int _inner;
public:
    SingleArgumentClass()
        :_inner(-1)
    {

    }
    SingleArgumentClass(int actual)
        :_inner(actual)
    {

    }
    bool operator==(const SingleArgumentClass& rhs);
    std::string str(){
        // we'd better to use boost::lexical_cast to cast.
        // #region cast
        std::stringstream strStream;
        strStream << _inner;
        std::string str;
        strStream >> str;
        // #endregion
        return str;
    }
};
bool
SingleArgumentClass::operator ==(const SingleArgumentClass& rhs){
    if(_inner == rhs._inner)
        return true;
    return false;
}

// single-argument class fixed bug by explicit keyword.
class SingleArgumentClassFixedBugByExplicitKeyword {
private:
    int _inner;
public:
    SingleArgumentClassFixedBugByExplicitKeyword()
        :_inner(-1)
    {

    }
    explicit SingleArgumentClassFixedBugByExplicitKeyword(int actual)
        :_inner(actual)
    {

    }
    bool operator==(const SingleArgumentClassFixedBugByExplicitKeyword& rhs);
    std::string str(){
        // we'd better to use boost::lexical_cast to cast.
        // #region cast
        std::stringstream strStream;
        strStream << _inner;
        std::string str;
        strStream >> str;
        // #endregion
        return str;
    }
};
bool
SingleArgumentClassFixedBugByExplicitKeyword::operator ==(const SingleArgumentClassFixedBugByExplicitKeyword& rhs){
    if(_inner == rhs._inner)
        return true;
    return false;
}

// single-argument class fixed bug by helper class.
class ActualType {
public:
    ActualType(int value):_value(value){};
    int get_value(){ return _value; }
private:
    int _value;
};
class SingleArgumentClassFixedBugByHelperClass {
private:
    int _inner;
public:
    SingleArgumentClassFixedBugByHelperClass()
        :_inner(-1)
    {

    }
    SingleArgumentClassFixedBugByHelperClass(ActualType actual)
        :_inner(actual.get_value())
    {

    }
    bool operator==(const SingleArgumentClassFixedBugByHelperClass& rhs);
    std::string str(){
        // we'd better to use boost::lexical_cast to cast.
        // #region cast
        std::stringstream strStream;
        strStream << _inner;
        std::string str;
        strStream >> str;
        // #endregion
        return str;
    }
};
bool
SingleArgumentClassFixedBugByHelperClass::operator ==(const SingleArgumentClassFixedBugByHelperClass& rhs){
    if(_inner == rhs._inner)
        return true;
    return false;
}


void Assert(bool status,
        std::string strTrue = std::string("assert result is true;"),
        std::string strFalse = std::string("assert result is false;"));
int main(void){
    SingleArgumentClass obj(3);
    std::cout << obj.str() << std::endl;

    // our purpose.
    SingleArgumentClass obj1(1);
    SingleArgumentClass obj2(1);
    Assert(obj1 == obj2, "obj1 == obj2", "obj1 != obj2");

    int i = 3;
    // warning!!!
    // obj is a SingleArgumentClass object.
    // i is a integer.
    // operator== only define the equal between two SingleArgumentClass object.
    // In fact:
    //    obj == i:
    //        1.compiler found the operator== require two SingleArgumentClass object.
    //        2.compiler try to find a cast method for casting int to SingleArgumentClass.
    //        3.compiler found it can use the SingleArguementClass.Ctor(int)
    //            to create a new SingleArgumentClass.
    //         4.compiler try to create a new SingleArgumentClass object from i.
    //        5.so it without any warning and error, but it's logical not we need.
    Assert(obj == i, "obj == i //right?", "obj != i");
    // Assert(i == obj); // Compile ERROR: no match for 'operator==' in 'i == obj'

    // it's may encounter a compile-time error.
    // GNU G++: no match for 'operator==' in 'objFixed == i'    single_argument_ctor.cpp    single_argument_ctor/src    106    C/C++ Problem
    // MSVC: 錯誤    1    error C2679: 二進制“==”: 沒有找到接受“int”類型的右操作數的運算符(或沒有可接受的轉換)    {projectpath}\single_argument_ctor\src\single_argument_ctor.cpp    107    single_argument_ctor
    SingleArgumentClassFixedBugByExplicitKeyword objFixed(3);
    // Assert(objFixed == i, "objFixed == i", "objFixed != i");

    SingleArgumentClassFixedBugByHelperClass objFixedByHelper1(3);
    SingleArgumentClassFixedBugByHelperClass objFixedByHelper2(3);
    // it's may encounter a compile-time error.
    // GNU G++: no match for 'operator==' in 'objFixedAuto1 == i'    single_argument_ctor.cpp    single_argument_ctor/src    158    C/C++ Problem
    // MSVC: 錯誤    1    error C2679: 二進制“==”: 沒有找到接受“int”類型的右操作數的運算符(或沒有可接受的轉換)    {projectpath}\single_argument_ctor\src\single_argument_ctor.cpp    163    single_argument_ctor
    // Assert(objFixedByHelper1 == i);
}
void Assert(bool status,
        std::string strTrue, std::string strFalse)
{
    std::cout << (status  strTrue : strFalse) << std::endl;
}
解決方法:
1、explicit關鍵字,在單參數構造函數前使用explicit參數,可以避免單參數構造函數被用于隱式轉換。
2、利用中間類的方式,詳見代碼“SingleArgumentClassFixedBugByHelperClass相關部分”。如果編譯器不支持解決方法1,則建議使用此方法。上面代碼所提及的兩款主流編譯器均支持explicit關鍵字。