接
上一篇,首先需要修正的是在DFA生成算法中的傳播部分,應該需要有個循環一直傳播到不能傳播為止,在多次實驗中表明,有些展望符是通過第2,3,4甚至更多次傳播得來的。
應此,相應的make函數變成了
bool LALR1::make()
{
vector<LALR1Production> v;
v.push_back(inputProductions[begin][0]);
pStart = closure(v);
pStart->idx = Item::inc();
context.states.insert(pStart);
items.push_back(pStart);
queue<Item*> q;
q.push(pStart);
vector<Item*> changes;
bool bContinue = false;
while (!q.empty())
{
Item* pItem = q.front();
vector<Production::Item> s;
symbols(pItem, s);
select_into(s, vts, compare_production_item_is_vt, push_back_unique_vector<Production::Item>);
select_into(s, vns, compare_production_item_is_vn, push_back_unique_vector<Production::Item>);
for (vector<Production::Item>::const_iterator i = s.begin(), m = s.end(); i != m; ++i)
{
Item* pNewItem = NULL;
if (go(pItem, *i, pNewItem))
{
long n = itemIndex(pNewItem);
if (n == -1)
{
pNewItem->idx = Item::inc();
q.push(pNewItem);
items.push_back(pNewItem);
context.states.insert(pNewItem);
}
else
{
items[n]->mergeWildCards(pNewItem, bContinue);
changes.push_back_unique(items[n]);
destruct(pNewItem, has_destruct(*pNewItem));
Item_Alloc::deallocate(pNewItem);
}
edges[pItem].push_back_unique(Edge(pItem, n == -1 ? pNewItem : items[n], *i));
}
}
q.pop();
}
while (bContinue)
{
vector<Item*> v;
v.reserve(changes.size());
bContinue = false;
for (vector<Item*>::const_iterator i = changes.begin(), m = changes.end(); i != m; ++i)
{
vector<Production::Item> s;
symbols(*i, s);
for (vector<Production::Item>::const_iterator j = s.begin(), n = s.end(); j != n; ++j)
{
Item* pNewItem = NULL;
if (go(*i, *j, pNewItem))
{
long n = itemIndex(pNewItem);
if (n == -1) throw error<const char*>("unknown item", __FILE__, __LINE__);
else
{
items[n]->mergeWildCards(pNewItem, bContinue);
v.push_back_unique(items[n]);
destruct(pNewItem, has_destruct(*pNewItem));
Item_Alloc::deallocate(pNewItem);
}
}
}
}
changes = v;
}
}
在merge函數中,會檢測有沒有新生成的展望符來決定是否繼續傳播下去。
一個示例
下面我們用一個例子來說明LALR1 DFA是如何生成的,首先它的文法如下
S -> L "=" R
| R "+"
| R
;
L -> "*" R
| "id"
;
R -> L
;
根據之前的算法,我們先來看自生的部分
首先我們寫出這個文法的增廣文法
begin -> . S (#)
求取它的閉包得到
begin -> . S
wildCards:
#
S -> . L "=" R
wildCards:
#
S -> . R "+"
wildCards:
#
S -> . R
wildCards:
#
L -> . "*" R
wildCards:
"=" "+"
L -> . "id"
wildCards:
"=" "+"
R -> . L
wildCards:
"+" #
我們觀察到,其中有5個可轉移的符號,分別為S、L、R、"*"和"id",我們分別用go函數對這5個轉移符號求出新的狀態
首先用符號S求出新狀態
begin -> S
wildCards:
#
由于這個狀態不在原有列表中,應此它是一個新生成的狀態,我們為它添加一條通過符號S轉移的邊。
接下來用符號L求出新狀態
S -> L . "=" R
wildCards:
#
R -> L
wildCards:
"+" #
這個狀態也不在原有列表中,應此它也是一個新生成的狀態,我們為它添加一條通過符號L轉移的邊。
然后用符號R求出新狀態
S -> R . "+"
wildCards:
#
S -> R
wildCards:
#
這個狀態也不在原有列表中,應此它也是一個新生成的狀態,我們為它添加一條通過符號R轉移的邊。
然后用符號*求出新的狀態
L -> "*" . R
wildCards:
"=" "+"
R -> . L
wildCards:
"+" # "="
L -> . "*" R
wildCards:
"=" "+" #
L -> . "id"
wildCards:
"=" "+" #
同樣的它也不在原有的列表中,我們同樣為其添加一條通過符號*轉移的邊。
然后是符號id的
L -> "id"
wildCards:
"=" "+"
同樣不在列表中,我們為其添加一條通過符號id轉移的邊。
這樣,從start狀態轉移出來的5條邊就生成好了,下面來看看這5個新生成的狀態又會生成一些什么呢
begin -> S
wildCards:
#
由第一個狀態可知,它沒有任何的邊。
S -> L . "=" R
wildCards:
#
R -> L
wildCards:
"+" #
第二個狀態則有一個=的轉移,它生成了一個新狀態
S -> L "=" . R
wildCards:
#
R -> . L
wildCards:
"+" # "="
L -> . "*" R
wildCards:
"=" "+" #
L -> . "id"
wildCards:
"=" "+" #
S -> R . "+"
wildCards:
#
S -> R
wildCards:
#
第三個狀態有一個+的轉移,它生成了一個新狀態
S -> R "+"
wildCards:
#
L -> "*" . R
wildCards:
"=" "+"
R -> . L
wildCards:
"+" # "="
L -> . "*" R
wildCards:
"=" "+" #
L -> . "id"
wildCards:
"=" "+" #
第四個狀態有4個轉移,分別為R、L、*和id
1.通過符號R轉移到新狀態
L -> "*" R
wildCards:
"=" "+"
2.通過符號L轉移到新狀態
R -> L
wildCards:
"+" # "="
3.通過*則可轉移到它自己
4.通過id轉移到第5個狀態
第五個狀態則沒有任何的轉移。
S -> L "=" . R
wildCards:
#
R -> . L
wildCards:
"+" # "="
L -> . "*" R
wildCards:
"=" "+" #
L -> . "id"
wildCards:
"=" "+" #
第六個狀態有4個轉移,分別為R、L、*和id
1.通過符號R可轉移到新狀態
S -> L "=" R
wildCards:
#
2.通過符號L可轉移到狀態9
3.通過符號*可轉移到狀態4
4.通過符號id可轉移到狀態5
第6、7、8個狀態都沒有任何轉移
然后讓我們來看下changes列表里有哪些東西,根據
上一篇的算法可知,所有已存在的狀態都在changes列表里,應此它里面應該會有4、5和9三個狀態。
至此,整個自生的部分完成了,下面我們將其畫成一張圖
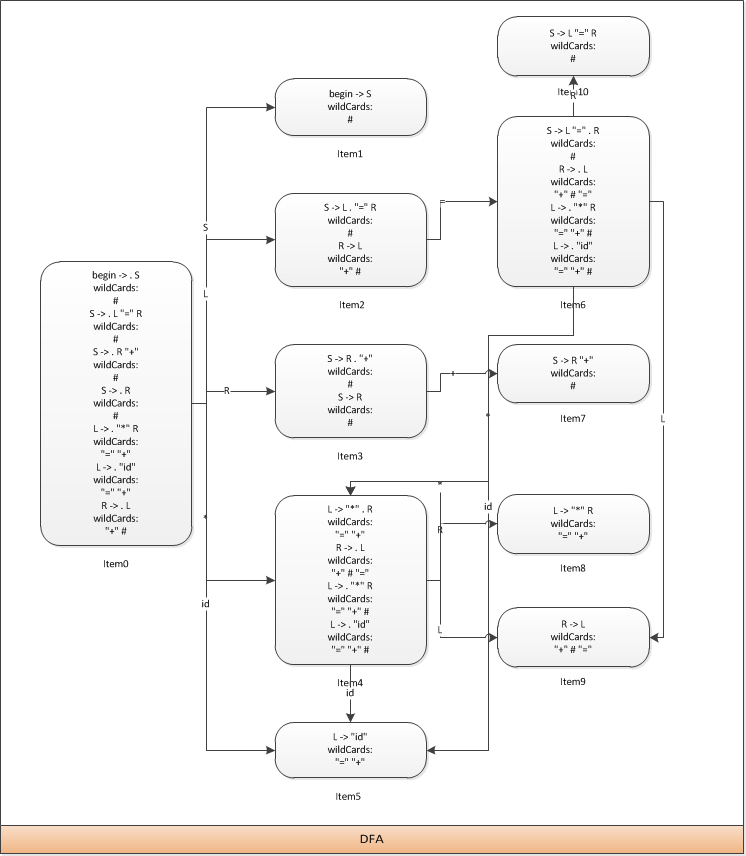 下面是傳播部分
在第一次傳播時changes列表里有3個狀態,分別對這3個狀態用go函數求出新的展望符,并把它們合并到原有的狀態上。
首先看狀態4,它有4個狀態轉移符,分別是R、L、*和id
1.通過符號R可轉移到狀態8,同時它的展望符如下
L -> "*" R
wildCards:
"=" "+" #
2.通過符號L可轉移到狀態9,同時它的展望符如下
R -> L
wildCards:
"+" # "="
3.通過符號*可轉移到它自己,同時它的展望符如下
L -> "*" . R
wildCards:
"=" "+" #
R -> . L
wildCards:
"+" # "="
L -> . "*" R
wildCards:
"=" "+" #
L -> . "id"
wildCards:
"=" "+" #
4.通過符號id可轉移到狀態5,同時它的展望符如下
L -> "id"
wildCards:
"=" "+" #
然后我們來看一下狀態5和9,它們沒有任何狀態轉移符,應此它們不會傳播任何展望符。
現在changes列表里有4個狀態,分別為8、9、4和5,又由于第8個狀態已經產生了新的展望符#應此需要繼續傳播
第二次傳播
首先先看狀態8和9,它們沒有任何狀態轉移符,應此它們不會傳播任何展望符。
然后來看狀態4,同樣的它有4個狀態轉移符,分別為R、L、*和id。
1.通過符號R可轉移到狀態8,同時它的展望符如下
L -> "*" R
wildCards:
"=" "+" #
2.通過符號L可轉移到狀態9,同時它的展望符如下
R -> L
wildCards:
"+" # "="
3.通過符號*可轉移到它自己,同時它的展望符如下
L -> "*" . R
wildCards:
"=" "+" #
R -> . L
wildCards:
"+" # "="
L -> . "*" R
wildCards:
"=" "+" #
L -> . "id"
wildCards:
"=" "+" #
4.通過符號id可轉移到狀態5,同時它的展望符如下
L -> "id"
wildCards:
"=" "+" #
最后我們來看狀態5,它沒有任何狀態轉移符,應此它不會傳播任何展望符。
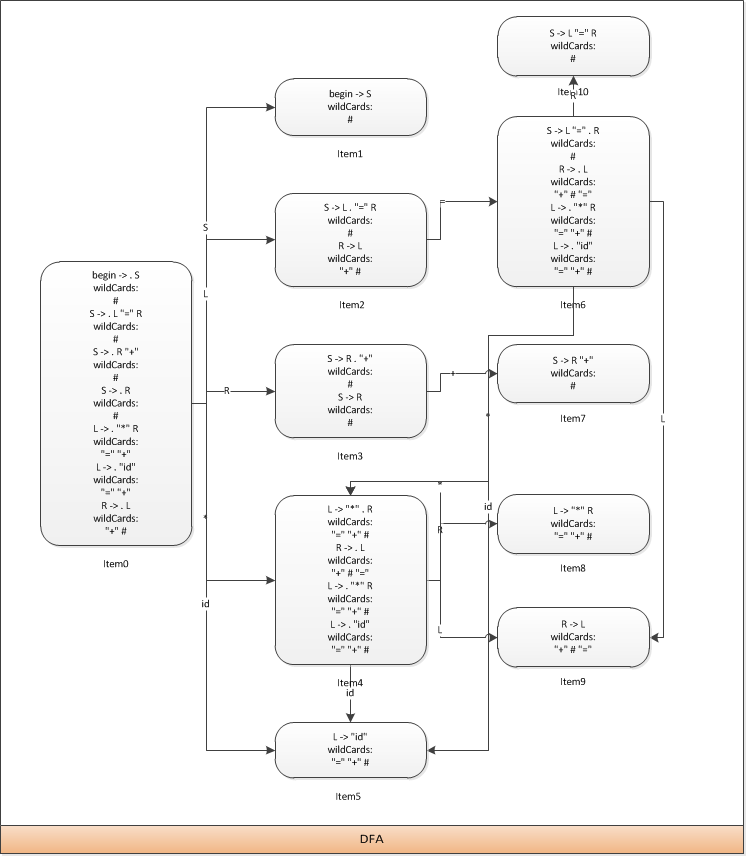
現在changes列表里同樣有4個狀態,分別為8、9、4和5,由于沒有一個狀態產生了新的展望符,應此它將不會繼續傳播下去了。
現在整個文法的DFA就生成完畢了,讓我們來修改一下原先的那張圖來看看最終的DFA是什么樣的。
整個示例就先介紹到這里,在接下來的一篇文章中將會通過幾個示例來介紹closure和go函數的原理,希望這種由粗到細的講解順序能夠被讀者所接受。最后完整的代碼可到
http://code.google.com/p/qlanguage下載。
posted on 2013-05-30 23:04
lwch 閱讀(1576)
評論(2) 編輯 收藏 引用 所屬分類:
QLanguage