引言
http://www.oschina.net/question/54100_28547
http://www.apkbus.com/android-18748-1-1.html
上篇我們介紹了Intents和Intent Filters的理論部分,主要是介紹了:activities、services、broadcastreceivers三種組件的Intent機制兩種Intent(顯式和隱式)及它們如何去匹配目的組件、Intent對象包含哪些信息、Intent Filters的action & category & data。
Intent的重要性,我不再著重介紹了,但我還是要說:Intent能夠使應用程序突破沙盒與外界交流,者這使得Android的世界變得豐富多彩!本篇將用實例來介紹,如何應用Intent,而且繼續(xù)用SMS方面的例子來闡述。本文的主要內容如下:
- 例子(需求)描述
- STEP1、添加用于顯示通訊錄的布局文件
- STEP2、添加Button的點擊事件
- STEP3、添加通訊錄活動
- STEP4、解析通訊錄返回的數(shù)據(jù)
- STEP5、在清單文件AndroidManifest.xml中注冊通訊錄活動和讀取Contact數(shù)據(jù)庫的權限
- 總結
例子(需求)描述
用手機發(fā)過SMS的人都知道:
- 用戶可以先編輯短信,然后再去通訊錄中選擇相應的人并發(fā)生給他。
- 用戶可以在短信內容中插入通訊錄中聯(lián)系人的號碼。
我們的這個例子就是要說明如何實現(xiàn)這個功能。要實現(xiàn)這個功能,即是創(chuàng)建一個新的Activity選擇(ACTION_PICK)通訊錄中的數(shù)據(jù),它會顯示通訊錄中的所有聯(lián)系人并讓用戶選擇,然后關閉并返回一個聯(lián)系人的URI給短信程序。下面介紹如何一步一步實現(xiàn)類似的功能,而且是在之前Android 開發(fā)之旅:短信的收發(fā)及在android模擬器之間實踐(一)中發(fā)送SMS的例子(TextMessage)基礎上加上從通訊錄中選擇聯(lián)系人的功能。
STEP1、添加用于顯示通訊錄的布局文件
我們用一個ListView來顯示整個通訊錄,其中用TextView顯示每一記錄。它們的xml文件分別為contact.xml、listitemlayout,如下所示:
====================================contact.xml
01 |
<?xmlversion="1.0"encoding="utf-8"?> |
03 |
<LinearLayoutxmlns:android="http://schemas.android.com/apk/res/android" |
05 |
android:orientation="vertical" |
07 |
android:layout_width="fill_parent" |
09 |
android:layout_height="fill_parent" |
13 |
<ListViewandroid:id="@+id/contactListView" |
15 |
android:layout_width="fill_parent" |
17 |
android:layout_height="wrap_content" |
=================================== listitemlayout
01 |
<?xmlversion="1.0"encoding="utf-8"?> |
03 |
<LinearLayoutxmlns:android="http://schemas.android.com/apk/res/android" |
05 |
android:orientation="vertical"android:layout_width="fill_parent" |
07 |
android:layout_height="fill_parent"> |
09 |
<TextViewandroid:id="@+id/itemTextView"android:layout_width="wrap_content" |
11 |
android:layout_height="wrap_content"android:padding="10px" |
13 |
android:textSize="16px"android:textColor="#FFF" /> |
為了能夠打開通訊錄,我們還需要在TextMessage程序中加入一個Button btnContact,通過點擊btnContact激活顯示通訊錄的活動。這只需在main.xml文件中加入如下代碼:
1 |
<Buttonandroid:layout_width="wrap_content" |
2 |
android:layout_height="wrap_content" |
3 |
android:text="@string/btnContact" |
4 |
android:id="@+id/btnContact" /> |
STEP2、添加Button的點擊事件
在上面準備工作做完之后,我們需要監(jiān)聽btnContact的點擊事件,當用戶點擊btnContact時,跳轉顯示通訊錄界面,當用戶選擇一個聯(lián)系人之后,返回SMS程序的主界面。這里就要用到了偉大的Intent啦!
01 |
btnContact = (Button) findViewById(R.id.btnContact); |
03 |
btnContact.setOnClickListener(new View.OnClickListener() { |
07 |
publicvoid onClick(View v) { |
11 |
Intent intent = new Intent(Intent.ACTION_PICK, |
13 |
ContactsContract.Contacts.CONTENT_URI); |
15 |
startActivityForResult(intent, PICK_CONTACT); |
STEP3、添加通訊錄活動
添加一個類文件,類名為ContactPick(表示通訊錄活動名)繼承Activity。它的主要功能就是獲取從SMS主程序傳遞來的Intent并提取數(shù)據(jù);然后去查詢通訊錄數(shù)據(jù)庫,取出數(shù)據(jù)并填充到STEP1中定義的ListView;最后,還需要添加當用戶選擇一個聯(lián)系人的事件onItemClick,將結果返回給SMS主程序,這里也用到了我們偉大的Intent啦!代碼如下:
01 |
package skynet.com.cnblogs.www; |
04 |
import android.app.Activity; |
06 |
import android.content.Intent; |
08 |
import android.database.Cursor; |
10 |
import android.net.Uri; |
12 |
import android.os.Bundle; |
14 |
import android.provider.ContactsContract; |
16 |
import android.view.View; |
18 |
import android.widget.AdapterView; |
20 |
import android.widget.ListView; |
22 |
importandroid.widget.SimpleCursorAdapter; |
24 |
import android.widget.AdapterView.OnItemClickListener; |
27 |
publicclass ContactPick extends Activity { |
29 |
/** Called when the activity is first created. */ |
33 |
publicvoid onCreate(Bundle savedInstanceState) { |
35 |
super.onCreate(savedInstanceState); |
37 |
setContentView(R.layout.main); |
40 |
Intent orgIntent=getIntent(); |
42 |
Uri queryUri=orgIntent.getData(); |
44 |
final Cursor c = managedQuery(queryUri, |
55 |
String[] fromColumns=new String[]{ContactsContract.Contacts.DISPLAY_NAME}; |
57 |
int[] toLayoutIDs = newint[] { R.id.itemTextView }; |
59 |
SimpleCursorAdapter adapter = newSimpleCursorAdapter(this, |
61 |
R.layout.listitemlayout, c, fromColumns, toLayoutIDs); |
63 |
ListView lv = (ListView) findViewById(R.id.contactListView); |
65 |
lv.setAdapter(adapter); |
67 |
lv.setOnItemClickListener(new OnItemClickListener() { |
71 |
publicvoid onItemClick(AdapterView<?> parent, View view, int pos, |
75 |
c.moveToPosition(pos); |
77 |
int rowId = c.getInt(c.getColumnIndexOrThrow(ContactsContract.Contacts._ID)); |
79 |
Uri outURI = Uri.parse(ContactsContract.Contacts.CONTENT_URI.toString() + rowId); |
81 |
Intent outData = new Intent(); |
83 |
outData.setData(outURI); |
85 |
setResult(Activity.RESULT_OK,outData); |
STEP4、解析通訊錄返回的數(shù)據(jù)
從通訊錄活動返回之后,我們從返回的Intent中提取數(shù)據(jù)并填充到填寫電話號碼的EditView中。代碼主要如下:
02 |
publicvoid onActivityResult(int reqCode, int resCode, Intent data) { |
04 |
super.onActivityResult(reqCode, resCode, data); |
09 |
case (PICK_CONTACT): { |
11 |
if (resCode == Activity.RESULT_OK) { |
15 |
Uri contactData = data.getData(); |
17 |
Cursor c = managedQuery(contactData, null, null, null, null); |
21 |
name = c.getString(c.getColumnIndex(ContactsContract.Contacts.DISPLAY_NAME)); |
25 |
tv = (TextView)findViewById(R.id.edtPhoneNo); |
STEP5、在清單文件AndroidManifest.xml中注冊通訊錄活動和讀取Contact數(shù)據(jù)庫的權限
主要工作基本做完了,現(xiàn)在我們只需要注冊通訊錄活動和讀取Contact數(shù)據(jù)的權限了。完整的清單文件代碼如下:
01 |
<?xmlversion="1.0"encoding="utf-8"?> |
02 |
<manifestxmlns:android="http://schemas.android.com/apk/res/android" |
03 |
package="skynet.com.cnblogs.www"android:versionCode="1" |
04 |
android:versionName="1.0"> |
08 |
<activityandroid:name=".TextMessage"android:label="@string/app_name"> |
12 |
<actionandroid:name="android.intent.action.MAIN"/> |
13 |
<categoryandroid:name="android.intent.category.LAUNCHER"/> |
19 |
<activityandroid:name=".ContactPick"android:label="@string/app_name"> |
20 |
<actionandroid:name="android.intent.action.PICK"/> |
21 |
<categoryandroid:name="android.intent.category.DEFAULT"/> |
27 |
<uses-permissionandroid:name="android.permission.SEND_SMS"/> |
28 |
<uses-permissionandroid:name="android.permission.READ_CONTACTS"/> |
注意通訊錄活動的Intent Filters,它的
action是
android.intent.action.PICK;
category是
android.intent.category.DEFAULT。現(xiàn)在我們分析一下這個Intent Filter:
- <actionandroid:name="android.intent.action.PICK"/>:使用戶能夠可以在通訊錄列表中選擇一個,然后將選擇的聯(lián)系人的 URL返回給調用者。
- <categoryandroid:name="android.intent.category.DEFAULT"/>:這是默認的category,如果不知道category系統(tǒng)會自動加上。這個屬性是讓使其能夠被像Context.startActivity()等找到。要說明的的是,如果列舉了多個category,這個活動僅會去處理那些Intent中都包含了所有列舉的category的組件。
我們還可以在清單文件中看到TextMessage活動的Intent Filter:
2 |
<actionandroid:name="android.intent.action.MAIN"/> |
3 |
<categoryandroid:name="android.intent.category.LAUNCHER"/> |
它指
TextMessage活動定是真?zhèn)€程序的入口并且
TextMessage會列舉在Launcher即啟動列表中。
程序運行結果如下圖所示:
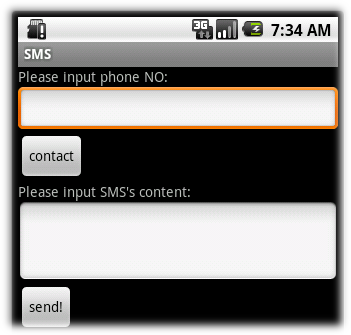
圖1、主界面

圖2、點擊contact按鈕之后

圖3、選擇一個聯(lián)系人之后
總結
我們用發(fā)短信中選擇聯(lián)系人的例子說明Intent和Intent Filter,這里體現(xiàn)了兩個活動之間如何通過Intent和Intent Filter來交互,這也是我們在編寫Android應用程序的時候經(jīng)常遇到了。本文除了上述的主要內容之外,還涉及別的知識點,下面列舉幾個個人認為比較有用的知識點: