Create your own controls - the art of subclassing
By Chris Maunder
An introduction to subclassing the Windows common controls using MFC
Introduction
程序員們可以用許多windows通用控件提供的功能方便的編程,這些控件從list到button甚至是進度條都是可以直接拿來用的.即便如此,仍然有時候你所選擇的標準控件并不夠用.歡迎學習子類化控件這個經典技法.
子類化一個窗體控件同子類化一個C++類并不一樣.子類化一個控件意味著你要替換這個窗口的某些默認消息處理方法(message handlers),子類化能讓你可以高效的劫持這個控件讓它按照你要求的行為工作,而不是默認Windows的默認的行為.子類化幾乎允許你把控件做成你想的那么完美.有兩種子類化類型.實例對象實例化(instance subclassing)和全局實例化(global subclassing).實例對象子類化是當你將一個單個的窗口實例作為子類.全局子類化是將某一種某一窗口類型的(CLASSWND吧,我吃不準)窗口(控件)做成自定義版本.這里只講下前者,實例對象實例化..
很重要的一點要了解繼承自CWnd的對象同窗口本身(一個HWND)的區別.你的CWnd繼承類對象包含一個成員變量指向HWND,并且包含HWND處理消息(eg WM_PAINT, WM_MOUSEMOVE)用到的處理調用函數?(message pump calls吃不準這個)
子類化是簡單的.首先你建立一個能夠處理你關注消息的窗口消息類,接著將你想要子類化的存在的窗體的行為用你指定的窗口消息類替換.之后這個窗口就很神奇了..下面就是一個對Button的子類化演示.
A New Class
為了子類化控件,我們要新建一個消息處理類,分別處理我們有興趣的所有消息,我們都很懶,所以就盡量少處理幾個消息,就處理我們常用的幾個就好,最好的建立消息處理類的方法是直接繼承存在的類 CButton ,這個類是Button 的默認消息處理類.
讓我們假定我們要做寫古怪的事,比如在每次鼠標落在按鈕時后讓按鈕變成亮黃色.第一件事用ClassWizard建立CButton繼承類CMyButton.
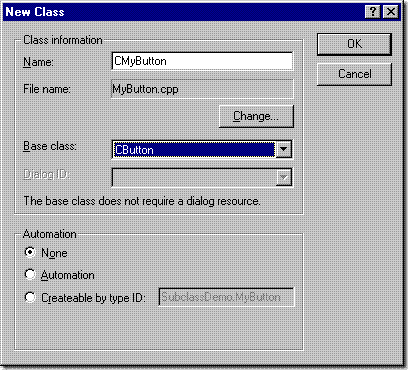
在MFC里繼承CButton有很多好處,最大好處就是不用再寫多一行來實現原有的默認消息處理.如果我們愿意我們可以直接進行下一步,用這個CMyButton子類化一個按鈕實例,這個按鈕實例已經是一個功能完善的控件了,只是有點無趣(廢話),button control 而已.因為MFC實現了所有的默認消息處理,所以我們可以僅僅重載幾個我們有興趣的消息處理,忽略其余的.
然而在這個例子中我們還是將其做成自己喜歡的怪異按鈕吧.
判斷鼠標是否在按鈕上需要一個bool類型變量m_bOverControl. TRUE代表鼠標在按鈕上,這個檢查是定期的(使用定時器timer).不幸的是對于我們來說沒有OnMouseEnter 和 OnMouseLeave 函數能夠跨越平臺使用(?不解?can be used across platforms),所以我們使用OnMouseMove做這件事. 當計時器激發時,我們發現鼠標不在按鈕上時我們讓計時器失效,重繪空間.
使用ClassWizard添加WM_MOUSEMOVE 和WM_TIMER消息處理,他們分別對應 OnMouseMove 和 OnTimer.
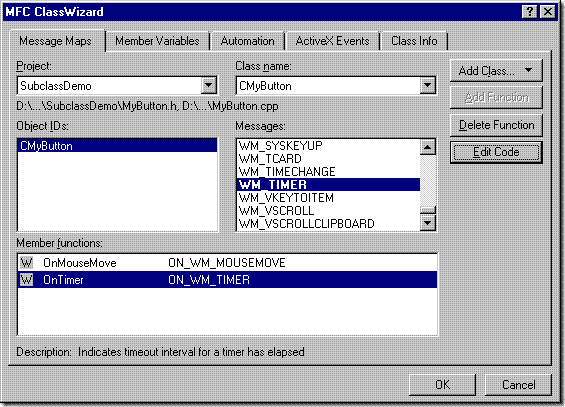
ClassWizard會添加如下代碼:
BEGIN_MESSAGE_MAP(CMyButton, CButton)
//{{AFX_MSG_MAP(CMyButton)
ON_WM_MOUSEMOVE()
ON_WM_TIMER()
//}}AFX_MSG_MAP
END_MESSAGE_MAP()
/////////////////////////////////////////////////////////////////////////////
// CMyButton message handlers
void CMyButton::OnMouseMove(UINT nFlags, CPoint point)
{
// TODO: Add your message handler code here and/or call default
CButton::OnMouseMove(nFlags, point);
}
void CMyButton::OnTimer(UINT nIDEvent)
{
// TODO: Add your message handler code here and/or call default
CButton::OnTimer(nIDEvent);
}
消息表內容(在 BEGIN_MESSAGE_MAP 段中) 將消息與函數一一映射. ON_WM_MOUSEMOVE 映射了 WM_MOUSEMOVE消息 => OnMouseMove(..), ON_WM_TIMER 映射 WM_TIMER消息 => OnTimer(..). 這兩個宏在MFC里很常用,有興趣可以看看.
假設我們定義了兩個變量BOOL m_bOverControl , UINT m_nTimerID, 在構造函數初始化好,我們的消息處理如下:
void CMyButton::OnMouseMove(UINT nFlags, CPoint point)
{
if (!m_bOverControl) // Cursor has just moved over control
{
TRACE0("Entering control\n");
m_bOverControl = TRUE; // Set flag telling us the mouse is in
Invalidate(); // Force a redraw
SetTimer(m_nTimerID, 100, NULL); // Keep checking back every 1/10 sec
}
CButton::OnMouseMove(nFlags, point); // drop through to default handler
}
void CMyButton::OnTimer(UINT nIDEvent)
{
// Where is the mouse?
CPoint p(GetMessagePos());
ScreenToClient(&p);
// Get the bounds of the control (just the client area)
CRect rect;
GetClientRect(rect);
// Check the mouse is inside the control
if (!rect.PtInRect(p))
{
TRACE0("Leaving control\n");
// if not then stop looking...
m_bOverControl = FALSE;
KillTimer(m_nTimerID);
// ...and redraw the control
Invalidate();
}
// drop through to default handler
CButton::OnTimer(nIDEvent);
}
我們的工作最后一塊就是繪制,繪制不需處理消息,而是重載CWnd::DrawItem這個虛函數.只有自繪控件才會調用這個函數,它沒有默認的實現(it ASSERT's if you try).這個函數只用來對于控件類的重載.
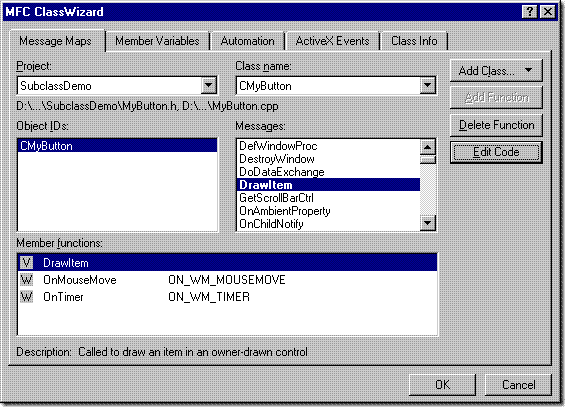
使用ClassWizard添加DrawItem重載,修改函數如下:
void CMyButton::DrawItem(LPDRAWITEMSTRUCT lpDrawItemStruct)
{
CDC* pDC = CDC::FromHandle(lpDrawItemStruct->hDC);
CRect rect = lpDrawItemStruct->rcItem;
UINT state = lpDrawItemStruct->itemState;
CString strText;
GetWindowText(strText);
// draw the control edges (DrawFrameControl is handy!)
if (state & ODS_SELECTED)
pDC->DrawFrameControl(rect, DFC_BUTTON, DFCS_BUTTONPUSH | DFCS_PUSHED);
else
pDC->DrawFrameControl(rect, DFC_BUTTON, DFCS_BUTTONPUSH);
// Deflate the drawing rect by the size of the button's edges
rect.DeflateRect( CSize(GetSystemMetrics(SM_CXEDGE), GetSystemMetrics(SM_CYEDGE)));
// Fill the interior color if necessary
if (m_bOverControl)
pDC->FillSolidRect(rect, RGB(255, 255, 0)); // yellow
// Draw the text
if (!strText.IsEmpty())
{
CSize Extent = pDC->GetTextExtent(strText);
CPoint pt( rect.CenterPoint().x - Extent.cx/2,
rect.CenterPoint().y - Extent.cy/2 );
if (state & ODS_SELECTED)
pt.Offset(1,1);
int nMode = pDC->SetBkMode(TRANSPARENT);
if (state & ODS_DISABLED)
pDC->DrawState(pt, Extent, strText, DSS_DISABLED, TRUE, 0, (HBRUSH)NULL);
else
pDC->TextOut(pt.x, pt.y, strText);
pDC->SetBkMode(nMode);
}
}
這個類的各部分就差不多講完了,但是這里要注意一點點. DrawItem 函數需要控件設置自繪屬性,在資源編輯界面為控件填上自繪屬性.不過還有一種更好的方法讓這個子類自動設置它的窗體風格,打開自繪屬性.要這樣做我們需要重載這最后的函數PreSubclassWindow.
這個函數叫做SubclassWindow, 當調用CWnd::Create 和DDX_Control后都會被調用,也就是說如果你建立一個類的實例,無論是動態建立還是用對話框模板,PreSubclassWindow都會被調用. PreSubclassWindow 將會在你要子類化的窗口建立后,在這個窗口顯示之前調用.也就是說它是需要對窗體表現進行初始化的一個最適合的位置.
非常重要的一點:如果你使用對話框資源新建了一個控件,那么你子類化的控件將不會得到WM_CREATE 消息, 因此我們不能使用 OnCreate 來初始化控件, 因為它有時候不會被調用(譯注:但是SubclassWindow都可以).
使用ClassWizard重載PreSubclassWindow 添加如下代碼:
void CMyButton::PreSubclassWindow()
{
CButton::PreSubclassWindow();
ModifyStyle(0, BS_OWNERDRAW); // make the button owner drawn
}
恭喜你 – 你現在有了CMybutton 這個繼承類!
子類化
使用DDX 在創建過程中子類化一個窗體
在這個例子中,我在Demo對話框放上了一個按鈕控件
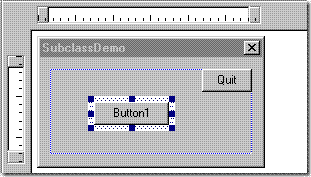
我讓默認的對話框創建過程創建這個控件,然后使用DDX_...將控件關聯于自定義的類. 這種方法可以用ClassWizard簡單的實現:添加一個成員變量,連接對應的控件ID(這里是IDC_BUTTON),設定為控件類型變量(Control type),class name為CMyButton我們自定義的類.
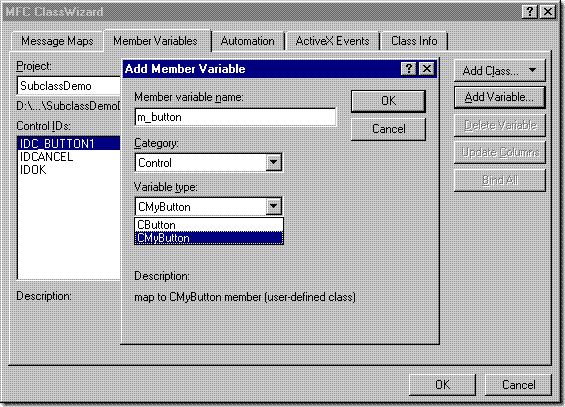
ClassWizard添加了一個DDX_Control調用在對話框的DoDataExchange 函數里. DDX_Control 調用SubclassWindow函數將CMyButton與控件關聯,于是有了自定義消息處理的效果.這個按鈕算是已經被劫持了,現在它的行為就跟我們想要的一樣了.
使用ClassWizard子類化窗體使用一個不識別的類
如果你在工程中添加了一個窗體類并且想要子類化一個窗體,但是ClassWizard添加變量時里面沒有顯示新的類型,你需要重新build Classwizard 文件. (這個是VC6BUG吧)
備份.clw,刪除原來的文件,回去原來的界面Ctrl+W.添加工程需要包括的文件,這樣應該就行了 不行的話只有將控件關聯的基類名稱替換成自定義類名稱了..
子類化一個存在的窗體
使用DDX 是簡單的,但是如果我們需要子類化一個已經存在的空間就沒有用了. 比如,如果你想要子類化一個在combobox中的Edit控件.你需要在你能子類化Edit窗口之前先擁有combobox類(combobox包含一個Edit控件)
在這種情況下你需要用到 SubclassDlgItem 或 SubclassWindow 函數.這兩個函數允許你動態子類化窗體,換句話說,將已存在的某窗體關聯于你的自定義窗體類.
舉例來說,假設我們有一個對話框包括一個按鈕IDC_BUTTON1. 這個按鈕已經創建了.我們想把它關聯于CMyButton ,讓它表現出我們想要的行為.
要這樣做,我們需要有一個新類型的對象,最好有一個對話框或視圖的成員函數.
CMyButton m_btnMyButton;
接著在你的 OnInitDialog(或其它適合的初始化函數) 中調用
m_btnMyButton.SubclassDlgItem(IDC_BUTTON1, this);
如果你已經有了你想要子類化的窗體的指針,或者你在動態創建控件的CView或其他CWnd子類下使用子類化,或者你不想用SubclassDlgItem,你可以簡單的調用:
CWnd* pWnd = GetDlgItem(IDC_BUTTON1); // or use some other method to get
// a pointer to the window you wish
// to subclass
ASSERT( pWnd && pWnd->GetSafeHwnd() );
m_btnMyButton.SubclassWindow(pWnd->GetSafeHwnd());
這個按鈕繪制很簡單, 但是也很經典了..是個基礎吧.程序編譯運行后就是如圖:

注意我們只是重載了繪制函數,使用獲取鼠標狀態函數.這意味著你的控件仍然是一個按鈕..為你的對話框類添加一個click的消息處理,你能看到它一樣會被調用.
gohan 2008.1.24
23:59
Conclusion
Subclassing is not hard - you just need to choose the class you wish to subclass carefully, and be aware of what messages you need to handle. Read up on the control you are subclassing - learn about the messages it handles and also the virtual member functions of its implementation class. Once you've hooked into a control and taken over it's inner workings the sky's the limit.
History
26 Oct 2001 - added info in SubclassWindow and SubclassDlgItem
License
This article is licensed under The Code Project Open License (CPOL)
About the Author
|
Chris Maunder

Sitebuilder, Editor, Staff, Admin
|
Chris is the Co-founder, Administrator, Architect, Chief Editor and Shameless Hack who wrote and runs CodeProject. He's been programming since 1988 while pretending to be, in various guises, an astrophysicist, mathematician, physicist, hydrologist, geomorphologist, defence intelligence researcher and then, when all that got a bit rough on the nerves, a web developer. He is a Microsoft Visual C++ MVP both globally and for Canada locally.
His programming experience includes C/C++, C#, MFC, ASP, ASP.NET, and far, far too much FORTRAN. He has worked on PocketPCs, AIX mainframes, Sun workstations, and a CRAY YMP C90 behemoth but finds notebooks take up less desk space.
He dodges, he weaves, and he never gets enough sleep. He is kind to small animals.
Chris was born and bred in Australia but splits his time between Toronto and Melbourne, depending on the weather. For relaxation he is into road cycling, snowboarding, rock climbing, and storm chasing.
|
Occupation:
|
Founder
|
|
Company:
|
The Code Project
|
|
Location:
|
 Canada Canada
|
|