Android UI工具包提供了一些布局管理器,它們使用起來相當容易,而且,大多數的時候,你只需要使用它們最基本的特征來實現UI。
執著于基本特征的使用對于創建UI來說,往往不是最高效的。一個常見的例子就是濫用LinearLayout,它將會導致View樹中的View數量激增。View——更糟的是,布局管理器——添加到應用程序里都會帶來一定的消耗:初始化,布局和繪制變得更加緩慢。嵌套布局的花銷尤其“昂貴”,例如,如果你嵌套了一些LinearLayout,并使用了weight參數,這會導致子元素要計算兩次。
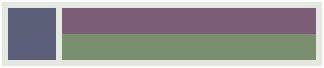
讓我們看一個非常簡單且常見的布局例子:一個列表項,左邊是一個圖標,右邊是標題和描述,上方是標題,下方是可選的描述。列表項可能看起來如下圖:

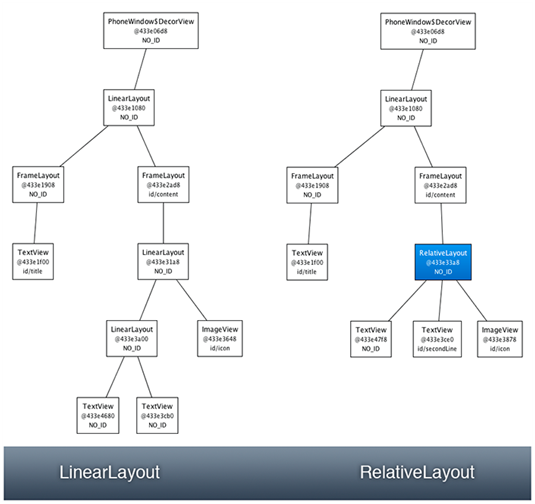
為了清楚地認識View之間(一個ImageView和兩個TextView)的相對位置,下圖是使用HierarchyViewer抓獲的布局剪影:
實現這個布局,直接使用LinearLayout就可以了。列表項本身是一個水平的LinearLayout,里面有一個ImageView和一個垂直的LinearLayout,垂直的LinearLayout里包含兩個TextView。以下是這個布局的源代碼:
<LinearLayout xmlns:android="http://schemas.android.com/apk/res/android"
android:layout_width="fill_parent"
android:layout_height="?android:attr/listPreferredItemHeight"
android:padding="6dip">
<ImageView
android:id="@+id/icon"
android:layout_width="wrap_content"
android:layout_height="fill_parent"
android:layout_marginRight="6dip"
android:src="@drawable/icon" />
<LinearLayout
android:orientation="vertical"
android:layout_width="0dip"
android:layout_weight="1"
android:layout_height="fill_parent">
<TextView
android:layout_width="fill_parent"
android:layout_height="0dip"
android:layout_weight="1"
android:gravity="center_vertical"
android:text="My Application" />
<TextView
android:layout_width="fill_parent"
android:layout_height="0dip"
android:layout_weight="1"
android:singleLine="true"
android:ellipsize="marquee"
android:text="Simple application that shows how to use RelativeLayout" />
</LinearLayout>
</LinearLayout>
如果你將它作為ListView的item,它能正常工作,但卻是相當浪費的。相同的布局可以使用RelativeLayout進行重寫,相對于每個列表項來說,可以節省一個View,且View層級上更好,只有一層。使用RelativeLayout也很簡單:
<RelativeLayout xmlns:android="http://schemas.android.com/apk/res/android"
android:layout_width="fill_parent"
android:layout_height="?android:attr/listPreferredItemHeight"
android:padding="6dip">
<ImageView
android:id="@+id/icon"
android:layout_width="wrap_content"
android:layout_height="fill_parent"
android:layout_alignParentTop="true"
android:layout_alignParentBottom="true"
android:layout_marginRight="6dip"
android:src="@drawable/icon" />
<TextView
android:id="@+id/secondLine"
android:layout_width="fill_parent"
android:layout_height="26dip"
android:layout_toRightOf="@id/icon"
android:layout_alignParentBottom="true"
android:layout_alignParentRight="true"
android:singleLine="true"
android:ellipsize="marquee"
android:text="Simple application that shows how to use RelativeLayout" />
<TextView
android:layout_width="fill_parent"
android:layout_height="wrap_content"
android:layout_toRightOf="@id/icon"
android:layout_alignParentRight="true"
android:layout_alignParentTop="true"
android:layout_above="@id/secondLine"
android:layout_alignWithParentIfMissing="true"
android:gravity="center_vertical"
android:text="My Application" />
</RelativeLayout>
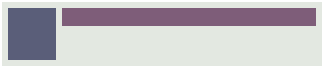
新的實現與老的實現看起來效果完全一致,除了一種情況。每個列表項顯示兩行文字:標題和可選的描述。當某一個列表項的描述不可獲得時,應用程序可能希望將第二個TextView的Visibility設為GONE。LinearLayout實現版表現得很完美,但RelativeLayout實現版就有點差強人意了:

在RelativeLayout里,每個View都是和父元素RelativeLayout對齊或是和其它View對齊的。例如,我們聲明描述部分是和RelativeLayout的底部對齊,標題位于其上并與RelativeLayout的頂端對齊。當描述GONE時,RelativeLayout不知道怎么去放置標題的底邊緣。為了解決這個問題,你可以使用一個非常簡單的布局參數:layout_alignWithParentIfMissing。
這個布爾參數告訴RelativeLayout:如果目標對象消失時使用自己的邊緣作為錨點。例如,如果你放置一個View到另一個Visibiity屬性設為GONE的View的右邊,且設定alignWithParentIfMissing為true,RelativeLayout就會將其左邊緣作為View的對齊錨點。在我們的這個場合,使用alignWithParentIfMissing的結果是RelativeLayout將標題部分的底部與自己的底部對齊。結果如下所示:


現在,我們的布局表現得很完美了,即使描述部分的Visibility屬性設為GONE。更好的是,層級更加簡單,因為我們不再使用LinearLayout,而且,更加高效了。當我們使用HierarchyViewer來比較兩個實現版的時候,事實就更明顯了:
另外,當你使用這么一個布局作為ListView的列表項時,這種差異就更為重要了。希望這個簡單的例子能讓你了解布局,了解如何優化你的UI。