SurfaceFlinger在系統啟動階段作為系統服務被加載。應用程序中的每個窗口,對應本地代碼中的Surface,而Surface又對應于 SurfaceFlinger中的各個Layer,SurfaceFlinger的主要作用是為這些Layer申請內存,根據應用程序的請求管理這些 Layer顯示、隱藏、重畫等操作,最終由SurfaceFlinger把所有的Layer組合到一起,顯示到顯示器上。當一個應用程序需要在一個 Surface上進行畫圖操作時,首先要拿到這個Surface在內存中的起始地址,而這塊內存是在SurfaceFlinger中分配的,因為 SurfaceFlinger和應用程序并不是運行在同一個進程中,如何在應用客戶端(Surface)和服務端(SurfaceFlinger - Layer)之間傳遞和同步顯示緩沖區?這正是本文要討論的內容。
Surface的創建過程
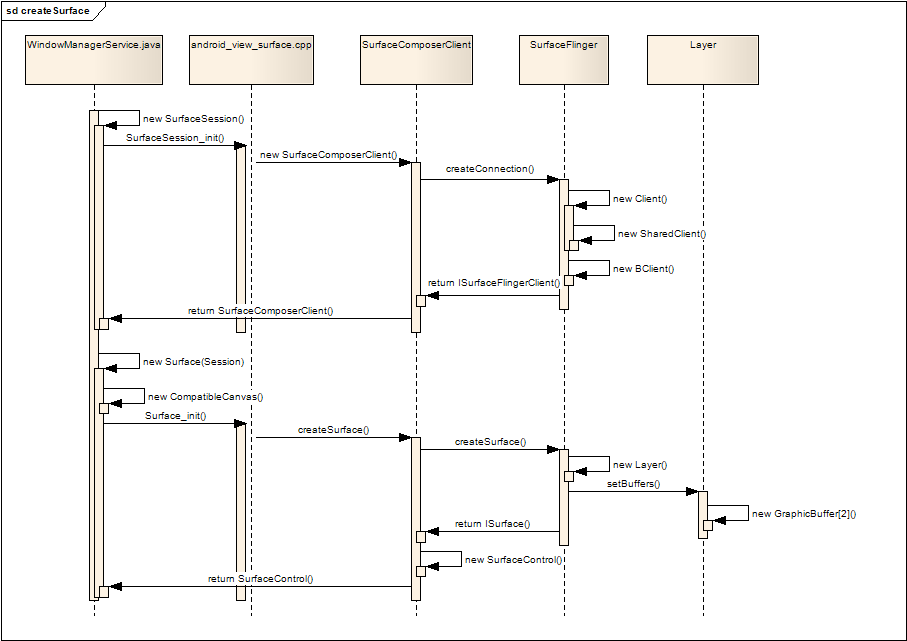
我們先看看Android如何創建一個Surface,下面的序列圖展示了整個創建過程。
圖一 Surface的創建過程
創建Surface的過程基本上分為兩步:
1. 建立SurfaceSession
第一步通常只執行一次,目的是創建一個SurfaceComposerClient的實例,JAVA層通過JNI調用本地代碼,本地代碼創建一個 SurfaceComposerClient的實例,SurfaceComposerClient通過ISurfaceComposer接口調用 SurfaceFlinger的createConnection,SurfaceFlinger返回一個ISurfaceFlingerClient接 口給SurfaceComposerClient,在createConnection的過程中,SurfaceFlinger創建了用于管理緩沖區切換 的SharedClient,關于SharedClient我們下面再介紹,最后,本地層把SurfaceComposerClient的實例返回給 JAVA層,完成SurfaceSession的建立。
2. 利用SurfaceSession創建Surface
JAVA層通過JNI調用本地代碼Surface_Init(),本地代碼首先取得第一步創建的SurfaceComposerClient實例, 通過SurfaceComposerClient,調用ISurfaceFlingerClient接口的createSurface方法,進入 SurfaceFlinger,SurfaceFlinger根據參數,創建不同類型的Layer,然后調用Layer的setBuffers()方法, 為該Layer創建了兩個緩沖區,然后返回該Layer的ISurface接口,SurfaceComposerClient使用這個ISurface接 口創建一個SurfaceControl實例,并把這個SurfaceControl返回給JAVA層。
由此得到以下結果:
- JAVA層的Surface實際上對應于本地層的SurfaceControl對象,以后本地代碼可以使用JAVA傳入的SurfaceControl對象,通過SurfaceControl的getSurface方法,獲得本地Surface對象;
- Android為每個Surface分配了兩個圖形緩沖區,以便實現Page-Flip的動作;
- 建立SurfaceSession時,SurfaceFlinger創建了用于管理兩個圖形緩沖區切換的SharedClient對 象,SurfaceComposerClient可以通過ISurfaceFlingerClient接口的getControlBlock()方法獲得 這個SharedClient對象,查看SurfaceComposerClient的成員函數_init:
- void SurfaceComposerClient::_init(
- const sp<ISurfaceComposer>& sm, const sp<ISurfaceFlingerClient>& conn)
- {
- ......
- mClient = conn;
- if (mClient == 0) {
- mStatus = NO_INIT;
- return;
- }
-
- mControlMemory = mClient->getControlBlock();
- mSignalServer = sm;
- mControl = static_cast<SharedClient *>(mControlMemory->getBase());
- }
獲得Surface對應的顯示緩沖區
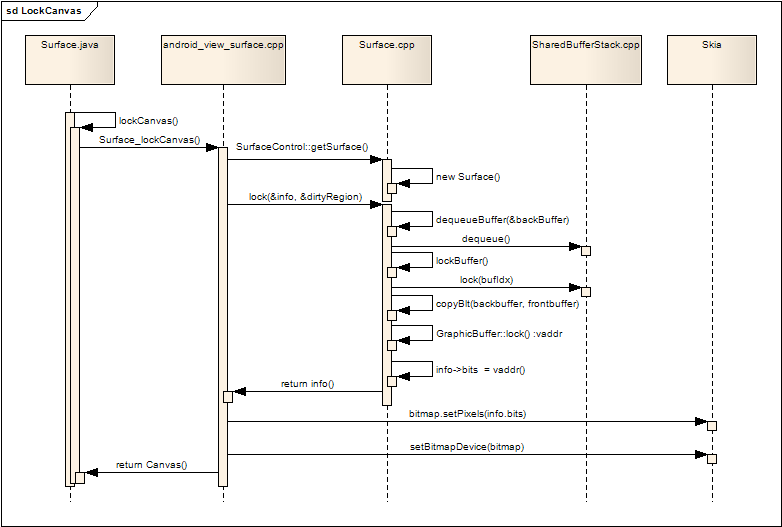
雖然在SurfaceFlinger在創建Layer時已經為每個Layer申請了兩個緩沖區,但是此時在JAVA層并看不到這兩個緩沖 區,JAVA層要想在Surface上進行畫圖操作,必須要先把其中的一個緩沖區綁定到Canvas中,然后所有對該Canvas的畫圖操作最后都會畫到 該緩沖區內。下圖展現了綁定緩沖區的過程:
圖二 綁定緩沖區的過程
開始在Surface畫圖前,Surface.java會先調用lockCanvas()來得到要進行畫圖操作的Canvas,lockCanvas會進 一步調用本地層的Surface_lockCanvas,本地代碼利用JAVA層傳入的SurfaceControl對象,通過getSurface() 取得本地層的Surface對象,接著調用該Surface對象的lock()方法,lock()返回了改Surface的信息,其中包括了可用緩沖區的 首地址vaddr,該vaddr在Android的2D圖形庫Skia中,創建了一個bitmap,然后通過Skia庫中Canvas的 API:Canvas.setBitmapDevice(bitmap),把該bitmap綁定到Canvas中,最后把這個Canvas返回給JAVA 層,這樣JAVA層就可以在該Canvas上進行畫圖操作,而這些畫圖操作最終都會畫在以vaddr為首地址的緩沖區中。
再看看在Surface的lock()方法中做了什么:
- dequeueBuffer(&backBuffer)獲取backBuffer
- SharedBufferClient->dequeue()獲得當前空閑緩沖區的編號
- 通過緩沖區編號獲得真正的GraphicBuffer:backBuffer
- 如果還沒有對Layer中的buffer進行映射(Mapper),getBufferLocked通過ISurface接口重新重新映射
- 獲取frontBuffer
- 根據兩個Buffer的更新區域,把frontBuffer的內容拷貝到backBuffer中,這樣保證了兩個Buffer中顯示內容的同步
- backBuffer->lock() 獲得backBuffer緩沖區的首地址vaddr
- 通過info參數返回vaddr
釋放Surface對應的顯示緩沖區
畫圖完成后,要想把Surface的內容顯示到屏幕上,需要把Canvas中綁定的緩沖區釋放,并且把該緩沖區從變成可投遞(因為默認只有兩個 buffer,所以實際上就是變成了frontBuffer),SurfaceFlinger的工作線程會在適當的刷新時刻,把系統中所有的 frontBuffer混合在一起,然后通過OpenGL刷新到屏幕上。下圖展現了解除綁定緩沖區的過程:

圖三 解除綁定緩沖區的過程
- JAVA層調用unlockCanvasAndPost
- 進入本地代碼:Surface_unlockCanvasAndPost
- 本地代碼利用JAVA層傳入的SurfaceControl對象,通過getSurface()取得本地層的Surface對象
- 綁定一個空的bitmap到Canvas中
- 調用Surface的unlockAndPost方法
- 調用GraphicBuffer的unlock(),解鎖緩沖區
- 在queueBuffer()調用了SharedBufferClient的queue(),把該緩沖區更新為可投遞狀態
SharedClient 和 SharedBufferStack
從前面的討論可以看到,Canvas綁定緩沖區時,要通過SharedBufferClient的dequeue方法取得空閑的緩沖區,而解除綁定 并提交緩沖區投遞時,最后也要調用SharedBufferClient的queue方法通知SurfaceFlinger的工作線程。實際上,在 SurfaceFlinger里,每個Layer也會關聯一個SharedBufferServer,SurfaceFlinger的工作線程通過 SharedBufferServer管理著Layer的緩沖區,在SurfaceComposerClient建立連接的階 段,SurfaceFlinger就已經為該連接創建了一個SharedClient 對象,SharedClient 對象中包含了一個SharedBufferStack數組,數組的大小是31,每當創建一個Surface,就會占用數組中的一個 SharedBufferStack,然后SurfaceComposerClient端的Surface會創建一個 SharedBufferClient和該SharedBufferStack關聯,而SurfaceFlinger端的Layer也會創建 SharedBufferServer和SharedBufferStack關聯,實際上每對 SharedBufferClient/SharedBufferServer是控制著同一個SharedBufferStack對象,通過 SharedBufferStack,保證了負責對Surface的畫圖操作的應用端和負責刷新屏幕的服務端(SurfaceFlinger)可以使用不 同的緩沖區,并且讓他們之間知道對方何時鎖定/釋放緩沖區。
SharedClient和SharedBufferStack的代碼和頭文件分別位于:
/frameworks/base/libs/surfaceflinger_client/SharedBufferStack.cpp
/frameworks/base/include/private/surfaceflinger/SharedBufferStack.h
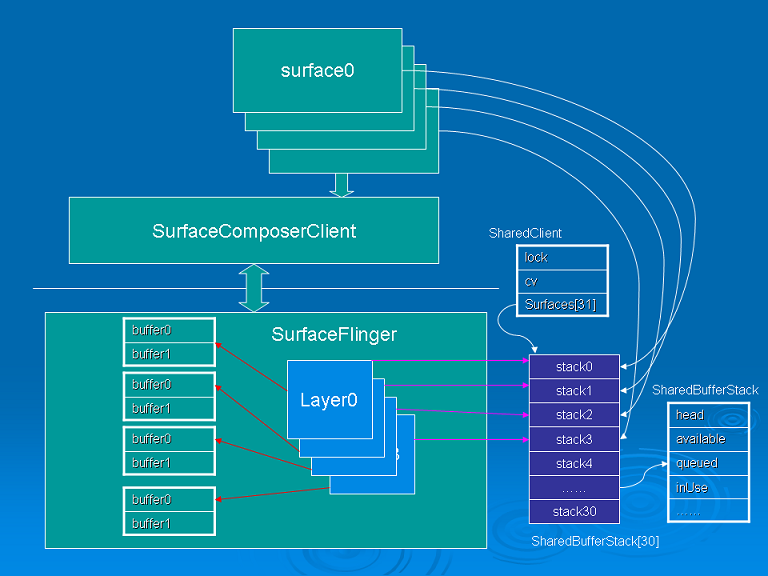
圖四 客戶端和服務端緩沖區管理
繼續研究SharedClient、SharedBufferStack、SharedBufferClient、SharedBufferServer的誕生過程。
1. SharedClient
- 在createConnection階段,SurfaceFlinger創建Client對象:
- sp<ISurfaceFlingerClient> SurfaceFlinger::createConnection()
- {
- Mutex::Autolock _l(mStateLock);
- uint32_t token = mTokens.acquire();
-
- sp<Client> client = new Client(token, this);
- if (client->ctrlblk == 0) {
- mTokens.release(token);
- return 0;
- }
- status_t err = mClientsMap.add(token, client);
- if (err < 0) {
- mTokens.release(token);
- return 0;
- }
- sp<BClient> bclient =
- new BClient(this, token, client->getControlBlockMemory());
- return bclient;
- }
- 再進入Client的構造函數中,它分配了4K大小的共享內存,并在這塊內存上構建了SharedClient對象:
- Client::Client(ClientID clientID, const sp<SurfaceFlinger>& flinger)
- : ctrlblk(0), cid(clientID), mPid(0), mBitmap(0), mFlinger(flinger)
- {
- const int pgsize = getpagesize();
- const int cblksize = ((sizeof(SharedClient)+(pgsize-1))&~(pgsize-1));
-
- mCblkHeap = new MemoryHeapBase(cblksize, 0,
- "SurfaceFlinger Client control-block");
-
- ctrlblk = static_cast<SharedClient *>(mCblkHeap->getBase());
- if (ctrlblk) { // construct the shared structure in-place.
- new(ctrlblk) SharedClient;
- }
- }
- 回到createConnection中,通過Client的getControlBlockMemory()方法獲得共享內存塊的 IMemoryHeap接口,接著創建ISurfaceFlingerClient的子類BClient,BClient的成員變量mCblk保存了 IMemoryHeap接口指針;
- 把BClient返回給SurfaceComposerClient,SurfaceComposerClient通過 ISurfaceFlingerClient接口的getControlBlock()方法獲得IMemoryHeap接口指針,同時保存在 SurfaceComposerClient的成員變量mControlMemory中;
- 繼續通過IMemoryHeap接口的getBase ()方法獲取共享內存的首地址,轉換為SharedClient指針后保存在SurfaceComposerClient的成員變量mControl中;
- 至此,SurfaceComposerClient的成員變量mControl和SurfaceFlinger::Client.ctrlblk指向了同一個內存塊,該內存塊上就是SharedClient對象。
2. SharedBufferStack、SharedBufferServer、SharedBufferClient
SharedClient對象中有一個SharedBufferStack數組:
SharedBufferStack surfaces[ NUM_LAYERS_MAX ];
NUM_LAYERS_MAX 被定義為31,這樣保證了SharedClient對象的大小正好滿足4KB的要求。創建一個新的Surface時,進入SurfaceFlinger的 createSurface函數后,先取在createConnection階段創建的Client對象,通過Client在 0--NUM_LAYERS_MAX 之間取得一個尚未被使用的編號,這個編號實際上就是SharedBufferStack數組的索引:
- int32_t id = client->generateId(pid);
然后以Client對象和索引值以及其他參數,創建不同類型的Layer對象,一普通的Layer對象為例:
- layer = createNormalSurfaceLocked(client, d, id,
- w, h, flags, format);
在createNormalSurfaceLocked中創建Layer對象:
- sp<Layer> layer = new Layer(this, display, client, id);
構造Layer時會先構造的父類LayerBaseClient,LayerBaseClient中創建了SharedBufferServer對 象,SharedBufferStack 數組的索引值和SharedClient被傳入SharedBufferServer對象中。
- LayerBaseClient::LayerBaseClient(SurfaceFlinger* flinger, DisplayID display,
- const sp<Client>& client, int32_t i)
- : LayerBase(flinger, display), lcblk(NULL), client(client), mIndex(i),
- mIdentity(uint32_t(android_atomic_inc(&sIdentity)))
- {
- lcblk = new SharedBufferServer(
- client->ctrlblk, i, NUM_BUFFERS,
- mIdentity);
- }
自此,Layer通過lcblk成員變量(SharedBufferServer)和SharedClient共享內存區建立了關聯,并且每個Layer對應于SharedBufferStack 數組中的一項。
回到SurfaceFlinger的客戶端Surface.cpp中,Surface的構造函數如下:
- Surface::Surface(const sp<SurfaceControl>& surface)
- : mClient(surface->mClient), mSurface(surface->mSurface),
- mToken(surface->mToken), mIdentity(surface->mIdentity),
- mFormat(surface->mFormat), mFlags(surface->mFlags),
- mBufferMapper(GraphicBufferMapper::get()), mSharedBufferClient(NULL),
- mWidth(surface->mWidth), mHeight(surface->mHeight)
- {
- mSharedBufferClient = new SharedBufferClient(
- mClient->mControl, mToken, 2, mIdentity);
-
- init();
- }
SharedBufferClient構造參數mClient->mControl就是共享內存塊中的SharedClient對象,mToken就是SharedBufferStack 數組索引值。
到這里我們終于知道,Surface中的mSharedBufferClient成 員和Layer中的lcblk成員(SharedBufferServer),通過SharedClient中的同一個 SharedBufferStack,共同管理著Surface(Layer)中的兩個緩沖區。
一并參考:
http://wenku.baidu.com/view/0243844bc850ad02de8041e6.html