2020年2月26日
#
Refer to How to Easily Create Ramdisk on Linux
This tutorial will show you how to quickly create a RAM disk in any Linux distro (Debian, Ubuntu, Linux, Fedora, Arch Linux, CentOS, etc). Compared to commercial Windows RAM disk software that costs money, Linux can utilize this cool feature 100% free of charge.
What is RAM Disk?
RAM disk is also known as RAM drive. It’s a portion of your RAM that are formated with a file system. You can mount it to a directory on your Linux system and use it as a disk partition.
Why use RAM disk?
RAM is ultra-fast compared to even the fastest solid state drive (SSD). As you may know, the main performance bottleneck in today’s computer is the speed of hard drive, so moving programs and files to the RAM disk yields super fast computing experience.
Pros of RAM disk:
- Ultra-fast
- Can sustain countless reads and writes
Cons of RAM disk:
- RAM is volatile which means all data in RAM disk will be lost when the computer shutdowns or reboots. However, this can be a pro in some situations, if you use it wisely.
- RAM is expensive so it has limited capacity. You need to make sure not allocate too much space for RAM disk, or the operating system would run out of RAM.
You can do a lot of interesting things with RAM disk.
- RAM disk is best suited for temporary data or caching directories, such as Nginx FastCGI cache. If you use a SSD and there will be a lot of writes to a particular directory, you can mount that directory as a RAM disk to reduce wear out of SSD.
- I also use RAM disk to temporary store screenshots when writing articles on this blog, so when my computer shut down, those screenshots will automatically be deleted on my computer.
- You may not believe it, but I use RAM disk to run virtual machines inside VirtualBox. My SSD is about 250G. I can’t run many VMs directly on the SSD and I’m not happy about the speed of my 2TB mechanical hard drive (HDD). I can move the VM from HDD to RAM disk before starting the VM, so the VM can run much faster. After shutting down the VM, I move the VM files back to HDD, which takes less than 1 minute. This of course requires your computer to have a large capacity RAM.
How to Create a RAM Disk in Any Linux Distro
First make a directory which can be anywhere in the file system such as
sudo mkdir /tmp/ramdisk
If you want to let every user on your Linux system use the RAM disk, then change its permission to 777.
sudo chmod 777 /tmp/ramdisk
Next, check how much free RAM are left on your system with htop command line utility because we don’t want to use too much RAM.
htop
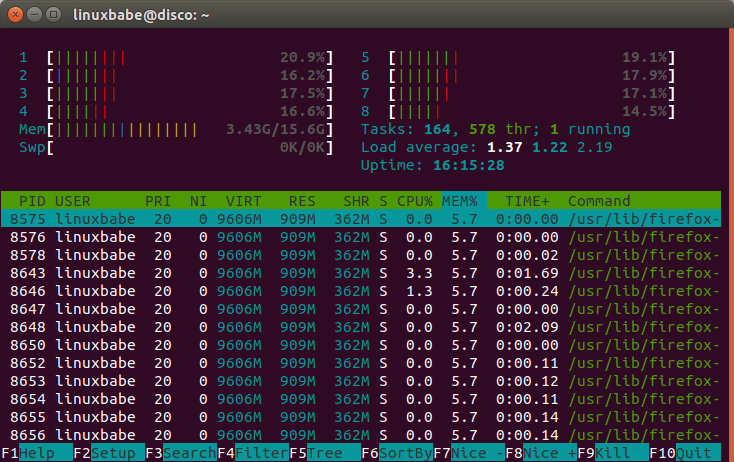
Then all left to do is to specify the file system type, RAM disk size, device name and mount it to the above directory. You can see from the screenshot above that I have plenty of free RAM, so I can easily allocate 1GB for my RAM disk. This can be done with the following one-liner. It will be using tmpfs file system and its size is set to 1024MB. myramdisk is the device name I gave to it.
sudo mount -t tmpfs -o size=1024m myramdisk /tmp/ramdisk
To allocate 10G for the RAM disk, run this instead.
sudo mount -t tmpfs -o size=10G myramdisk /tmp/ramdisk
If we issue the following command
mount | tail -n 1
We can see it’s successfully mounted.

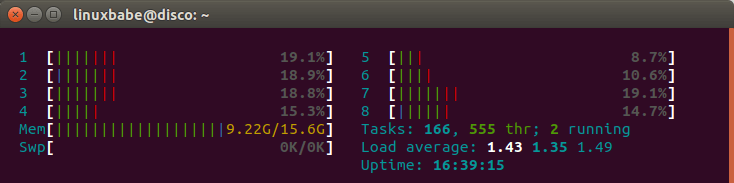
Now if I copy my VirtualBox machines file (5.8G) into the RAM disk, my RAM usage suddenly goes up to 9.22G.
If I unmount RAM disk,
sudo umount /tmp/ramdisk/
Everything in that directory will be lost and RAM usage goes down to original.
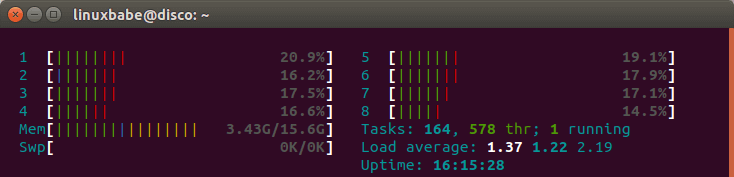
This is how you can test if your RAM disk is working.
Test RAM Disk Speed
To test write speed of RAM disk, you can use dd utility.
sudo dd if=/dev/zero of=/tmp/ramdisk/zero bs=4k count=100000
Which gave me 2.8GB/s write speed.

To test read speed, run:
sudo dd if=/tmp/ramdisk/zero of=/dev/null bs=4k count=100000
Which gave me 3.1 GB/s read speed.
I also did a speed test on my SSD. The write speed is 534MB/s and read speed 1.6GB/s.
Auto-mount on System Boot
Edit /etc/fstab file.
sudo nano /etc/fstab
Add an entry like this:
myramdisk /tmp/ramdisk tmpfs defaults,size=1G,x-gvfs-show 0 0
x-gvfs-show will let you see your RAM disk in file manager. Save and close the file. Your Linux system will automatically mount the RAM disk when your computer boots up.
To mount it immediately without reboot, run the following command.
sudo mount -a
2019年11月28日
#
1. 使用pure或者view函數,直接拿到返回值,但不是所有的函數都能聲明成pure/view。
2. 使用event包裝返回值,但是在emit之前返回的函數是沒有event的,如果需要每條path都返回有意義的return value,可能需要定義很多個event。(不考慮require throw的情況下)
3. 使用web3.eth.Contract.call,需要ABI和deployed address,這個用法有個缺點是將函數變成了constant的,即和1一樣無法改變合約內部狀態,只能說在特定的場景下有用。
4. EIP-758(https://eips.ethereum.org/EIPS/eip-758),返回returnData在subscribe的通道上,但是看目前的狀態還是draft。
2019年3月27日
#
原文
在此在使用git提交代碼時候,有時候會遇到一個問題,就是自己明明只修改了其中幾行,提交上去以后發現整個文件都被修改了,在設置了格式風格以后還會有提交不上去的情況,這個時候經常讓人摸不到頭腦,其實就是CRLF和LF在作怪
CRLF LF CR 都是什么意思:
CRLF: 是carriagereturnlinefeed的縮寫。中文意思是回車換行。
LF: 是line feed的縮寫,中文意思是換行。
CR: 是carriagereturn的縮寫。中文意思是回車。
簡單的換行回車為什么會引出這么多的問題呢,關鍵在于操作系統之間的分歧:
早期的mac系統使用CR當做換行,現在也已經統一成了LF
Unix(包含現在大量使用的linux)系統使用LF
windows系統使用LFCR當做換行(自作聰明的兼容性??)
也正是因為不同系統的分歧,在多人協作共同開發的時候,可能導致提交代碼時候產生問題。
解決方法:
Android Studio內部可以設置不同模式,具體位置在setting-->搜索code style見下圖:
其中有四個選項System-Dependent LF CR CRLF,默認是System-Dependent,也就是根據你是什么系統選擇什么類型,如果想要自定義的話可以在這里設置,以后創建的新代碼也默認用設置的方式
而如果想單獨修改某個文件的類型,也可以在右下角進行修改,見下圖:
跨平臺合作時候的解決方式:
當我們使用git庫提交代碼的時候,有的人可能使用mac,有的人使用linux,有的人使用windows,不同的開發環境如果都是按照自己系統的方式任意修改換行類型,難免會讓代碼庫整體混亂或者產生許多沒有必要的代碼更新
那么解決該問題的方式有:core.autocrlf命令
git為了防止以上問題擾亂跨平臺合作開發,使用命令可以轉化LF和CRLF
具體體現為:
- git config --global core.autocrlf true
Git可以在你push時自動地把行結束符CRLF轉換成LF,而在pull代碼時把LF轉換成CRLF。用core.autocrlf來打開此項功能,如果是在Windows系統上,把它設置成true,這樣當簽出代碼時,LF會被轉換成CRLF
- git config --global core.autocrlf input
Linux或Mac系統使用LF作為行結束符;當一個以CRLF為行結束符的文件不小心被引入時你肯定想進行修正,把core.autocrlf設置成input來告訴 Git 在push時把CRLF轉換成LF,pull時不轉換
- git config --global core.autocrlf false
在本地和代碼庫中都保留CRLF,無論pull還是push都不變,代碼庫什么樣,本地還是什么樣子
當然在多人跨平臺工作時候,最好還是約定使用LF,還是CRLF,然后不同系統進行對應的設置,這樣是工作規范,也有利于提高工作效率,希望以上可以幫助大家。
作者:sososun
鏈接:https://www.jianshu.com/p/dd7464cf32b5
來源:簡書
簡書著作權歸作者所有,任何形式的轉載都請聯系作者獲得授權并注明出處。
2019年1月17日
#
原文
在此
由于Go沒有為slice提供shuffle函數,所以需要自己想辦法。由于我只需要隨機一次遍歷1 -> N,所以這段code最匹配。
func main() {
vals := []int{10, 12, 14, 16, 18, 20}
r := rand.New(rand.NewSource(time.Now().Unix()))
for _, i := range r.Perm(len(vals)) {
val := vals[i]
fmt.Println(val)
}
}
似乎go不像scala有那種惰性求值的特性,所以這里的r.Perm()還是產生了一個slice,如果N很大可能是個問題。
2018年8月14日
#
測試中想通過命令行傳遞一些參數給test func,網上找了一些資料但過程不是很順利,這里記錄一下。
首先go test有一個-args的參數說可以達到這個目的,但實測下來發現有沒有沒區別。。。
google查到的大部分也是用到了flag類型。
flag.go的注釋寫的比較清楚
/*
Package flag implements command-line flag parsing.
Usage:
Define flags using flag.String(), Bool(), Int(), etc.
This declares an integer flag, -flagname, stored in the pointer ip, with type *int.
import "flag"
var ip = flag.Int("flagname", 1234, "help message for flagname")
If you like, you can bind the flag to a variable using the Var() functions.
var flagvar int
func init() {
flag.IntVar(&flagvar, "flagname", 1234, "help message for flagname")
}
Or you can create custom flags that satisfy the Value interface (with
pointer receivers) and couple them to flag parsing by
flag.Var(&flagVal, "name", "help message for flagname")
For such flags, the default value is just the initial value of the variable.
After all flags are defined, call
flag.Parse()
to parse the command line into the defined flags.

*/
因此需要做的事情就是:
1. 定義flag,這個需要在main()執行之前完成,我這里在test文件里面用全局變量完成,但a可以放在函數里面。
var (
// Define global args flags.
pA = flag.Int("a", 0, "a.")
a = 0
)
2. parse flag,這個要在test func執行之前,所以可以考慮加入一個init()在test文件里。
func init() {
flag.Parse()
a = *pA
}
后面使用這些變量就沒有問題了,比如這樣
func TestInit(t *testing.T) {
flag.Parse()
t.Log("a = ", a)
}
這里用到的主要是flag的功能,測試用發現有沒有-args問題不大,所以這個用法可能不是很符合go test的要求,先用起來再說了。
REF
1. https://www.golangtc.com/t/584cbd16b09ecc2e1800000b
2. https://stackoverflow.com/.../process-command-line-arguments-in-go-test
3. https://hsulei.com/2017/08/23/gotest如何使用自定義參數/
原文在此
學習shell的時候總是被shell里的條件判斷方式搞得頭疼,經常不知道改 用[],[[]],(())還是test,let,而很少有書把它們的關系講解的很清楚(應該是我悟性差或是看書太少),今天總結一下,基礎的東西如它們 的使用方法不再贅述,重點說說它們的區別的使用時應該注意的地方。
先說[]和test,兩者是一樣的,在命令行里test expr和[ expr ]的效果相同。test的三個基本作用是判斷文件、判斷字符串、判斷整數。支持使用與或非將表達式連接起來。要注意的有:
1.test中可用的比較運算符只有==和!=,兩者都是用于字符串比較的,不可用于整數比較,整數比較只能使用-eq, -gt這種形式。無論是字符串比較還是整數比較都千萬不要使用大于號小于號。當然,如果你實在想用也是可以的,對于字符串比較可以使用尖括號的轉義形式, 如果比較"ab"和"bc":[ ab \< bc ],結果為真,也就是返回狀態為0.
然后是[[ ]],這是內置在shell中的一個命令,它就比剛才說的test強大的多了。支持字符串的模式匹配(使用=~操作符時甚至支持shell的正則表達 式)。簡直強大的令人發指!邏輯組合可以不使用test的-a,-o而使用&&,||這樣更親切的形式(針對c、Java程序員)。當 然,也不用想的太復雜,基本只要記住
1.字符串比較時可以把右邊的作為一個模式(這是右邊的字符串不加雙引號的情況下。如果右邊的字符串加了雙引號,則認為是一個文本字符串。),而不僅僅是一個字符串,比如[[ hello == hell? ]],結果為真。
另外要注意的是,使用[]和[[]]的時候不要吝嗇空格,每一項兩邊都要有空格,[[ 1 == 2 ]]的結果為“假”,但[[ 1==2 ]]的結果為“真”!后一種顯然是錯的
3.最后就是let和(()),兩者也是一樣的(或者說基本上是一樣的,雙括號比let稍弱一些)。主要進行算術運算(上面的兩個都不行),也比較適合進 行整數比較,可以直接使用熟悉的<,>等比較運算符。可以直接使用變量名如var而不需要$var這樣的形式。支持分號隔開的多個表達式
2018年8月1日
#
圖片來源:https://blog.slock.it/public-vs-private-chain-7b7ca45044f
2018年7月21日
#
REF: https://dominik.honnef.co/posts/2014/12/an_incomplete_list_of_go_tools/
go get github.com/golang/lint/golint
go get github.com/kisielk/errcheck
go get golang.org/x/tools/cmd/benchcmp
go get github.com/cespare/prettybench
go get github.com/ajstarks/svgo/benchviz
go get golang.org/x/tools/cmd/stringer
go get github.com/josharian/impl
go get golang.org/x/tools/cmd/goimports
go get sourcegraph.com/sqs/goreturns
go get code.google.com/p/rog-go/exp/cmd/godef
go get github.com/nsf/gocode
go get golang.org/x/tools/cmd/oracle
go get golang.org/x/tools/cmd/gorename
go get github.com/kisielk/godepgraph
2018年7月14日
#
Introduction
Solidiay doc about ABI and contract access.
https://solidity.readthedocs.io/en/develop/abi-spec.html
https://solidity.readthedocs.io/en/latest/introduction-to-smart-contracts.html?highlight=selfdestruct
http://www.ethdocs.org/en/latest/contracts-and-transactions/accessing-contracts-and-transactions.html
http://ethdocs.org/en/latest/contracts-and-transactions/contracts.html#testing-contracts-and-transactions
https://solidity.readthedocs.io/en/latest/units-and-global-variables.html?highlight=suicide [global variables like msg.sender]
ABI intro in Ethereum Wiki.
https://github.com/ethereum/wiki/wiki/Ethereum-Contract-ABI#argument-encoding
https://github.com/ethereum/go-ethereum/wiki/Contract-Tutorial
JAON rpc api of Eth.
https://github.com/ethereum/wiki/wiki/JSON-RPC#json-rpc-api
https://github.com/ethereum/wiki/wiki/JavaScript-API#contract-methods
Deploy a contract using RPC.
https://github.com/rsksmart/rskj/wiki/Deploying-contracts-using-RPC-calls
A tool to generate the grpc server code for a contract
https://github.com/getamis/grpc-contract
How to test.
http://ethereum-tests.readthedocs.io/en/latest/test_types/transaction_tests.html
https://github.com/ethereum/cpp-ethereum/blob/develop/doc/generating_tests.rst
go-ethereum里面有一批vm和contract相關的tests,結合ABI和contract的定義,可以很容易的寫一批自己定制的測試,從web3js或者直接在go project里面調用都可以。
2017年6月19日
#
https://stackoverflow.com/questions/13620281/what-is-the-maven-shade-plugin-used-for-and-why-would-you-want-to-relocate-java
Uber JAR, in short, is a JAR containing everything.
Normally in Maven, we rely on dependency management. An artifact contains only the classes/resources of itself. Maven will be responsible to find out all artifacts (JARs etc) that the project depending on when the project is built.
An uber-jar is something that take all dependencies, and extract the content of the dependencies and put them with the classes/resources of the project itself, in one big JAR. By having such uber-jar, it is easy for execution, because you will need only one big JAR instead of tons of small JARs to run your app. It also ease distribution in some case.
Just a side-note. Avoid using uber-jar as Maven dependency, as it is ruining the dependency resolution feature of Maven. Normally we create uber-jar only for the final artifact for actual deployment or for manual distribution, but not for putting to Maven repository.
Update: I have just discovered I haven't answered one part of the question : "What's the point of renaming the packages of the dependencies?". Here is some brief updates and hopefully will help people having similar question.
Creating uber-jar for ease of deployment is one use case of shade plugin. There are also other common use cases which involve package renaming.
For example, I am developing Foo library, which depends on a specific version (e.g. 1.0) of Bar library. Assuming I cannot make use of other version of Bar lib (because API change, or other technical issues, etc). If I simply declare Bar:1.0 as Foo's dependency in Maven, it is possible to fall into a problem: A Qux project is depending on Foo, and also Bar:2.0 (and it cannot use Bar:1.0 because Qux needs to use new feature in Bar:2.0). Here is the dilemma: should Qux use Bar:1.0 (which Qux's code will not work) or Bar:2.0 (which Foo's code will not work)?
In order to solve this problem, developer of Foo can choose to use shade plugin to rename its usage of Bar, so that all classes in Bar:1.0 jar are embedded in Foo jar, and the package of the embedded Bar classes is changed from com.bar to com.foo.bar. By doing so, Qux can safely depends on Bar:2.0 because now Foo is no longer depending on Bar, and it is using is own copy of "altered" Bar located in another package.