上一�ơ打���在Eclipse下进行,不知道哪一个环节出错,没能成功�Q�这�ơ改用NetBeans吧,正好赶上NetBeans新版本发布,来试用一�ơ�?/font>
按照�q�里描述的方法,很快把Eclipse下创建的工程导入��C��NetBeans下,不过遇到了点���问题,一堆的��q��。检查了下发玎ͼ�Eclipse下创建的文�g�~�码为ANSI�Q�在NetBeans下不识别其中的中文注释,把文件改成UTF-8后问题解冻I��可后来我再试囑֜�Eclipse下打开�q�些文�g旉���题又出现了,Eclipse只识别ANSI�~�码的文�Ӟ����g��不大可能吧,不过一时也没找到解��x��法,暂时攑ּ��Q�改用NetBeans吧�?/font>
按照论坛上的�Ҏ��做就行,不过可能因�ؓ版本更新的原因,实际做的时候还是有点差�?/font>
Step 1
Download the Netbeans IDE for java development. (47mb SE version should be fine!)
�q�一步就是这样了
Step 2
Install and open Netbeans. Create a project from existing java source pointing to where your extensions are. Should be placed in src subfolder to be nice.
(I for sure could not make it work if the source was not in a subfolder)
Right click on project and choose properties->libraries. Add all jar files from your smartfox installation lib dir.
在NetBeans下导入原来Eclipse创徏的文�Ӟ��只需要src目录卛_��
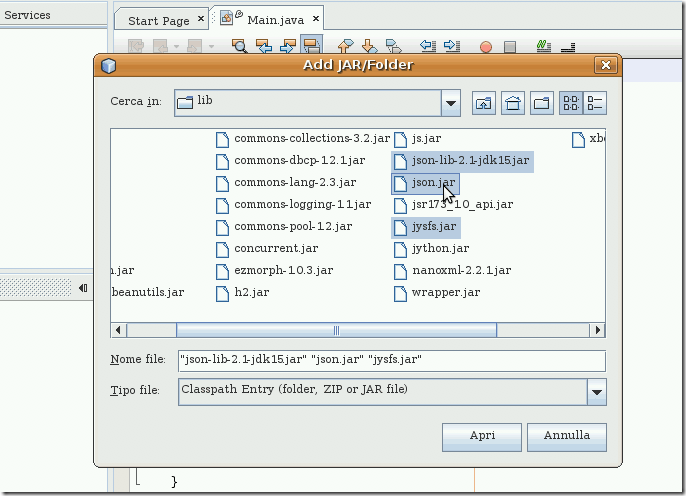
导入libraries时注意,按照�q�里的方法,只需要导�?个jar文�g�Q�就是这�?/font>

Step 3
Goto Files tab. Expand nbbuild.xml. Click on -post-compile target.
Copy and paste the following code: (Note: adjust todir to point to your smartfox program extension directory)
<copy todir="C:\Programmer\SmartFoxServerPRO_1.6.6\Server\javaExtensions">
<fileset dir="${build.dir}/classes/"/>
</copy>
我的NetBeans下没有nbbuild.xml�Q�倒是有一个build.xml�Q�不�q�里面没内容 ![]()
再看了下�Q�原来引用的build-impl.xml�Q�上面有个简单的介绍�Q�在build.xml里添加如下内容即可:
<target name="-post-compile">
<copy todir="D:\SmartFoxServer\Server\javaExtensions">
<fileset dir="${build.dir}/classes/"/>
</copy>
</target>
�Ҏ��你的SmartFoxServer安装目录�q�行修改卛_��
Step 4
Create a new batchfile called SmartFoxDebug?.bat
Copy and paste the following content into it: (Again adjust to your installation directory)
C:\Programmer\SmartFoxServerPRO_1.6.6\Server\wrapper.exe -c "C:\Programmer\SmartFoxServerPRO_1.6.6\Server\conf\wrapper.conf"
�q�一步不需要,在我安装的目录下直接有个smarfoxService.bat批处理文�Ӟ��用它���p���?/font>
Step 5
Add the following lines to your wrapper.conf
Code:
# runtimedebug
wrapper.java.additional.3=-Xdebug
wrapper.java.additional.4=-Xnoagent
wrapper.java.additional.5=-Xrunjdwp:transport=dt_socket,address=8888,server=y,suspend=n
�q�里的意思是要在SmartFoxServer里开戯����E�调试的监听�Q�在我安装的SFS版本里原来比�q�多了一��w���|�,所以最�l�是�q�样的:
# Java Additional Parameters
wrapper.java.additional.1=-server
wrapper.java.additional.2=-Dfile.encoding=UTF-8
wrapper.java.additional.3=-Djava.util.logging.config.file=logging.properties
wrapper.java.additional.4=-Xdebug
wrapper.java.additional.5=-Xnoagent
wrapper.java.additional.6=-Xrunjdwp:transport=dt_socket,address=8787,server=y,suspend=n
Step 6
Choose Run->Build main project (F11) in Netbeans.
If build is ok, click the batch file. Now select debug->attach debugger and choose port 8888. Debugger console should say "User program running".
Now you can place breakpoints and trigger your extensions normally.
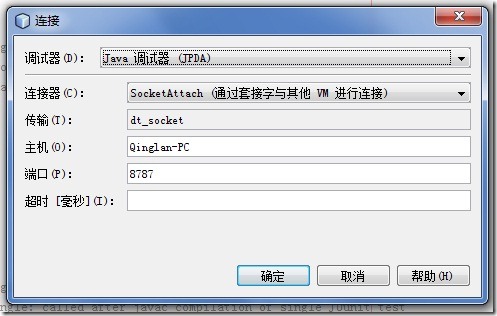
�q�里���是最�l�我们要实现的效果了�Q�挂接SmartFoxServer的远�E�JVM�q�行调试�Q�配�|�项�?调试(D) 下的 �q�接调试�?A) �Q�如果你跟我一样安装的是中文版NetBeans的话 ![]()
贴张图,���是�q�样�Q�注意端口号�Q�是上面配置的那个,不是SFS对客��L���q�接的监听商品号9393�?/font>

好了�Q�先启动SFS�Q�用上面说的那个批处理文�Ӟ��你会看到一行提�C�Z��息,JVM�q�程调试的监听已打开
然后�q�接调试�?/font>
在NetBeans里打个断点看看,O�?/font>
]]>