.torrent: A .torrent fille contains all the info you need to download the file you want. For example, a torrent file has info on the size, the filename, and how to connect to other people (tracker). Another important function of the .torrent file is that it has a “hash” (sort of a digital signature) of each part of the file to make sure you don’t download corrupt of fake data but “the real thing”.
Client: The BitTorrent client is the application you use to “load” the .torrent file so that you can connect to other people. There are a lot of different torrent clients available. The three most popular clients are Bitcomet, Azureus and uTorrent. If you’re new to
BitTorrent I would recommend uTorrent, It’s light and has a great settings wizard to help you on your way.
Indexer: Indexers are websites which list (index) .torrent files (myBitTorrent, Torrentz, Mininova etc.).
Leecher: A leecher is someone who is downloading (and uploading) a file. You are a leecher if you do not have a complete copy of the file you’re trying to get. Note that a leecher normally is someone who’s not uploading, that’s not true in the BitTorrent jargon.
Peer: A peer is the same as a leecher, but without the negative connotation.
Ratio: The data you uploaded divided by the data you downloaded. A ratio higher than 1.00 means that you upload more than you download, which is a good thing. Most private trackers keep track of your ratio and will ban or block you if you have a bad ratio. Try to get at least a 1.00 or higher ratio.
Scrape: Scraping means that your BitTorrent client is requesting info from the “tracker” about other people who are down- or uploading the file. This is important because you need to know who has pieces of the file you still need.
Seeder: A seeder is someone who has a complete version of the file you are downloading. If there are no seeders, you probably wont be able to get the file. So seeders are extremely important, make sure to “seed” the torrent once you finished downloading.
Tracker: The tracker is a server that has all the info about the people that are down- and uploading the file. The tracker itself does not have a copy of the file, it only tracks the up- and dowloaders and makes sure people are able to connect to each other. A tracker is not the same as a website that hosts torrents. Mininova for example is not a tracker, just a “torrent-site”.
Super-Seed: Some clients have the option to “super-seed”. Super seeding is different from seeding because it tries to send out pieces of the file that have not been sent before. So instead of sending the same piece to several peers, it tries to send a unique piece to everyone so that other peers can swap those pieces.
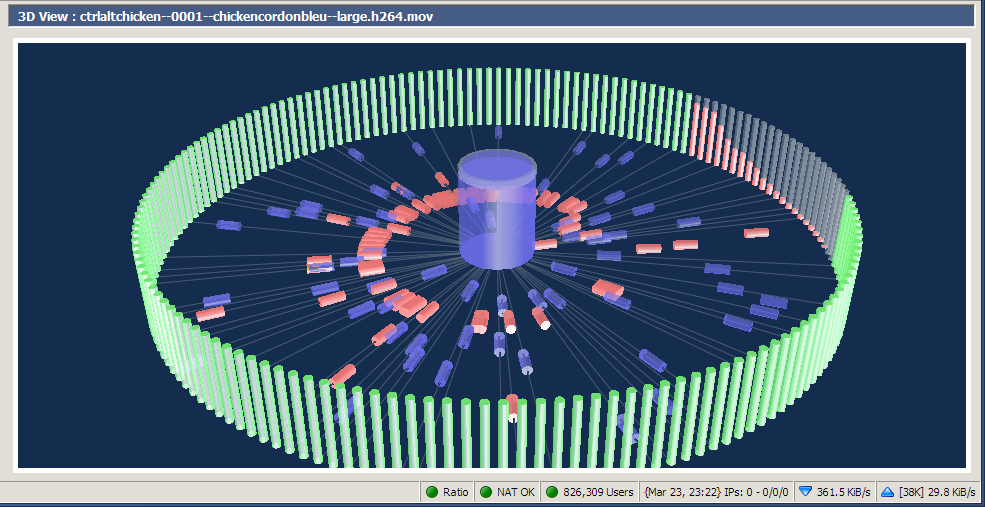
Swarm: The swarm are all seeds and peers that are connected together. So if your client shows 5 seeds and 10 peers then that’s your swarm.
Azureus has a plugin to visualize the swarm
Now let’s see if you learned something. If you can understand the next sentence you probably have.
DHT: DHT stands for “Distributed Hash Table”. DHT layers “decentralize” torrents what make them more stable and less reliant on the web based trackers. If a web based tracker goes down, the torrents stay alive because peers can act as “nodes” keeping the swarm intact.
原文地址:http://torrentfreak.com/bittorrent-jargon/
posted @
2014-02-18 12:31 似水之心 閱讀(573) |
評論 (0) |
編輯 收藏
1,首先通過App Store安裝Xcode;@import url(http://www.shnenglu.com/CuteSoft_Client/CuteEditor/Load.ashx?type=style&file=SyntaxHighlighter.css);@import url(/css/cuteeditor.css);
2,再安裝Xcode command line tools;
3,下載squid源碼,解包;
4,到源碼目錄,mkdir build, cd build;
5,sudo LIBS=-lresolv ../configure --prefix=/usr/squid
6,sudo make
7,sudo make install
安裝完成
posted @
2013-12-20 13:16 似水之心 閱讀(1326) |
評論 (0) |
編輯 收藏
posted @
2013-09-09 08:54 似水之心 閱讀(415) |
評論 (0) |
編輯 收藏 針對現象
1, 運行程序提示“由于應用程序配置不正確,應用程序未能啟動。重新安裝應用程序可能會糾正這個問題”
2, 程序啟動即發生異常,或者沒反應。(具體現象跟系統設置有關)
3, 客戶端發布必須連帶msvcr80.dll,mfc80.dll等dll和manifest文件才能正常運行
問題定位
出現上述現象之后可以確定是缺少程序運行所需的環境,可以通過安裝相應的vcredist_x86.exe來驗證。針對vs版本,分別有
32位的(X86),也有64位的(X64),請注意區別下載。
★Microsoft Visual C++ 2005 Redistributable Package下載地址:
(x86):http://www.microsoft.com/downloads/details.aspx?familyid=32BC1BEE-A3F9-4C13-9C99-220B62A191EE&displaylang=zh-cn
(x64):http://www.microsoft.com/downloads/details.aspx?familyid=90548130-4468-4BBC-9673-D6ACABD5D13B&displaylang=zh-cn
★Microsoft Visual C++ 2008 Redistributable Package的下載地址:
(x86):http://www.microsoft.com/download/en/details.aspx?displaylang=en&id=5582
★Microsoft Visual C++ 2010 Redistributable Package
(x86):http://www.microsoft.com/download/en/details.aspx?id=5555?
(x64):http://www.microsoft.com/download/en/details.aspx?id=14632?
如果安裝完之后可以正常運行程序,可以繼續往下看,如果還不行,請考慮其它原因。
解決辦法
如果可以接受,讓用戶自行下載VC運行庫也是一種辦法。
其次,可以把程序所需的dll一并發布。
如果不想帶很多文件一起發布,可以使用靜態鏈接發布程序。
靜態鏈接MFC和ATL庫的方法是:
Alt+F7打開Project Property,展開:
Configuration Properties
General
Use of MFC
Use of ATL
然后改成Static Library即可.如果已經是“在靜態庫中使用 MFC”了,生成之后在目標機器還是會有現象1的提示,那么很有可能就是沒有靜態鏈接C,C++運行庫,
msvcr是C運行庫,msvcp是C++運行庫。如果你使用了STL之類C++的東西,msvcp就是必須的。修改方法如下:
靜態鏈接MSVCR和MSVCP的辦法是:
Alt+F7打開Project Property,展開:
Configuration Properties
C/C++
Code Generation
Runtime Library
然后將選項由/MD改為 "Multi-threaded (/MT)"
*再如果。。。。。按照上面操作完成之后程序依然有問題,請考慮:程序有沒有靜態連接其它的lib,而這些lib是不是也是同樣靜態連接的C,C++運行庫,如果連接的lib還依賴和其它的lib,那么被依賴的lib是不是同樣靜態鏈接了C,C++運行庫.*
舉例說明
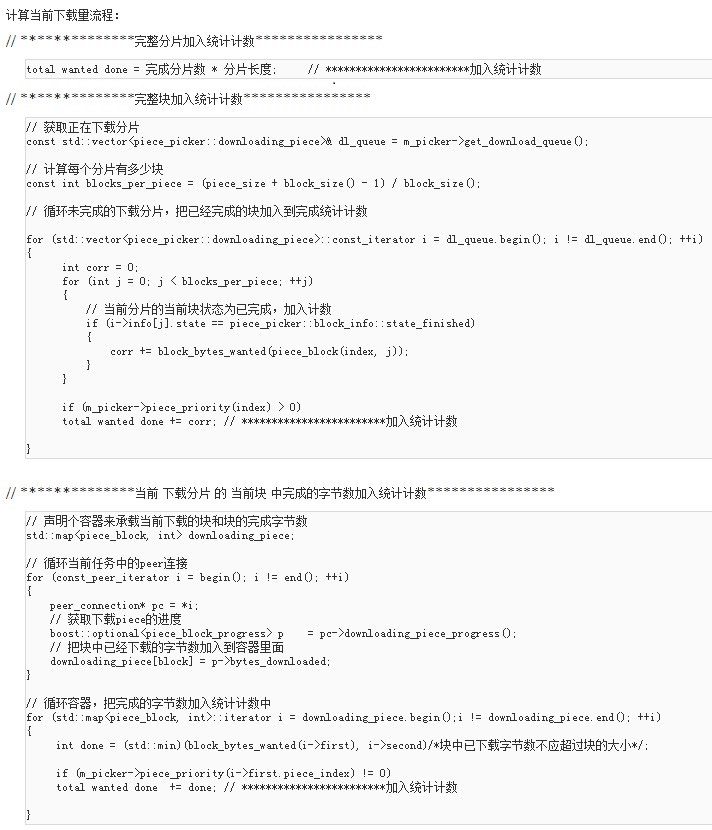
一個利用libtorrent庫開發的下載測試程序(以下簡稱為例子)為win32項目,沒有使用mfc,在純凈版系統上運行需要msvcr和msvcp的支持。例子編譯依賴libtorrent.lib,而libtorrent.lib又深度依賴boost庫,確保例子靜態編譯,不再依賴msvcr和msvcp的支持就必須在編譯libtorrent.lib和boost庫的時候明確靜態鏈接c,c++運行庫。經過實際測試,例子程序已經實現單獨在純凈系統上的運行。
參考資料:
http://wylht.blogspot.com/2012_03_01_archive.html (需fan墻訪問)
http://gamebabyrocksun.blog.163.com/blog/static/57153463201081101856593/
http://www.cnblogs.com/dementia/archive/2009/04/10/1433217.html
posted @
2013-09-09 08:48 似水之心 閱讀(4464) |
評論 (0) |
編輯 收藏
1、安裝手機驅動;
2、設置PC上的調制解調器屬性;
A, 電腦右鍵,管理,設備管理,調制解調器;
B, 設置MODEM屬性,高級-額外設置中,添加如下命令:
cmnet是:AT+CGDCONT=1,"ip","cmnet"
cmwap是:+CGDCONT=,,"cmwap"
3、cmnet撥號號碼是:*99***1#
   cmwap撥號號碼是:*99#
用戶名密碼為空
數據線連接PC之后新建internet連接,按上面信息輸入,撥號,正常的話成功之后就可以用PC打開網頁了
posted @
2013-02-02 11:47 似水之心 閱讀(1064) |
評論 (0) |
編輯 收藏
需要引用頭文件:#include <afxinet.h>
CInternetSession sess ;
DWORD dwFlag = INTERNET_FLAG_TRANSFER_BINARY|INTERNET_FLAG_DONT_CACHE|INTERNET_FLAG_RELOAD ;
CHttpFile *pF = (CHttpFile*)sess.OpenURL("http://www.google.cn/images/na666v_logo7.png",
1, dwFlag);
ASSERT(pF);
if(!pF)//網上有人說判斷HttpFile指針是否為空就可以判斷網絡文件是否存在,經實驗一直不為空,郁悶,是我的機器問題?
{
AfxThrowInternetException(1);
}
CString str;
pF->QueryInfo (HTTP_QUERY_STATUS_CODE, str);//HTTP_QUERY_STATUS_CODE查詢狀態信息,這里可以查詢文件的大小等等,具體的在HTTP_QUERY_STATUS_CODE上右鍵,轉到定義,有很多可選項
int b = _ttoi(str);
if (b==404)
{
AfxMessageBox("文件不存在");
}
else
{
AfxMessageBox("存在");
}
posted @
2009-10-20 16:09 似水之心 閱讀(1556) |
評論 (0) |
編輯 收藏
首先是用ICMP檢查網絡是否連通:
bool Util::CheckInternet()
{
char *SendData = "Data Buffer";
LPVOID ReplyBuffer;
DWORD dwRetVal;
HANDLE hIcmpFile;
bool b=false;
if ((hIcmpFile = IcmpCreateFile()) == INVALID_HANDLE_VALUE)
return false;
ReplyBuffer = (VOID*) malloc(sizeof(ICMP_ECHO_REPLY) + sizeof(SendData));
if ((dwRetVal = IcmpSendEcho(hIcmpFile,
inet_addr("209.131.36.158"), //用的雅虎的一個IP,可能延遲會大一點,用國內的會小一點
SendData, sizeof(SendData),
NULL, ReplyBuffer,
sizeof(ReplyBuffer) + sizeof(ICMP_ECHO_REPLY),
1000)) != 0) {
b=true;
}
free(ReplyBuffer);
return b;
}
很簡單的幾行代碼,沒有注釋;
如果網絡不通的話枚舉撥號連接,進行撥號:
bool RASManager::ConnectNetwork()
{
RASENTRYNAME Entries[15];
DWORD cb,cEntries,dwRet;
Entries[0].dwSize=sizeof(RASENTRYNAME);
cb=sizeof(Entries);
cEntries=0;
dwRet=::RasEnumEntries(NULL, NULL, &Entries[0], &cb, &cEntries);//如果函數成功,則返回0
if(dwRet == 0)
{
CHAR szRasEntryName[RAS_MaxEntryName + 1]={0};
for(UINT i=0;i<cEntries;i++)
strcpy(szRasEntryName,Entries[i].szEntryName);
RASDIALPARAMS rdParams;
DWORD dwRet;
hConn=NULL;
rdParams.dwSize=sizeof(RASDIALPARAMS);
strcpy(rdParams.szEntryName,szRasEntryName);
strcpy(rdParams.szPhoneNumber,"#777");//我用的3G卡,撥#777號碼
strcpy(rdParams.szUserName,"用戶名");
strcpy(rdParams.szPassword,"密碼");
strcpy(rdParams.szDomain,"");//這個也很重要,指定域,如果不指定這個的話下面注釋的兩句一定要加上,下邊兩句的意思是獲取最后一次連接成功時的參數信息,如果用下邊兩句的話連同這行和這行上面的三行都可以省略
// BOOL fPass;
//RasGetEntryDialParams(NULL, &rdParams,&fPass);
dwRet=RasDial(NULL,NULL,&rdParams,0L,NULL,&hConn);
if(dwRet!=0)
{
return false;
}
return true;
}
else
{
return false;
}
}
預先建立撥號連接,以上撥號代碼經過修改已經不需要保存密碼,只建立一個撥號連接即可。
Windows XP or later: Do not use the
RasSetEntryDialParams
function. MSDN上面的說法就是
RasSetEntryDialParams
別在XP之后的系統上使用了。
檢查撥號連接的狀態,如果已經通過撥號連接上了網絡當然不用再進行撥號了,代碼如下:
bool RASManager::RasGetConnectStatus()
{
LPRASCONN lpRasConn = NULL;
DWORD cbBuf = 0;
DWORD cConn = 0;
DWORD dwRet = 0;
HRASCONN hrasconn;
bool bResult=FALSE;
RASCONNSTATUS rasStatus;
UINT ndx;
cbBuf = sizeof(RASCONN);
lpRasConn = (LPRASCONN)malloc((UINT)cbBuf);
if (lpRasConn != NULL)
{
lpRasConn->dwSize = sizeof(RASCONN);
dwRet = RasEnumConnections(lpRasConn,&cbBuf,&cConn);
for(ndx=0;ndx<cConn;ndx++)
{
hrasconn = lpRasConn[ndx].hrasconn;
rasStatus.dwSize = sizeof(RASCONNSTATUS);
dwRet = ::RasGetConnectStatus(hrasconn,&rasStatus);
if(dwRet)
bResult=FALSE;
else
{
if(rasStatus.rasconnstate == RASCS_Connected)
bResult=TRUE;
else
bResult=FALSE;
}
}
}
else
bResult=FALSE;
free(lpRasConn);
return bResult;
}
以上判斷是如果檢查到有一個已經連接的撥號連接就返回了,應該不會有兩個或者以上的撥號連接同時連接,打開端口會失敗的。
還有一個是斷線:
void RASManager::HungUP()
{
LPRASCONN lpRasConn=NULL;
DWORD cbBuf = 0;
DWORD cConn = 0;
DWORD dwRet = 0;
HRASCONN hrasconn;
RASCONNSTATUS rasStatus;
UINT ndx;
cbBuf = sizeof(RASCONN);
lpRasConn = (LPRASCONN)malloc((UINT)cbBuf);
if(lpRasConn != NULL)
{
lpRasConn->dwSize = sizeof(RASCONN);
dwRet = RasEnumConnections(lpRasConn,&cbBuf,&cConn);
for(ndx=0;ndx<cConn;ndx++)
{
hrasconn = lpRasConn[ndx].hrasconn;
rasStatus.dwSize = sizeof(RASCONNSTATUS);
dwRet = ::RasGetConnectStatus(hrasconn,&rasStatus);
if(!dwRet)
{
if(rasStatus.rasconnstate == RASCS_Connected)
RasHangUp(hrasconn);
}
}
free(lpRasConn);
}
}
這個沒什么好說的,執行關閉撥號連接的操作。
用程序創建連接,經過修改,已經可以正常創建連接,代碼如下:
bool RASManager::CreateRASLink()
{
LPRASENTRY lpRasEntry = NULL;
DWORD cb = sizeof(RASENTRY);
DWORD dwBufferSize = 0;
DWORD dwRet = 0;
// 取得entry的大小,這句也不知道是不是必須的,因為sizeof(RASENTRY)和這里取到的dwBufferSize是一樣的,不過還是Get一下安全點
RasGetEntryProperties(NULL,"", NULL, &dwBufferSize, NULL, NULL);
if (dwBufferSize == 0)
return false;
lpRasEntry = (LPRASENTRY)HeapAlloc(GetProcessHeap(), HEAP_ZERO_MEMORY, dwBufferSize);
if (lpRasEntry == NULL)
return false;
ZeroMemory(lpRasEntry, sizeof(RASENTRY));
lpRasEntry->dwSize = dwBufferSize;
lpRasEntry->dwfOptions = RASEO_RemoteDefaultGateway|RASEO_PreviewPhoneNumber|RASEO_PreviewUserPw; // 這里的幾個選項挺重要的,RASEO_RemoteDefaultGateway這個選項把創建的連接設置為默認連接,RASEO_PreviewPhoneNumber對應選項中的提示輸入電話號碼,RASEO_PreviewUserPw對應選項中的提示用戶名和密碼
lpRasEntry->dwType = RASET_Phone;
lstrcpy(lpRasEntry->szDeviceType, RASDT_Modem);
lstrcpy(lpRasEntry->szDeviceName,"www");
lpRasEntry->dwfNetProtocols = RASNP_Ip;
lpRasEntry->dwFramingProtocol = RASFP_Ppp;
dwRet = RasSetEntryProperties(NULL, "www", lpRasEntry, dwBufferSize, NULL, 0); // 創建連接
//The RasSetEntryProperties function changes the connection information for
an entry in the phone book or creates a new phone-book entry.(reference MSDN)
HeapFree(GetProcessHeap(), 0, (LPVOID)lpRasEntry);
if (dwRet != 0)
return false;
return true;
}
上面的代碼到是可以創建一個撥號連接,不過是個空的,里面沒用用戶名和密碼等信息,需要用上面的撥號代碼來指定撥號參數,不能使用
RasGetEntryDialParams來獲取了。上面的代碼基本上是在網絡上搜索所得,稍加修改,在這里整理一下。
再補充一下刪除連接的操作,代碼如下:
void RASManager::DeletePhoneBookEntry()
{
RASENTRYNAME Entries[15];
DWORD cb,cEntries,dwRet;
Entries[0].dwSize=sizeof(RASENTRYNAME);
cb=sizeof(Entries);
cEntries=0;
dwRet=::RasEnumEntries(NULL, NULL, &Entries[0], &cb, &cEntries);//如果函數成功,則返回0
if(dwRet == 0)
{
CHAR szRasEntryName[RAS_MaxEntryName + 1]={0};
for(UINT i=0;i<cEntries;i++)
{
strcpy(szRasEntryName,Entries[i].szEntryName);
RasDeleteEntry(NULL,szRasEntryName);
}
}
}
要想實現自動啟動撥號網絡,就要使用Remote Access Service (RAS) API,這個API最早是在Windows for Workgroup 3.11中出現的,現在它已經成為Win32 API的一個組成部分。該API將整個撥號網絡稱為Phonebook,而每一個連接稱為PhonebookEntry。你可以使用RasCreatePhonebookEntry來創建新的連接,用RasDial來撥號,而RasEnumEntries可以獲得當前系統已有的所有連接,使用其它的RAS函數還可以獲取或設置連接的參數。 RasEditPhonebookEntry函數將激活標準的Windows 95/NT屬性對話框來修改連接的屬性。你可以從Win32 API的手冊找到所有相關函數的詳細介紹。
補充:在windows中一個撥號連接即為一個PhonrbookEntry以下稱為電話薄記錄或是連接。總的這些稱為Phonebook。
posted @
2009-10-10 17:27 似水之心 閱讀(1616) |
評論 (0) |
編輯 收藏
int main()
{
int a[5]={1,2,3,4,5};
int *ptr1=(int *)(&a+1);
// a本身就為一個數組的地址,其值=&a[0],即數組第一個元素的地址,對a再取址
// &a = a,似乎沒什么不同,其實這里發生了對齊變更,a+1的對齊是以int為界的
// 而&a+1是以整個數組為單位的,即5個int=20字節,這是關鍵!!!
// 那么&a+1實際是跨越了整個數組,可得ptr1存儲了數組a最后一個元素5緊跟著的一個int的地址
int *ptr2=(int *)((int )a+1);
// 同理,(int)a先將其值(地址)轉為整型值,再加一成為一個新的整數
// (int *)將這個值轉換為一個指向int型變量的指針(地址)
// ptr2即存儲了這個地址和指向的變量的類型
printf("%x,%x",ptr1[-1],*ptr2);
// 先解釋一下a[-1],即將數組向前偏差一個類型大小的距離
// 數組a的內存布局(16進制):01000000 02000000 03000000 04000000 05000000
// ptr1[-1]
// 你說這里等于什么呢?數組a最后一個元素(5)緊跟著一個int的前面一個元素當然就是5了。
// *ptr2
// ptr2的值為a保存的地址值的絕對值+1,假設a=1000,那么(int)a+1=1001。
// 而后將其再轉為(int *)指針,那么指針指向的內存布局為000000 02,即向后移了一個字節
// 那么在little-enddian架構下顯示出來為02000000,低位在高地址。
return 0;
}
posted @
2009-09-24 11:14 似水之心 閱讀(431) |
評論 (0) |
編輯 收藏
HANDLE PrnHandle;
if (OpenPrinter("EPSON Stylus Photo R270 Series",&PrnHandle,NULL))
{
unsigned char buf[8192];
DWORD dwSize;
if (GetPrinter(PrnHandle,2,buf,sizeof(buf),
&dwSize)) {
PRINTER_INFO_2* pInfo;
pInfo = (PRINTER_INFO_2*)buf;
//pInfo->Status 就是打印機的狀態,詳細的代碼可以
//參見winspool.h中以PRINTER_STATUS開頭的宏定義
if(pInfo->Status==PRINTER_STATUS_PAUSED)
AfxMessageBox("a");
else if(pInfo->Status==PRINTER_STATUS_PENDING_DELETION)
AfxMessageBox("b");
///////////以上pInfo->Status代碼試驗不成功,哪位知道原因請告知,謝謝
if (pInfo->Attributes&PRINTER_ATTRIBUTE_WORK_OFFLINE)//測試成功
{
AfxMessageBox("offline");
}
else
{
AfxMessageBox("online");
}
}
ClosePrinter(PrnHandle);
}
上面是判斷打印機是否連機的。
下面是判斷打印任務是否正常完成的:
SetTimer(1,500,NULL);//用定時器來完成
響應函數:
switch(nIDEvent)
{
case 1:
{
JOB_INFO_2 *pJobs;
int cJobs,
i;
DWORD dwPrinterStatus;
if (!GetJobs(hPrinter, &pJobs, &cJobs, &dwPrinterStatus))
return ;
for (i=0; i < cJobs; i++)
{
if (pJobs[i].Status &
(JOB_STATUS_ERROR |
JOB_STATUS_OFFLINE |
JOB_STATUS_PAPEROUT |
JOB_STATUS_BLOCKED_DEVQ))
{
KillTimer(1);
AfxMessageBox(pJobs[i].pDocument);
free( pJobs );
return ;
}
}
free( pJobs );
}
break;
default:
break;
}
用到的方法:
BOOL GetJobs(HANDLE hPrinter, /* Handle to the printer. */
JOB_INFO_2 **ppJobInfo, /* Pointer to be filled. */
int *pcJobs, /* Count of jobs filled. */
DWORD *pStatus) /* Print Queue status. */
{
DWORD cByteNeeded,
nReturned,
cByteUsed;
JOB_INFO_2 *pJobStorage = NULL;
PRINTER_INFO_2 *pPrinterInfo = NULL;
/* Get the buffer size needed. */
if (!GetPrinter(hPrinter, 2, NULL, 0, &cByteNeeded))
{
if (GetLastError() != ERROR_INSUFFICIENT_BUFFER)
return FALSE;
}
pPrinterInfo = (PRINTER_INFO_2 *)malloc(cByteNeeded);
if (!(pPrinterInfo))
/* Failure to allocate memory. */
return FALSE;
LPCSTR str="sssssssssss";
/* Get the printer information. */
if (!GetPrinter(hPrinter,2,(unsigned char *)(LPSTR)pPrinterInfo,cByteNeeded,&cByteUsed))
{
/* Failure to access the printer. */
free(pPrinterInfo);
pPrinterInfo = NULL;
return FALSE;
}
/* Get job storage space. */
if (!EnumJobs(hPrinter,
0,
pPrinterInfo->cJobs,
2,
NULL,
0,
(LPDWORD)&cByteNeeded,
(LPDWORD)&nReturned))
{
if (GetLastError() != ERROR_INSUFFICIENT_BUFFER)
{
free(pPrinterInfo);
pPrinterInfo = NULL;
return FALSE;
}
}
pJobStorage = (JOB_INFO_2 *)malloc(cByteNeeded);
if (!pJobStorage)
{
/* Failure to allocate Job storage space. */
free(pPrinterInfo);
pPrinterInfo = NULL;
return FALSE;
}
ZeroMemory(pJobStorage, cByteNeeded);
/* Get the list of jobs. */
if (!EnumJobs(hPrinter,
0,
pPrinterInfo->cJobs,
2,
(LPBYTE)pJobStorage,
cByteNeeded,
(LPDWORD)&cByteUsed,
(LPDWORD)&nReturned))
{
free(pPrinterInfo);
free(pJobStorage);
pJobStorage = NULL;
pPrinterInfo = NULL;
return FALSE;
}
/*
* Return the information.
*/
*pcJobs = nReturned;
*pStatus = pPrinterInfo->Status;
*ppJobInfo = pJobStorage;
free(pPrinterInfo);
return TRUE;
}
需要插入頭文件#include <winspool.h>
posted @
2009-07-15 17:49 似水之心 閱讀(5955) |
評論 (3) |
編輯 收藏